2017 Laramie Crew Cab

Disclaimer: Links on this page pointing to Amazon, eBay and other sites may include affiliate code. If you click them and make a purchase, we may earn a small commission.

OP
OP
mdifilippo

mdifilippo

Senior Member
Joined
Mar 12, 2017
Posts
571
Reaction score
348
Location
NJ
Ram Year
2017
Engine
5.7 hemi
Awesome, thanks for the info! My line-x goes down where the bar will apply, and they bedlined over the ring, so I doubt I could get it off if I wanted to. I'm also thinking I might want to add additional adhesive being that I'm applying the light to a rougher surface.

Doh! Sorry, totally forgot to get a picture and its a bit too dark now. I would definitely suggest some additional adhesive if bedliner has been sprayed there. I'd suggest something like 3M 03614 which I think is what is already on the back of the LED strip, having two layers of it could help make up for the roughness of the line-x. I did run a bead of RTV silicone along the top and bottom edge as well just as a some added adhesive.
 
OP
OP
mdifilippo

mdifilippo

Senior Member
Joined
Mar 12, 2017
Posts
571
Reaction score
348
Location
NJ
Ram Year
2017
Engine
5.7 hemi
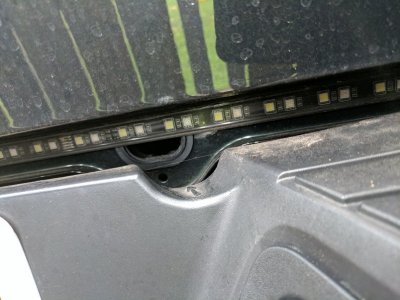
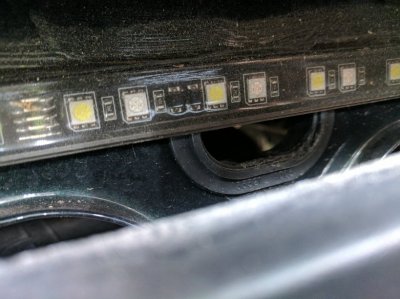
Hey Zflat here are a couple photos for you. My suggestion would be just pull out the drop bar and stick it in, then see where the bar will mount.


IMG_20170711_092149.jpg

IMG_20170711_092205.jpg

Truck update: I've ran about 1,000 miles on premium gas so far and the truck seems to run a bit smoother on it versus regular. Just ticked over 2500 miles total on the truck yesterday.

A few days ago I rubbed the front bumper on some bags of sand and rubbed off some of the plastidip - which I have to say is a way better result than scratching up the chrome bumper - so today I already peeled the bumper and began to apply new dip. I like that the plastidip adds a layer of cheap protection.
 

zflat

Member
Joined
Sep 3, 2015
Posts
94
Reaction score
22
Ram Year
2016
Engine
6.4 Hemi
Perfect, thanks! Definitely going to be ordering one in the next few weeks. Was hoping Amazon Prime day would have them on sale, but alas they did not. Definitely going to go with the Curt adapter, as my wiring/ electrical skills are minimal at best. Just gotta give Curt a call and make sure I get the right one.
 

Litew8

Senior Member
Joined
Feb 21, 2014
Posts
279
Reaction score
67
Location
Near Youngstown Ohio
Ram Year
2009
Engine
4.7l
I'll get some additional pictures soon but got all the lights ran and wired! I created a harness that runs under the driver side of the vehicle from the engine compartment all the way to the end of the bed, providing white LED light for "oem" style operation of bed lights and step lights AS WELL as full RGB control of bed lights and step lights when the car is running (acc/ignition tap). The results are exactly what I wanted.
Foot steps lit up
View attachment 86436
Bed lit up
View attachment 86437

And videos;
White LED operating
https://youtu.be/Z4sC-yO4cmY
RGB Control (in this video they are just color fading but full control via iphone)
https://youtu.be/6a2__kgVoIo
Wish I could do the running board lights but they won't last in ohio. Too much salt here. They just need to make the roads out of salt.

Sent from my LGLS775 using Tapatalk
 

Litew8

Senior Member
Joined
Feb 21, 2014
Posts
279
Reaction score
67
Location
Near Youngstown Ohio
Ram Year
2009
Engine
4.7l
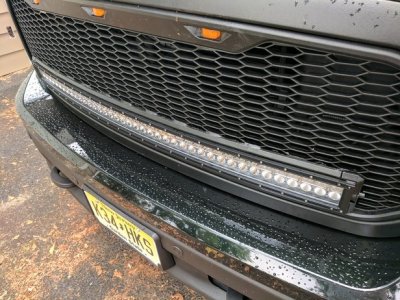
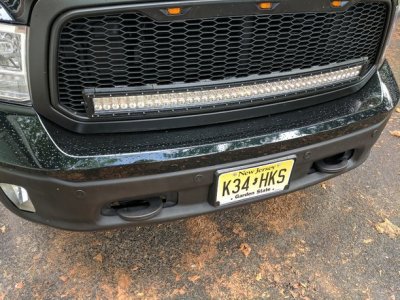
Been a while since I updated and just wrapped up the grill install today. So started out with an EAG Raptor Grill and a 42 inch light bar, cut it up, fabricated mounts, 3D designed and printed trim fillers to blend the bar back into the grill and finished it all off with plasti-dip. I plan to black out the rest of the chrome by the end of the summer at the latest.

The grill's amber markers I wired up to be on when the ignition is on. The LED bar is wired up utilizing a wireless transmitter so I can use the Homelink button to trigger it on and off (didn't want to add any switches in the cab). There are also RGBW LED lights behind the grill to match the courtesy and RGB control the rest of the truck has.

View attachment 88421 mockup of new grill stock before cutting into it to test fitment and look

View attachment 88422 outer bezel and light bar mocked up, a tight fit between the light bar and the cross beam but it fit!

View attachment 88423 Grill cut for light bar to fit


View attachment 88425 Here you can see the trim pieces to blend back in the light bar, about 5 coats of plasti dip in total

View attachment 88424 All attached and ready to go!


Next up; I have 8 cans of plasti-dip waiting for good weather and time. I plan to black out the bumper, mirror caps, wheels, rear bumper, running boards, and possibly the door handles. I'm iffy about how the plasti-dip will last on the running boards and door handles but worth a shot.
Good job on the grill

Sent from my LGLS775 using Tapatalk
 

Litew8

Senior Member
Joined
Feb 21, 2014
Posts
279
Reaction score
67
Location
Near Youngstown Ohio
Ram Year
2009
Engine
4.7l
the blackout work continues... Did both bumpers this morning. I decided to pull the rear one off the truck and then popped off the black plastic so I could spray it best. Was actually really easy to do, hardest part was figuring out how to remove the license plate light housings. There is a metal "key" they use to lock them in place, simply pull it out and out comes the housings.

I took more care in protecting the truck from over spray this time although I think when I touch up in th future I won't need to protect very much. I cut some card stock and used it to protect the fog lights, and used a plastic tarp to protect the painted bumper skin and the hood.

I was thinking of pulling the front bumper off as well BUT looking around online it looks like that is a big ordeal involving having to remove the headlights and so forth.

In total did about 6 coats, and used up about 3 1/2 cans of dip. Next up are wheels and side steps. I MAY leave the exhaust tips or pick up some high heat black once they bother me enough.View attachment 88811

View attachment 88812

View attachment 88813

View attachment 88814

View attachment 88815
That looks so much better.

Sent from my LGLS775 using Tapatalk
 
OP
OP
mdifilippo

mdifilippo

Senior Member
Joined
Mar 12, 2017
Posts
571
Reaction score
348
Location
NJ
Ram Year
2017
Engine
5.7 hemi
Thanks LiteW8
As far as the lights under the running boards. My first attempt of them failed after a month or so. I had attached them on the body of the truck on the fold under the door panels by where the running board brackets were and the water just destroyed them. I ended up mounting them in the aluminum channel and mounted that under the body of the truck. So they are totally protected from the elements. I'll crawl under and snap a few pictures on Friday for you.
 

Litew8

Senior Member
Joined
Feb 21, 2014
Posts
279
Reaction score
67
Location
Near Youngstown Ohio
Ram Year
2009
Engine
4.7l
Thanks LiteW8
As far as the lights under the running boards. My first attempt of them failed after a month or so. I had attached them on the body of the truck on the fold under the door panels by where the running board brackets were and the water just destroyed them. I ended up mounting them in the aluminum channel and mounted that under the body of the truck. So they are totally protected from the elements. I'll crawl under and snap a few pictures on Friday for you.
There u go. That will prolong the life. Thanks

Sent from my LGLS775 using Tapatalk
 

Bdersch

Senior Member
Joined
Nov 1, 2016
Posts
356
Reaction score
125
Ram Year
2016
Engine
3.6
Had some questions on the grill so I wanted to post more detailed photos of what I did to mount the light bar. I used some aluminum flat bar and bent one piece into a simple 90 degree angle bracket which I then riveted directly to the grill surround. I then used a short straight bar to attach to the new made bracket and the lightbar. This too got riveted. This allows me to slightly adjust the light bar angle but the trim really helps hold it in place (as far as the angle).

View attachment 88643
View attachment 88644
View attachment 88645 (ignore how crappy the paint looks, it's just the light)

First off absolutely wonderful build youve got going here! I have a black truck ( i know yours is forest green) but i went the blackout look too and have never regretted it! SO onto my question. I see the way you have this lightbar mounted now and i see that how its attached with the angle iron/ flat iron. I think that looks super clean and im really impressed with it! my only question is what exactly is the trim piece that goes around the lightbar? in my opinion thats the money maker that brings the grille/ lightbar together to make it look "factory" I think if it was just cut and the lightbar was just sitting there that it may look like a hack job... so where did you get the trim piece? What is the trim piece? and can you shoot a few more close up picks of the trim and the mounting? I plan to do this in my future but i think i might go 32" curved with pod lights on the outside of it. But it depends what i decide to do with my bumper situation.
 
OP
OP
mdifilippo

mdifilippo

Senior Member
Joined
Mar 12, 2017
Posts
571
Reaction score
348
Location
NJ
Ram Year
2017
Engine
5.7 hemi
Hey man thanks for the kind words! Agreed, the trim around the lightbar is what makes the entire grill work. I actually own a 3D printer and designed and printed the trim my self. That is why it works (as well as I think it does) because I created a profile that somewhat fit the look of the original grill. A few people have reached out to me saying they were just going to cut up the grill and slap on the bar, if you cut carefully enough it will probably work "good enough" but the reason I get the compliments I do on it is 100% because of the detail of the trim.

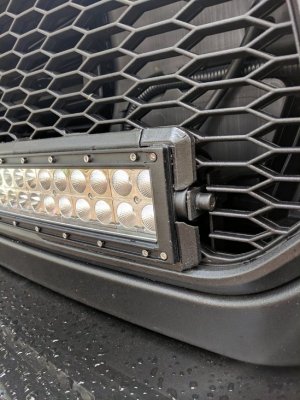
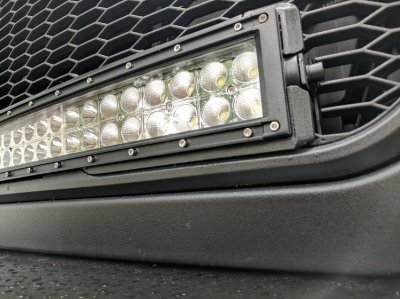
In total it is - I believe - 6 pieces that are actually attached to the top part of the grill, 2 pieces that fill in the bottom section and then the corners are attached to the lightbar, this is important as otherwise you would not be able to remove the lightbar with out breaking off the trim. I had to 3D print individual pieces because of the size, I simply glued, sanded, and painted them. I've thought of redoing it because there are a few imperfections but at the same time it is totally holding up.

a 32" with pod lights would look cool too, honestly if you could get the light bars and pods with the RGB halos in them it could be a super unique look. One thought for those with no access to a 3D printer, you could pick up some strips of ABS plastic stock, maybe like a few thicknesses of flatbar and play with them to create the trim.

I'll get some more up close photos for you tomorrow as long as I remember. Thanks again and feel free to ask any questions!

Also side note! If you guys are on instagram give me a follow - mikediflip I post plenty of pictures of my truck
 
OP
OP
mdifilippo

mdifilippo

Senior Member
Joined
Mar 12, 2017
Posts
571
Reaction score
348
Location
NJ
Ram Year
2017
Engine
5.7 hemi
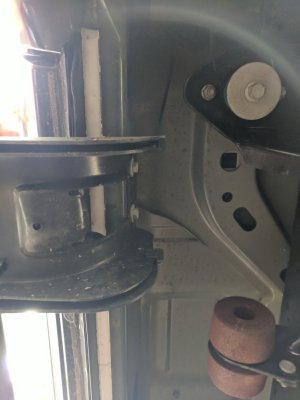
Here are a few more detailed photos, first one is showing how the LED lights are mounted under the truck, the aluminum channel is attached using the industrial double sideded 3M foam tape, the white diffusion really helps to protect the lights and with how tucked up they are it would take some rough off roading most likely to throw some debris up to break the diffusors.
IMG_20170818_110703.jpg


I've had a lot of questions about the trim around the lightbar, as I've stated it was designed and 3D printed. I am throwing around the idea of doing it again as I'm noticing a little bit of separation between some of the pieces, most likely this is just from exposure to the elements (the material is shrinking and expanding plus the heat of the sun). Here are some more detailed photos of it all for you guys.

IMG_20170818_110621.jpg
IMG_20170818_110626.jpg
IMG_20170818_110632.jpg
IMG_20170818_110725.jpg
 
OP
OP
mdifilippo

mdifilippo

Senior Member
Joined
Mar 12, 2017
Posts
571
Reaction score
348
Location
NJ
Ram Year
2017
Engine
5.7 hemi
Just got back from my first road trip with the truck. In total about 1500 miles. She did great! Drove like a dream, no issues with the grill/lightbar, got some compliments on the look of the truck as well which is always nice.

I noticed with the Hemi, gas mileage is great right around the 65-75mph zone. I could average just under 22 MPG but once I could really let her loose at higher speeds I couldn't get higher than about 18MPG. No complaints though super comfortable ride (from NJ to Myrtle Beach SC straight through, only stopping for gas and a few stretch / bathroom breaks). Also had the bed loaded up with some furniture and other odds and ends.

Got home and immediately had to clean the windshield though, damn thats a lot of bug guys.
 
OP
OP
mdifilippo

mdifilippo

Senior Member
Joined
Mar 12, 2017
Posts
571
Reaction score
348
Location
NJ
Ram Year
2017
Engine
5.7 hemi
Jersey tolls, Delaware Bridge toll, Baltimore Tunnel toll.. yeah EZPass bill will suck.
 

AFMoulton

Senior Member
Military
Joined
Apr 1, 2016
Posts
3,178
Reaction score
5,194
Location
Nuevo Mexico
Ram Year
2018
Engine
6.4 Hemi
I paid $10 to cross a bridge in Jersey once, never again will I visit that place! Your truck is awesome looking though, I love what you have done with it


Sent from my iPhone using Tapatalk
 

DRkNESS

Senior Member
Joined
Apr 24, 2012
Posts
5,808
Reaction score
3,393
Location
South Jersey
Ram Year
2019
Engine
5.7 HEMI
Lol we specialize in making good people never and I do mean NEVER want to visit again. :)
 
OP
OP
mdifilippo

mdifilippo

Senior Member
Joined
Mar 12, 2017
Posts
571
Reaction score
348
Location
NJ
Ram Year
2017
Engine
5.7 hemi
If only we could run out some of the New Yorkers... (for reference, I live on the coast, from May until September all the @sshole New Yorkers come and ruin the beach and the roads). I do enjoy flashing them with my lightbar at night though when they want to do 20MPH on a 40MPH road.
 
Top