You are using an out of date browser. It may not display this or other websites correctly.
You should upgrade or use an alternative browser.
You should upgrade or use an alternative browser.
Gofishn 2014 Ram 1500 Express Crew Cab 4x4 Cherry Red Build Thread
- Thread starter gofishn
- Start date
Disclaimer: Links on this page pointing to Amazon, eBay and other sites may include affiliate code. If you click them and make a purchase, we may earn a small commission.
gofishn
Senior Member
- Joined
- Sep 12, 2014
- Posts
- 5,082
- Reaction score
- 10,142
- Location
- Iowa
- Ram Year
- 2022 Ram 1500 5th Gen, Big Horn, 4X4, Crew Cab, 6'4" Box
- Engine
- hemi 5.7L, 345 cu in
Line-X Spray in Bed Liner - Dee Zee Bed Mat - Dee Zee Tailgate Assist
Well, the dealers F&I guy goofed up. Called to correct it. He blew me off, so to did the Office Manager. Called my buddy , who actually runs the place. Told him about the F&I guys $2000+ mistake, in my favor. He laughed, fixed it & gave me Line-X for being a Dummy.
We've known each other for over 20 yrs & Fair is Fair.
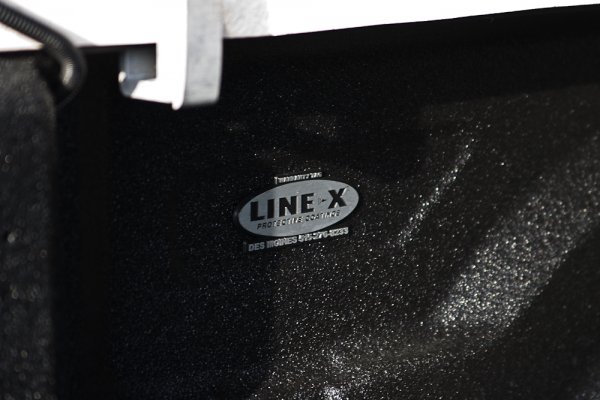
Got the truck home, after getting it Line-X'ed.
Really liked it too. Right up to the moment when I tried to crawl around on it.
Rut Roh!!
Time to head over to DZ Outlet Store and get myself a Bed Mat !
While I was there, thought to myself, everyone loves those Tailgate Assists so much, I should get one. Since I'm here.
I really think these are two of my Favorite mods, to date.
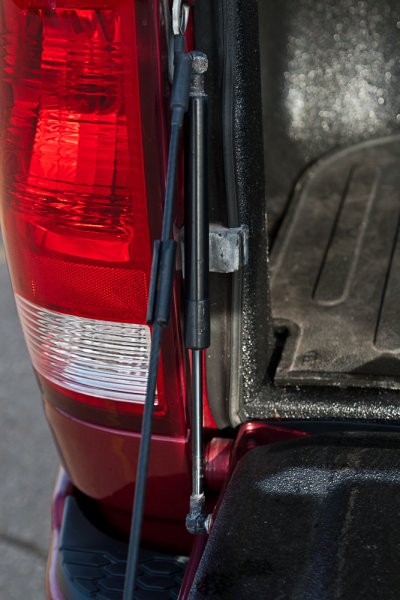
LIne-X, Dee Zee Bed Mat and Dee Zee Tailgate Assist.
This truck bed is Done!
Well, the dealers F&I guy goofed up. Called to correct it. He blew me off, so to did the Office Manager. Called my buddy , who actually runs the place. Told him about the F&I guys $2000+ mistake, in my favor. He laughed, fixed it & gave me Line-X for being a Dummy.
We've known each other for over 20 yrs & Fair is Fair.

Got the truck home, after getting it Line-X'ed.
Really liked it too. Right up to the moment when I tried to crawl around on it.
Rut Roh!!
Time to head over to DZ Outlet Store and get myself a Bed Mat !
While I was there, thought to myself, everyone loves those Tailgate Assists so much, I should get one. Since I'm here.
I really think these are two of my Favorite mods, to date.

LIne-X, Dee Zee Bed Mat and Dee Zee Tailgate Assist.
This truck bed is Done!
Last edited:
gofishn
Senior Member
- Joined
- Sep 12, 2014
- Posts
- 5,082
- Reaction score
- 10,142
- Location
- Iowa
- Ram Year
- 2022 Ram 1500 5th Gen, Big Horn, 4X4, Crew Cab, 6'4" Box
- Engine
- hemi 5.7L, 345 cu in
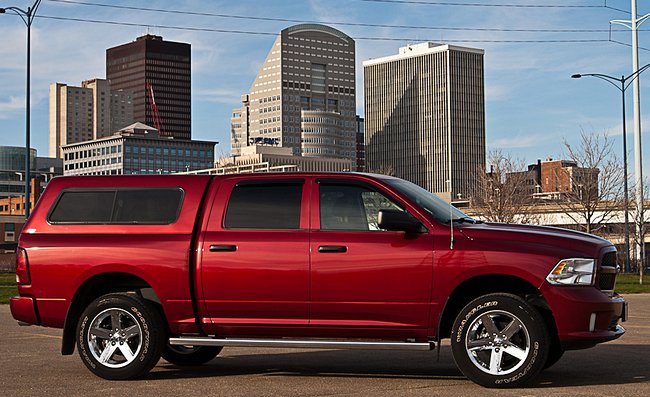
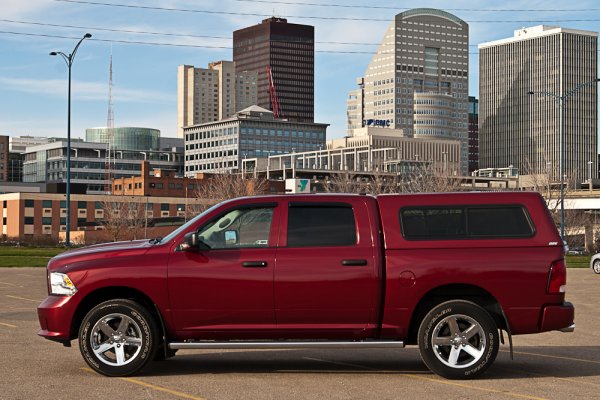
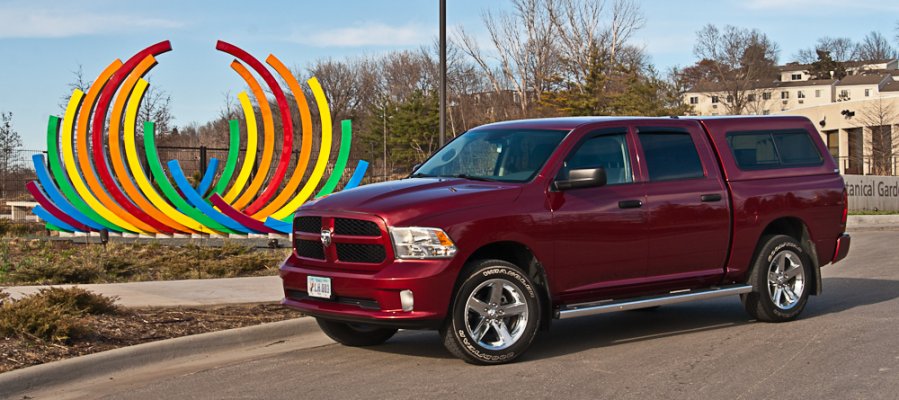
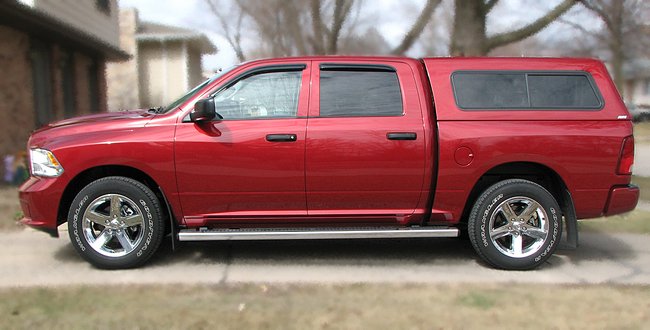
A.R.E. V-Series topper. 5'7" Deep Cherry Red
Remember I said this truck bed was done?
Well, not so much.
Problem with this forum, gives me ideas.
So, off to the truck after-market store I go.
Trying to decide between Tonneau Cover, Lid or Topper.
Come back home and read some more, on this forum.
What's this? Everyone is talking about Craigslist Finds.
Well, I got to take look-see at Craigslist too.
NO! That can't be.
Same color and 5'7" too?
$450?
Only an hour away?
Honey, Grab the kids, let's GO!
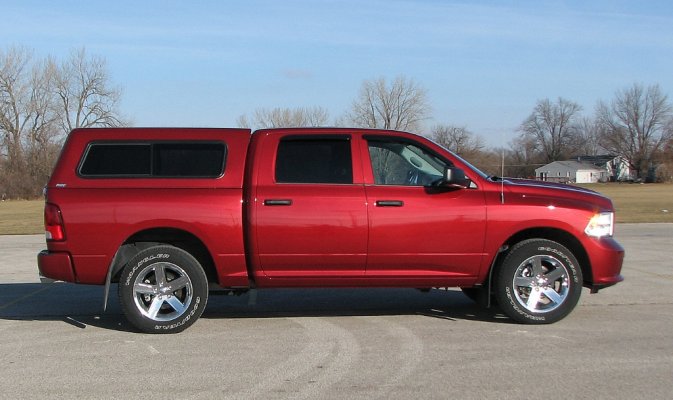
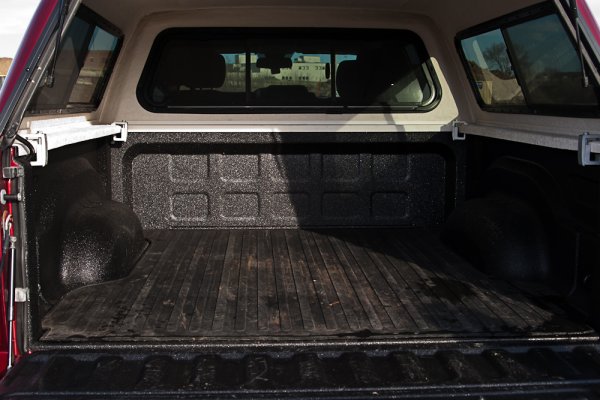
Took the topper to the after-market store.
Had them wire it up and slap on some tailgate sealer, while they had it.
Picked up a pair of AVS Vent Shades too.
Not the "inside the window channel" kind.
Just regular old "Tape on the outside" kind.
Remember I said this truck bed was done?
Well, not so much.
Problem with this forum, gives me ideas.
So, off to the truck after-market store I go.
Trying to decide between Tonneau Cover, Lid or Topper.
Come back home and read some more, on this forum.
What's this? Everyone is talking about Craigslist Finds.
Well, I got to take look-see at Craigslist too.
NO! That can't be.
Same color and 5'7" too?
$450?
Only an hour away?
Honey, Grab the kids, let's GO!


Took the topper to the after-market store.
Had them wire it up and slap on some tailgate sealer, while they had it.
Picked up a pair of AVS Vent Shades too.
Not the "inside the window channel" kind.
Just regular old "Tape on the outside" kind.
Last edited:
gofishn
Senior Member
- Joined
- Sep 12, 2014
- Posts
- 5,082
- Reaction score
- 10,142
- Location
- Iowa
- Ram Year
- 2022 Ram 1500 5th Gen, Big Horn, 4X4, Crew Cab, 6'4" Box
- Engine
- hemi 5.7L, 345 cu in
OEM MUD FLAPS MOD
Now, should mention, somewhere in all this, I had bought a pair of OEM molded mud flaps.
Then read about the rubbing issues and got rid of them.
Bought a pair of OEM Heavy Duty Rubber Mud Flaps instead.
No, they do not look, as cool, as the molded ones, But, they don't hurt my paint either.
Now, if you look at the picture , below, you will see that the mudflap comes out, from the fender well, at a slight angle.
This is because I left the factory "Splat", ON.
The Splat is that form fitted plastic piece that comes, stock, on all our trucks.
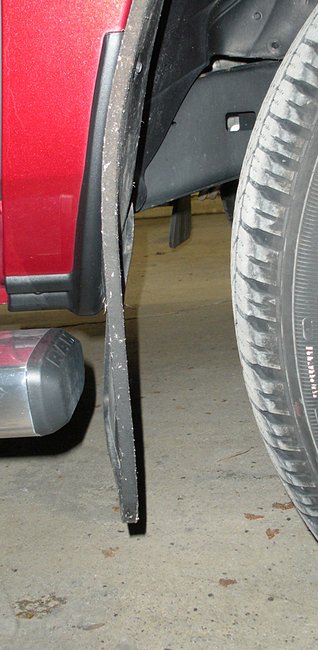
the reason I left the Splat 'on' is because the OEM Rubber mud flap comes with cut-outs, designed to go around the Splat.
Problem is the cut out is designed to go around the splats that they put on 2013 and down model years.
2014 and up model years, the splats are thicker and throw the mud flap,"off" just abit. I actually like, as it keeps from hitting the side steps and keeps gunk, trapped in.
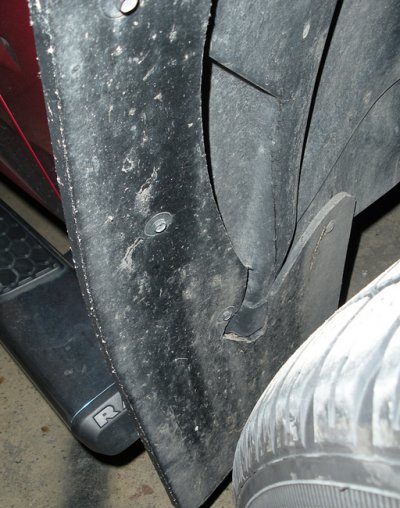
If you look at the picture above, you can see the splat. Now, some guys take the splats off their trucks and just an extra pieceof rubber to cover up the hole that is left nbehind,t o protect the exposed metal. Even heard of some guys buying 2013 splats.
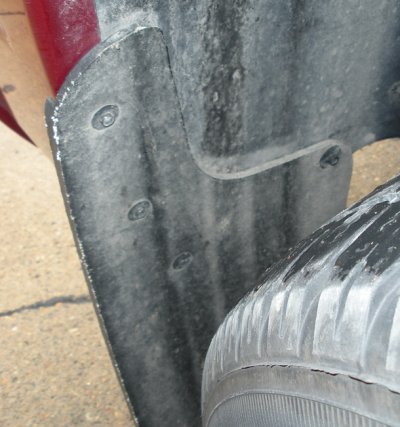
On the rear mud flaps, I took the Splats off the truck and tossed them.
I have the 20X9 inch rims. Notice how the mud flap goes ever so slightly beyond the width of the tire?
The OEM Molded mud flaps did not and let gunk get on the side of my trunk, with these rims.
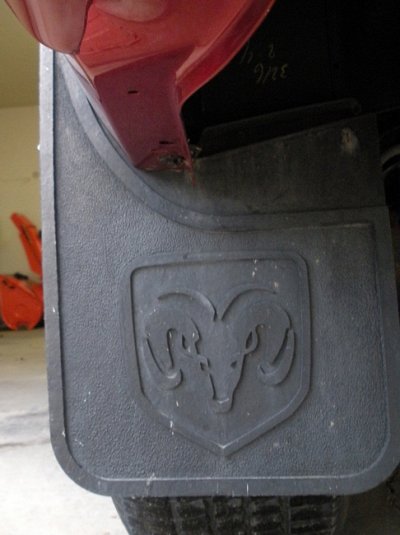
Here, you can see how the road gunk is thrown up, onto the mud flap, and stays within the flap itself.
Looks like the flaps are doing their job, as designed, and the side of my truck stays cleaner!
OEM REMOTE START MOD
Also, before Winter kicked, I wanted OEM Remote Start. Called every Chrysler Service Dept, in 50 mile area. Got best price, just under $500, done, and got that puppy installed.
Neat thing was I got to keep my original two key fobs and got to more fobs, with remote start button on them. So, now I got four key fobs that will work in the truck.
Thought about going with an after-market remote start but OEM would be covered under my Chrysler Extended Warranty AND I did not want to carry two fobs, on for the truck and one for the remote start. Loved the incredible distance you get, with after market remote starts but have no regrets, so far.
Now, should mention, somewhere in all this, I had bought a pair of OEM molded mud flaps.
Then read about the rubbing issues and got rid of them.
Bought a pair of OEM Heavy Duty Rubber Mud Flaps instead.
No, they do not look, as cool, as the molded ones, But, they don't hurt my paint either.
Now, if you look at the picture , below, you will see that the mudflap comes out, from the fender well, at a slight angle.
This is because I left the factory "Splat", ON.
The Splat is that form fitted plastic piece that comes, stock, on all our trucks.

the reason I left the Splat 'on' is because the OEM Rubber mud flap comes with cut-outs, designed to go around the Splat.
Problem is the cut out is designed to go around the splats that they put on 2013 and down model years.
2014 and up model years, the splats are thicker and throw the mud flap,"off" just abit. I actually like, as it keeps from hitting the side steps and keeps gunk, trapped in.

If you look at the picture above, you can see the splat. Now, some guys take the splats off their trucks and just an extra pieceof rubber to cover up the hole that is left nbehind,t o protect the exposed metal. Even heard of some guys buying 2013 splats.
On the rear mud flaps, I took the Splats off the truck and tossed them.
I have the 20X9 inch rims. Notice how the mud flap goes ever so slightly beyond the width of the tire?
The OEM Molded mud flaps did not and let gunk get on the side of my trunk, with these rims.

Here, you can see how the road gunk is thrown up, onto the mud flap, and stays within the flap itself.
Looks like the flaps are doing their job, as designed, and the side of my truck stays cleaner!

OEM REMOTE START MOD
Also, before Winter kicked, I wanted OEM Remote Start. Called every Chrysler Service Dept, in 50 mile area. Got best price, just under $500, done, and got that puppy installed.
Neat thing was I got to keep my original two key fobs and got to more fobs, with remote start button on them. So, now I got four key fobs that will work in the truck.
Thought about going with an after-market remote start but OEM would be covered under my Chrysler Extended Warranty AND I did not want to carry two fobs, on for the truck and one for the remote start. Loved the incredible distance you get, with after market remote starts but have no regrets, so far.
Last edited:
gofishn
Senior Member
- Joined
- Sep 12, 2014
- Posts
- 5,082
- Reaction score
- 10,142
- Location
- Iowa
- Ram Year
- 2022 Ram 1500 5th Gen, Big Horn, 4X4, Crew Cab, 6'4" Box
- Engine
- hemi 5.7L, 345 cu in
OEM 82213266AB Wheel well to wheel well, Side Steps
Next Mod was side steps.
Once again, read this forum to research what was what.
Ended up going with the OEM 82213266AB Wheel well to wheel well, Side Steps.
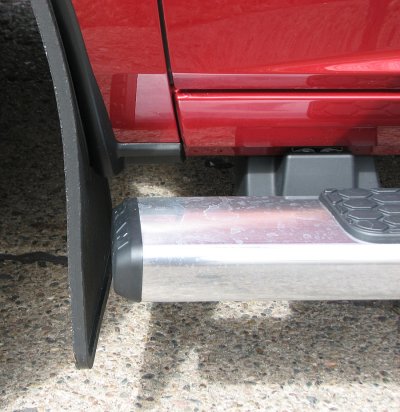
Front edge of the step.
Tight to the flaps but it works.
Back edge of the step.
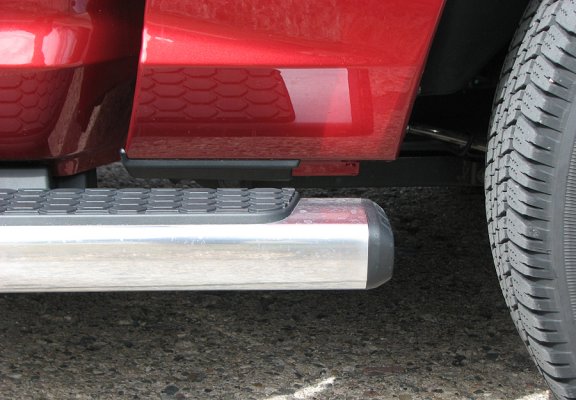
Now, while these are wheel well to wheel well steps, they are only a two bracket step.
found out, just recently that there is a third bracket that can be bought.
Mopar part # 68193127AA
BRACKET KIT. Side Step. Step Kit, Tubular Side for DODGE. #68193127AA
I have not got it, yet, but it will be a project, come Summer.
Neatest part about these steps?
Got a $400 rebate, back, from Chrysler for installing them.
Chrysler Automobility
Chrysler Automobility Program reimburses the cost of making your truck compliant with your disability. Up to set amounts.
All that is needed is medical documentation stating that a person who will regularly be using your truck needs the alteration to the truck, for their medical condition. Does not need to be the registered Owner of the truck.
Next Mod was side steps.
Once again, read this forum to research what was what.
Ended up going with the OEM 82213266AB Wheel well to wheel well, Side Steps.

Front edge of the step.
Tight to the flaps but it works.

Back edge of the step.

Now, while these are wheel well to wheel well steps, they are only a two bracket step.
found out, just recently that there is a third bracket that can be bought.
Mopar part # 68193127AA
BRACKET KIT. Side Step. Step Kit, Tubular Side for DODGE. #68193127AA
I have not got it, yet, but it will be a project, come Summer.
Neatest part about these steps?
Got a $400 rebate, back, from Chrysler for installing them.
Chrysler Automobility
Chrysler Automobility Program reimburses the cost of making your truck compliant with your disability. Up to set amounts.
All that is needed is medical documentation stating that a person who will regularly be using your truck needs the alteration to the truck, for their medical condition. Does not need to be the registered Owner of the truck.
Last edited:
gofishn
Senior Member
- Joined
- Sep 12, 2014
- Posts
- 5,082
- Reaction score
- 10,142
- Location
- Iowa
- Ram Year
- 2022 Ram 1500 5th Gen, Big Horn, 4X4, Crew Cab, 6'4" Box
- Engine
- hemi 5.7L, 345 cu in
Husky X-act Contour Floor Mats
Needed some floor mats. OEM carpeted ones were getting clobbered.
Husky, Weathertech, Michelin . . .so many to choose from.
Ended up with the Husky X-Act Contours and could not be happier.
Probably my favorite about them it the fact they are not as stiff as other brands. they will flex. Makes it real easy to access all the stuff I keep in the rear floor storage compartments.
Grab the mat, fold it over the rear floor hump and open the floor storage lid .
Another great thing about these mats is how I do not slide around, when my boots are covered in whatever. They grip much better than my buddy's Weathertechs.
NOTE: my black mats are pretty black, just slightly less dark than my black carpet.
The pics have been highlighted, so everyone can see the mats, better.
Color is not accurate.
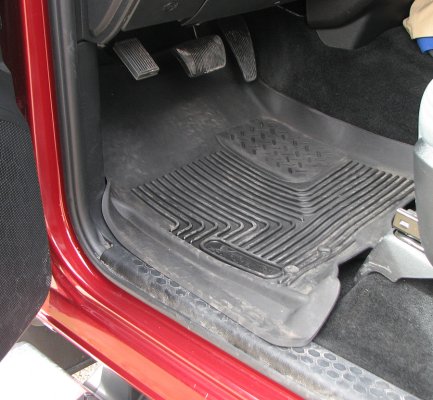
Now, take another look at the above image.
Notice that lifted edge, on the left side of the mat?
Runs across the open door sill?
That edge allows the mats to hold a ton of water and gunk.
If anything should get over it, which has not happened yet, the liquid just goes out the door,
Here is a closer look. that notch by teh gas pedal is perfect for my foot.
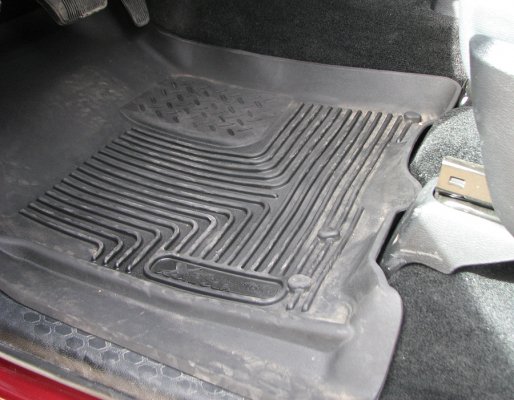
FYI, I am a Railroad Engineer. You can't begin imagine the stuff I haul in, on the bottom of my Industrial work boots.
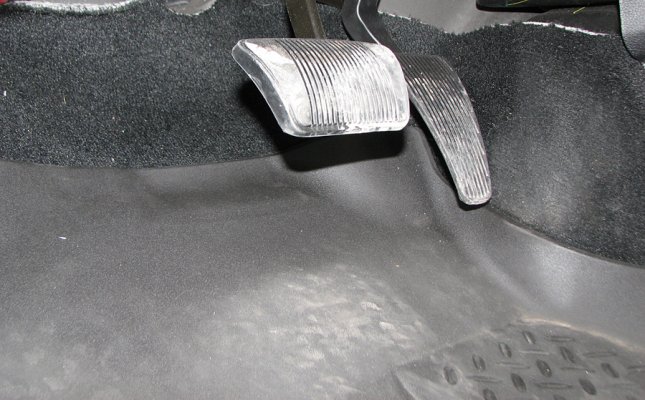
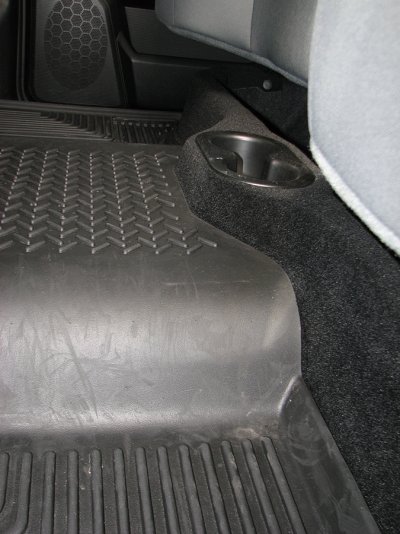
the rear floor mat is one piece. Notice how ti too has a high edge, along the side, to hold in liquids?
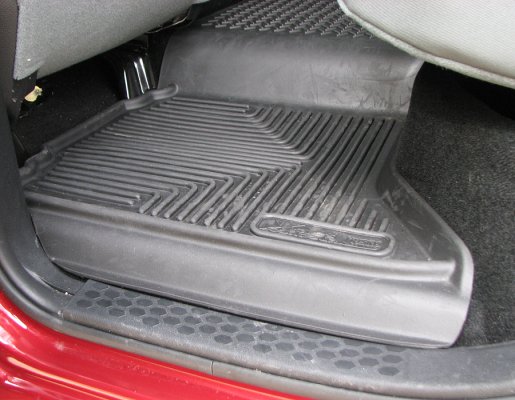
These are called the X-Act Contours and they meant it!
Notice how well it fits.
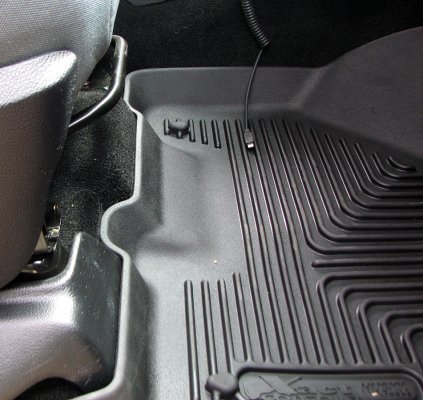
Front Passenger side Mat.
Needed some floor mats. OEM carpeted ones were getting clobbered.
Husky, Weathertech, Michelin . . .so many to choose from.
Ended up with the Husky X-Act Contours and could not be happier.
Probably my favorite about them it the fact they are not as stiff as other brands. they will flex. Makes it real easy to access all the stuff I keep in the rear floor storage compartments.
Grab the mat, fold it over the rear floor hump and open the floor storage lid .
Another great thing about these mats is how I do not slide around, when my boots are covered in whatever. They grip much better than my buddy's Weathertechs.
NOTE: my black mats are pretty black, just slightly less dark than my black carpet.
The pics have been highlighted, so everyone can see the mats, better.
Color is not accurate.

Now, take another look at the above image.
Notice that lifted edge, on the left side of the mat?
Runs across the open door sill?
That edge allows the mats to hold a ton of water and gunk.
If anything should get over it, which has not happened yet, the liquid just goes out the door,
Here is a closer look. that notch by teh gas pedal is perfect for my foot.

FYI, I am a Railroad Engineer. You can't begin imagine the stuff I haul in, on the bottom of my Industrial work boots.

the rear floor mat is one piece. Notice how ti too has a high edge, along the side, to hold in liquids?

These are called the X-Act Contours and they meant it!
Notice how well it fits.

Front Passenger side Mat.

Last edited:
Drummin4jc
WWG1WGA!
- Joined
- Feb 3, 2015
- Posts
- 2,375
- Reaction score
- 1,218
- Location
- SW Pennsylvania
- Ram Year
- 2024 Ram 2500 CC
- Engine
- 6.4 Hemi
Great job so far on the truck!  I can completely relate when you say that this forum gives you ideas... LOL!
Adam
 I can completely relate when you say that this forum gives you ideas... LOL!
Adam
Statcher1
Senior Member
Great job so far on the truck!I can completely relate when you say that this forum gives you ideas... LOL!
Adam
Yes it does. It causes a spending problem.
gofishn
Senior Member
- Joined
- Sep 12, 2014
- Posts
- 5,082
- Reaction score
- 10,142
- Location
- Iowa
- Ram Year
- 2022 Ram 1500 5th Gen, Big Horn, 4X4, Crew Cab, 6'4" Box
- Engine
- hemi 5.7L, 345 cu in
MOPAR OEM Part # CEC1MO71AA Under Hood Light Kit
Like so many other Mods, I never knew what I was missing, nor how much I needed it, until I stumbled across the information, reading this forum.
What is this? My Ram 1500 Express did not come with an under hood light?
Run outside, as fast as my feet will carry me. Pop that hood, hook up, in sheer Terror. There was no light!!
Now, to buy the parts, individually, you will need to sell a child or mortgage teh house. Not really but it is like a $100 or so.
OR, you can find MOPAR Part # CEC1MO71AA - about $20.
Seems this was a recall parts 'kit" , not a for retail sale kit, Chrysler whipped up for 2011-2013 Sport trucks that did NOT come with the under hood & glove box lights, but should have.
Called a local dealer, Dewey Dodge - Ankeny, Iowa. They had the kit.
FYI, just called the guy, he still has one , in stock, now $20
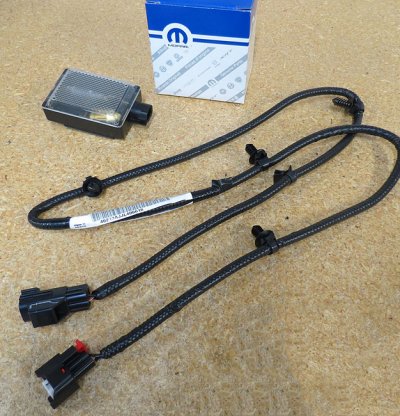
The kit includes the under hood light assembly, with bulb. One push pin, to mount the light to the hood itself, 2 replacement retaining clips, for the under hood mat, the wiring harness AND one glove box light assembly.
Just pop off the two clover leaf looking clips holding the under hood mat to the bottom of the hood. ( I got by with just popping of the one but the kit comes with two new clips).
Slide the mat from underneath the retaining thingy.
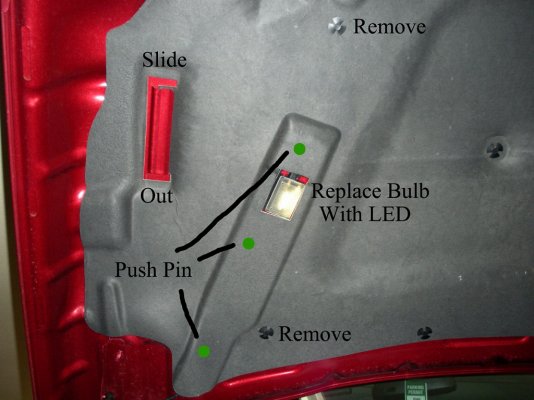
Remove the bulb from the light assembly.
Mount the light assembly, with the included push pin.
When mounting the light, have the "plug in" End of the light assembly pointing up.
You can't mess it up, there is a hole and a slot, on the hood, that matches up with the back of the light itself.
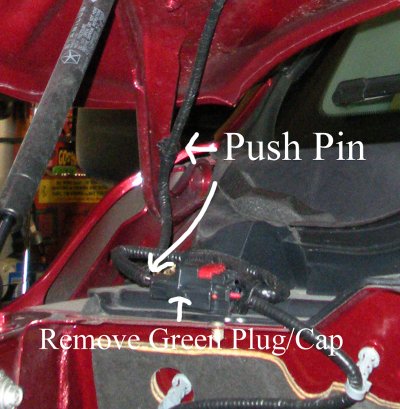
Plug in the wire harness. It has two ends but only one end of it will fit the light assembly itself. It's Gofishn Proof.
Wrap from top, down the side of the mounted light assembly.
You will notice clips, on the wiring harness.
Those clips match up perfectly with holes in the hood.
Just follow them along to the hood support.
Took me about 5 minutes to do it.
Getting the bulb out of the light, so I could mount the assembly to the hood,
took me longer than anything. Was worried I would break it.
Remove the Blank Filler plug, from the electrical connector you will need.
Plug in your new light.
I was not really that impressed with the amount of light the OEM bulb gave me.
Even at night, it was Weak, Whimpy, Whambly, Whombly. So I replaced it with this one.
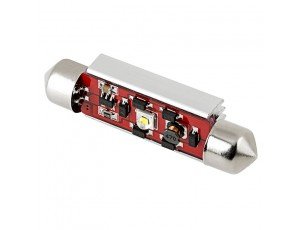
Got it here.
https://www.superbrightleds.com/mor...us-bulb-1-smd-led-festoon-44mm-car/1264/2937/
Like so many other Mods, I never knew what I was missing, nor how much I needed it, until I stumbled across the information, reading this forum.
What is this? My Ram 1500 Express did not come with an under hood light?
Run outside, as fast as my feet will carry me. Pop that hood, hook up, in sheer Terror. There was no light!!
Now, to buy the parts, individually, you will need to sell a child or mortgage teh house. Not really but it is like a $100 or so.
OR, you can find MOPAR Part # CEC1MO71AA - about $20.
Seems this was a recall parts 'kit" , not a for retail sale kit, Chrysler whipped up for 2011-2013 Sport trucks that did NOT come with the under hood & glove box lights, but should have.
Called a local dealer, Dewey Dodge - Ankeny, Iowa. They had the kit.
FYI, just called the guy, he still has one , in stock, now $20

The kit includes the under hood light assembly, with bulb. One push pin, to mount the light to the hood itself, 2 replacement retaining clips, for the under hood mat, the wiring harness AND one glove box light assembly.
Just pop off the two clover leaf looking clips holding the under hood mat to the bottom of the hood. ( I got by with just popping of the one but the kit comes with two new clips).
Slide the mat from underneath the retaining thingy.

Remove the bulb from the light assembly.
Mount the light assembly, with the included push pin.
When mounting the light, have the "plug in" End of the light assembly pointing up.
You can't mess it up, there is a hole and a slot, on the hood, that matches up with the back of the light itself.
Plug in the wire harness. It has two ends but only one end of it will fit the light assembly itself. It's Gofishn Proof.
Wrap from top, down the side of the mounted light assembly.
You will notice clips, on the wiring harness.
Those clips match up perfectly with holes in the hood.
Just follow them along to the hood support.
Took me about 5 minutes to do it.
Getting the bulb out of the light, so I could mount the assembly to the hood,
took me longer than anything. Was worried I would break it.
Remove the Blank Filler plug, from the electrical connector you will need.
Plug in your new light.

I was not really that impressed with the amount of light the OEM bulb gave me.
Even at night, it was Weak, Whimpy, Whambly, Whombly. So I replaced it with this one.

Got it here.
https://www.superbrightleds.com/mor...us-bulb-1-smd-led-festoon-44mm-car/1264/2937/
Last edited:
gofishn
Senior Member
- Joined
- Sep 12, 2014
- Posts
- 5,082
- Reaction score
- 10,142
- Location
- Iowa
- Ram Year
- 2022 Ram 1500 5th Gen, Big Horn, 4X4, Crew Cab, 6'4" Box
- Engine
- hemi 5.7L, 345 cu in
LED Bulbs - Under Hood Light and Interior Dome Light
Was so impressed with how bright that Under Hood LED bulb was. I knew I had to replace my Interior Dome Light bulb. It is the only overhead bulb I got. Need it to be Bright!
Followed along, with a great set of instructions, here.
http://www.paulstravelpictures.com/...-Dome-Light-Bulb-Replacement-Guide/index.html
Bought this bulb
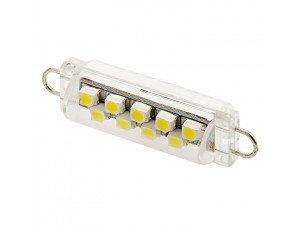
From here
https://www.superbrightleds.com/moreinfo/festoon/561-led-bulb-9-smd-led-festoon-44mm-car/244/1166/
Sweet Jesus is that bright!
Turns Night, into Day, inside my truck.
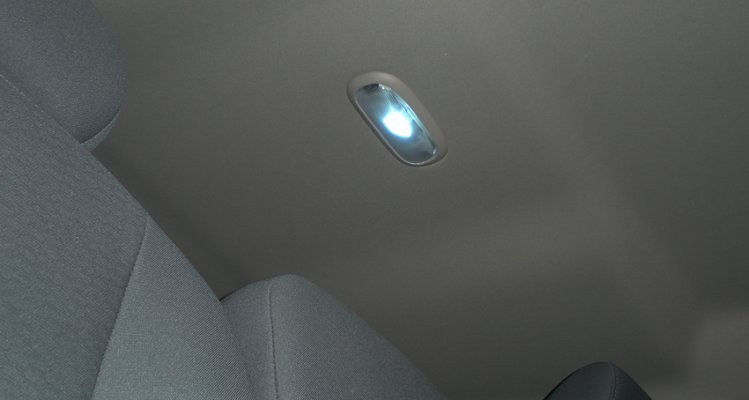
I still want to do the overhead light console add-on but with this bright LED bulb, there really is no hurry, whatsoever.
If, like me, all you have is that one OEM overhead dome light, do yourself a favor and get that LED Bulb. It is Ridiculous how bright it is.
Was so impressed with how bright that Under Hood LED bulb was. I knew I had to replace my Interior Dome Light bulb. It is the only overhead bulb I got. Need it to be Bright!
Followed along, with a great set of instructions, here.
http://www.paulstravelpictures.com/...-Dome-Light-Bulb-Replacement-Guide/index.html
Bought this bulb

From here
https://www.superbrightleds.com/moreinfo/festoon/561-led-bulb-9-smd-led-festoon-44mm-car/244/1166/
Sweet Jesus is that bright!
Turns Night, into Day, inside my truck.

I still want to do the overhead light console add-on but with this bright LED bulb, there really is no hurry, whatsoever.
If, like me, all you have is that one OEM overhead dome light, do yourself a favor and get that LED Bulb. It is Ridiculous how bright it is.
Last edited:
gofishn
Senior Member
- Joined
- Sep 12, 2014
- Posts
- 5,082
- Reaction score
- 10,142
- Location
- Iowa
- Ram Year
- 2022 Ram 1500 5th Gen, Big Horn, 4X4, Crew Cab, 6'4" Box
- Engine
- hemi 5.7L, 345 cu in
Actron CP9580A Code Reader
Turned out, my truck had some Gremlins. C.E.L. ( Check Engine Light) came on,4 or 5 times.
Each time, it was something minor.
Only problem with that is, when the CEL comes on, in a brand new truck, my first thought is this thing is going to blow!
Got tired of going to the Auto Parts store to have them use their code reader.
Started researching Code Readers and decided I wanted this one.
Actron CP9580A
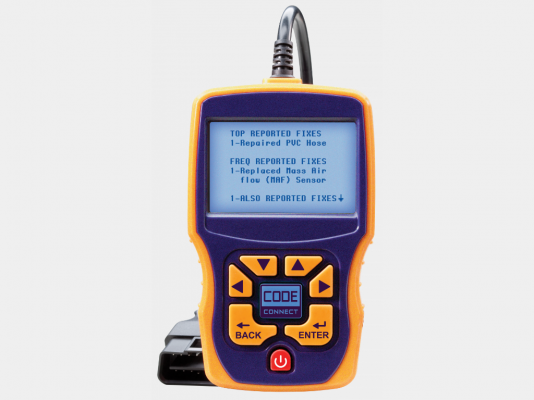
Best part? They had it, on sale, for $125.
Even better part, for you? It's even cheaper, now.
Only $110, Directly from the manufacturer, Actron.
https://actron.com/content/obd-ii-auto-scanner-plus
FYI, they are still $221 on Amazon
http://www.amazon.com/Actron-CP9580A-Enhanced-AutoScanner-Plus/dp/B008ZDYLC2
I love mine. Does practically everything, that I will ever use, that my Son-in-Laws Snap-on Solus does but I don't have to take a college course to figure it out.
Imagine Actron is phasing this model out, for the new years model.
Works for me.
Turned out, my truck had some Gremlins. C.E.L. ( Check Engine Light) came on,4 or 5 times.
Each time, it was something minor.
Only problem with that is, when the CEL comes on, in a brand new truck, my first thought is this thing is going to blow!
Got tired of going to the Auto Parts store to have them use their code reader.
Started researching Code Readers and decided I wanted this one.
Actron CP9580A

Best part? They had it, on sale, for $125.
Even better part, for you? It's even cheaper, now.
Only $110, Directly from the manufacturer, Actron.
https://actron.com/content/obd-ii-auto-scanner-plus
FYI, they are still $221 on Amazon
http://www.amazon.com/Actron-CP9580A-Enhanced-AutoScanner-Plus/dp/B008ZDYLC2
I love mine. Does practically everything, that I will ever use, that my Son-in-Laws Snap-on Solus does but I don't have to take a college course to figure it out.
Imagine Actron is phasing this model out, for the new years model.
Works for me.
Last edited:
gofishn
Senior Member
- Joined
- Sep 12, 2014
- Posts
- 5,082
- Reaction score
- 10,142
- Location
- Iowa
- Ram Year
- 2022 Ram 1500 5th Gen, Big Horn, 4X4, Crew Cab, 6'4" Box
- Engine
- hemi 5.7L, 345 cu in
RMI-25 Radiator Treatment Additive
Can't stop researching cool things to do to my truck.
Had to replace the Radiator, in the Wife's Grand Caravan.
Started reading up on the different types of anti-freeze they have, today.
Found a little Company that sells some snake-oil &, after reading up on them, they made a believer out of me.
I had NEVER seen a radiator, as gunked up, as that Caravan and it wasn't even that old. Only a 2006. Seems these new ECO Friendly Anti-freezes are, basically, Junk.
This RMI-25 is supposed to counter all that.
Lots of folks, across many forums, have been raving on this stuff, for years.
Figured Why not?
Don't cost much.
Like eating a Dutch Letter, it made me feel, better, so I did it.
Product | RMI-25
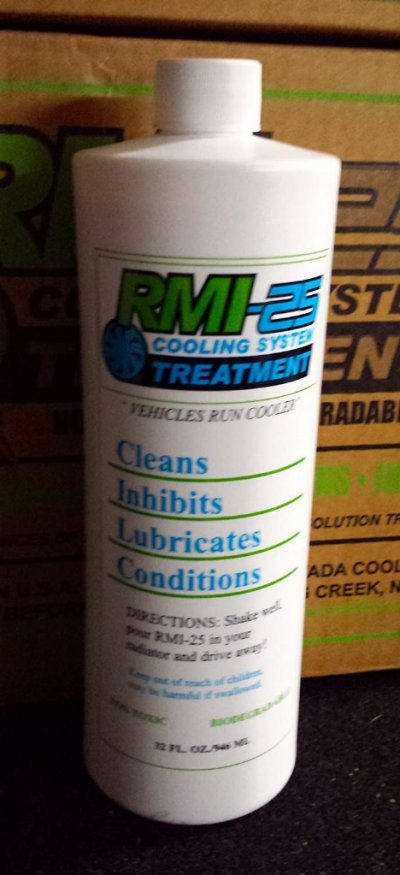
http://www.amazon.com/RMI-25-Cooling-System-Treatment-Quart/dp/B004JV8PI0
Can't stop researching cool things to do to my truck.
Had to replace the Radiator, in the Wife's Grand Caravan.
Started reading up on the different types of anti-freeze they have, today.
Found a little Company that sells some snake-oil &, after reading up on them, they made a believer out of me.
I had NEVER seen a radiator, as gunked up, as that Caravan and it wasn't even that old. Only a 2006. Seems these new ECO Friendly Anti-freezes are, basically, Junk.
This RMI-25 is supposed to counter all that.
Lots of folks, across many forums, have been raving on this stuff, for years.
Figured Why not?
Don't cost much.
Like eating a Dutch Letter, it made me feel, better, so I did it.
Product | RMI-25

http://www.amazon.com/RMI-25-Cooling-System-Treatment-Quart/dp/B004JV8PI0
Last edited:
gofishn
Senior Member
- Joined
- Sep 12, 2014
- Posts
- 5,082
- Reaction score
- 10,142
- Location
- Iowa
- Ram Year
- 2022 Ram 1500 5th Gen, Big Horn, 4X4, Crew Cab, 6'4" Box
- Engine
- hemi 5.7L, 345 cu in
Mopar OEM Fold Flat Foor
Saw a forum member had a set of fold flat floor pieces, for sale.
Jumped all over them, not knowing if they would work, for me, or not.
Remember, I got an Express. One solid back seat, not a split seat.
However, I did not have any compartment "floor" or "Cover", at all.
If the back seat was up, I could see the storage bins, under the seat.
Drove me Nutty. Buddy's Big Horn had flip up seats, thought the lower end model and I wanted something similar. Bought them , on a Hope.
Turned out, it worked out.
Yeah, Team Gofishn!
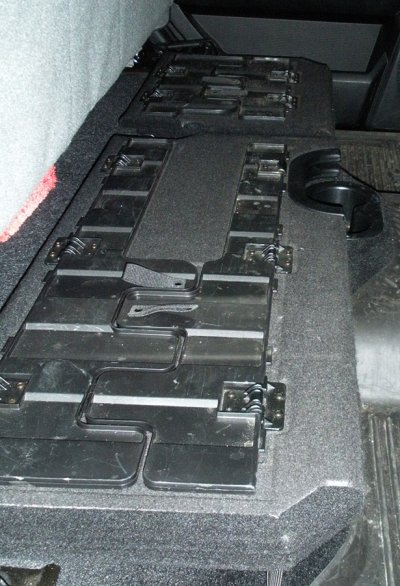
Here is the floor, installed. Split floor, for Split seat but works, just fine, with a solid seat.
I really like having the two hard plastic "legs" that can be flipped out to support the floor.
The hold down strap works great too. No flopping around or noise, whatsoever.
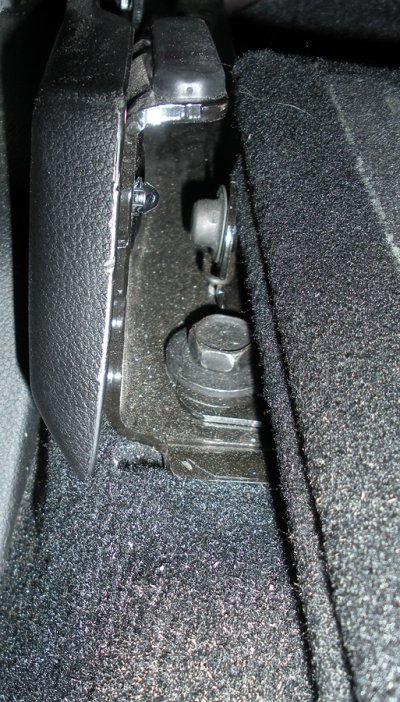
To install, simply remove the Bolt, that secures the back seat itself.
See it, from Passenger side, rear door. Here it is
In the middle, since I did not have a split rear seat, I had no bolts to remove. But, I noticed that there was a cutout, in the carpet. Removed the cutout and there were my two wholes, with nuts underneath, already welded to the cab, just waiting for my to buy a couple of bolts.Which I got from my local hardware store.
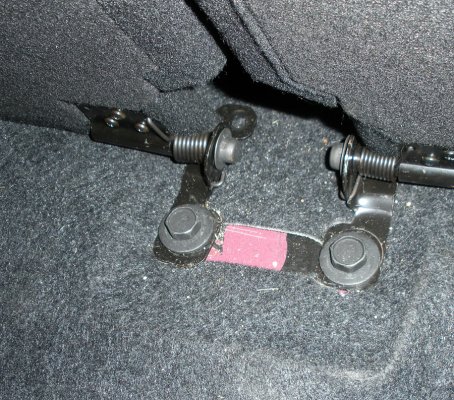
Now, if you look at the picture above, you see there is an extra hole, above the bolt, where it looks like another bolt could go in. Uh uh. No hole in the floor board for it. MEthinks it is a guide pin. There are guide pins, on each side of the seat I do have.
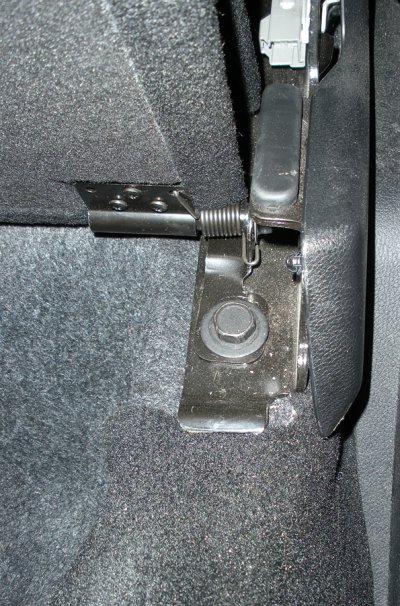
Here is the drivers side rear door view and the bolt that holds the seat, in place, simply remove, put your floor in place and reattach the bolt.
Here is my Fold Flat Floor Mod, all opened up, ready for my Gear.
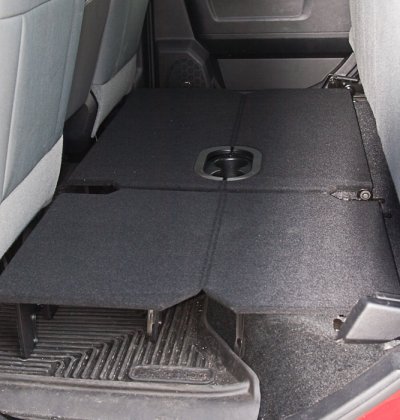
Ignore all the junk on my Husky floor mat. I swear, I vacuum the Truck.
Really, I do, Got a vacuum hanging on my garage wall and just used it, yesterday.
Even pulled out the floor mats, wash them down, let them dry and stuck them back.
Turn my head, for one second, and the damn things are dirty again.
Saw a forum member had a set of fold flat floor pieces, for sale.
Jumped all over them, not knowing if they would work, for me, or not.
Remember, I got an Express. One solid back seat, not a split seat.
However, I did not have any compartment "floor" or "Cover", at all.
If the back seat was up, I could see the storage bins, under the seat.
Drove me Nutty. Buddy's Big Horn had flip up seats, thought the lower end model and I wanted something similar. Bought them , on a Hope.
Turned out, it worked out.
Yeah, Team Gofishn!
Here is the floor, installed. Split floor, for Split seat but works, just fine, with a solid seat.
I really like having the two hard plastic "legs" that can be flipped out to support the floor.
The hold down strap works great too. No flopping around or noise, whatsoever.

To install, simply remove the Bolt, that secures the back seat itself.
See it, from Passenger side, rear door. Here it is

In the middle, since I did not have a split rear seat, I had no bolts to remove. But, I noticed that there was a cutout, in the carpet. Removed the cutout and there were my two wholes, with nuts underneath, already welded to the cab, just waiting for my to buy a couple of bolts.Which I got from my local hardware store.

Now, if you look at the picture above, you see there is an extra hole, above the bolt, where it looks like another bolt could go in. Uh uh. No hole in the floor board for it. MEthinks it is a guide pin. There are guide pins, on each side of the seat I do have.
Here is the drivers side rear door view and the bolt that holds the seat, in place, simply remove, put your floor in place and reattach the bolt.

Here is my Fold Flat Floor Mod, all opened up, ready for my Gear.

Ignore all the junk on my Husky floor mat. I swear, I vacuum the Truck.
Really, I do, Got a vacuum hanging on my garage wall and just used it, yesterday.
Even pulled out the floor mats, wash them down, let them dry and stuck them back.
Turn my head, for one second, and the damn things are dirty again.
Last edited:
gofishn
Senior Member
- Joined
- Sep 12, 2014
- Posts
- 5,082
- Reaction score
- 10,142
- Location
- Iowa
- Ram Year
- 2022 Ram 1500 5th Gen, Big Horn, 4X4, Crew Cab, 6'4" Box
- Engine
- hemi 5.7L, 345 cu in
Stock OEM Cold Air Intake Mod
How I wanted and S&B Intake.
I mean, I really , really wanted it.
Even more than a Red Rider BB Gun.
Just look at this thing.
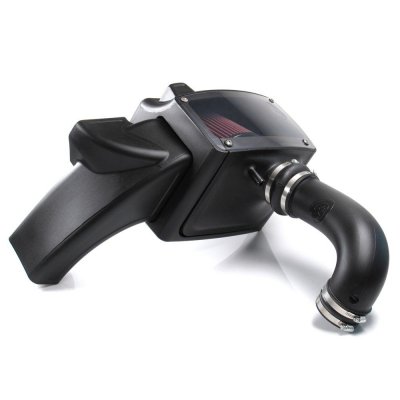
It has a HUGE air inlet piece that goes down, which is monstrously bigger than the one that goes to the inner fender well, like OEM's only air intake.
$300?
Man, I still want it. However, there were other, more practical things the truck needed.
Then, I came across this thread.
http://www.ramforum.com/f75/modded_stock_air-box_snorkle_more_airflow-37123/
Does the same thing, ie: get cold air from down below the engine bay.
Just slightly modify the stock air box? Under $30?
Time to get Creative!
Here is the stock air inlet. Not to bad but, more air, equals more power, at higher RPM's.
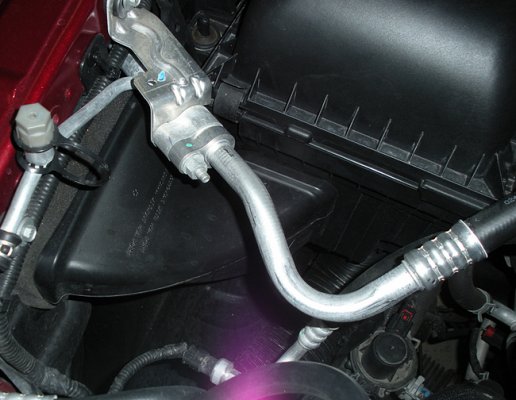
First thing to do is to remove the two top hoses, that are on the stock Air Box, towards the engine. Smaller one just pulls off, Big one needs to have the clamp, loosened, then pries off.
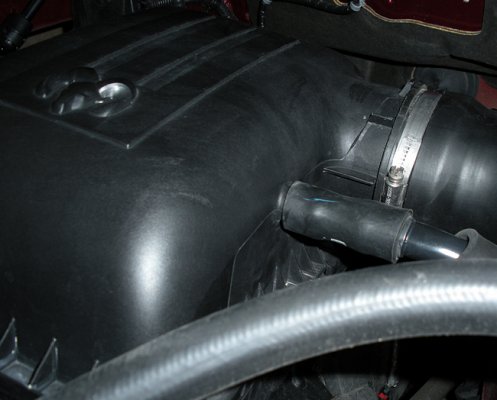
Now, pop the clips off the back side
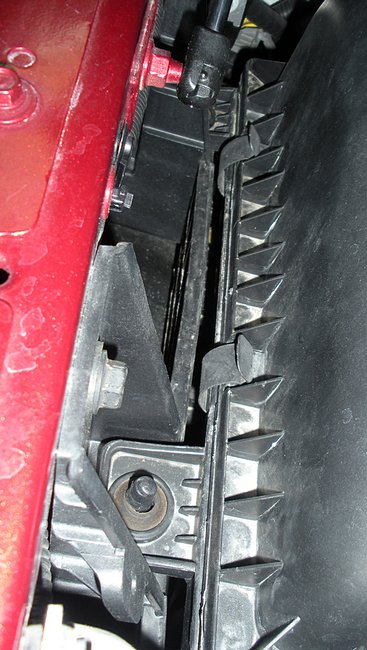
Take the bottom of the box, out, then cut a 3" hole in the corner, using a hole saw. Fetch a Basement type floor drain and remove the criss-cross drain catches. Then, slap down some silicone, if you are so inclined, and put your drain, in the hole.
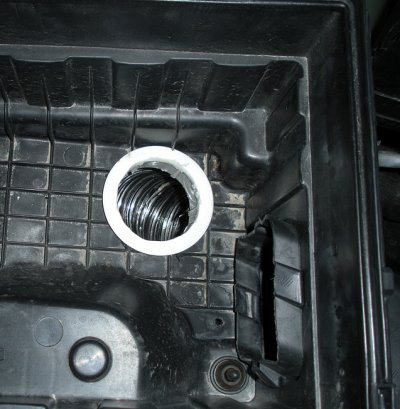
This is a picture of teh under side, of the cold air box, with the floor drain sticking out the bottom.
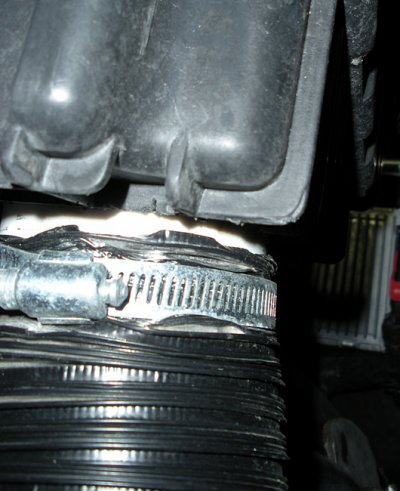
Slip the Aluminum flexible, painted black, Dryer Vent over the drains lip.
Tighten with a hose clamp.
Snake your hose, down, Try to get it to go besides the frame, right to the bottom edge.
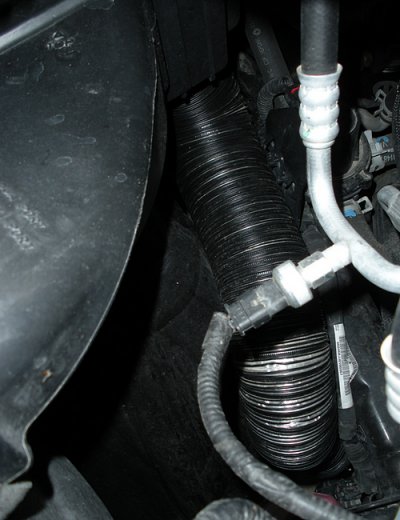
This will allow your truck to get cool air, from just below the frame, as you go down the road.
In this picture, I am standing directly in front of the radiator, aiming the camera straight down.
You can see, on the upper left side corner, is the original fender vent inlet, which runs to the Cold Air Intake box.
Then the inner fender well liner. My Painted dryer vent hose and, on the Bottom right side, you can even see the frame itself.
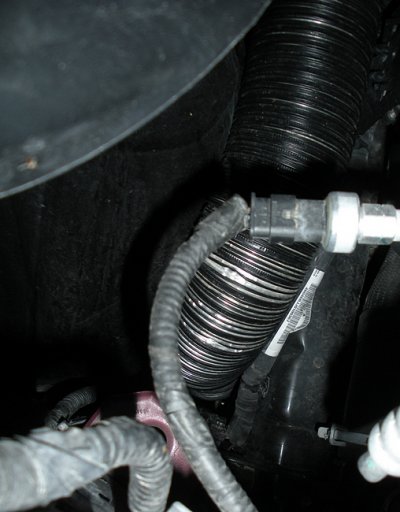
.
Now, does this Truly, do anything?
Are there, really, any improvements?
Performance, Mileage or otherwise?
Well, I think it gives the truck a lot more power, when already cruising at 70mph, for passing.
Seems like the truck literally leaps, when my foot hits the pedal.
Know the thing that blew me away, the most, about this Mod?
Wife came in, three days ago or so, after I finally got around to modding the air box, and wakes me up from my *****.
Wife: Hey, remember that 3" dryer vent tube thing you did?
Said it was going to make your truck pass easier, at highway speeds?
ME: Uh, yeah . . .
Wife: Well, it works.
Me: Uh, Okay. (thinking) Why would my Sunday School teaching, slow poke wife EVER need to pass someone?
Crap, she's getting Menopausal.
Crap, crap, crap. She's driving the truck too!
SO, yeah, I think this mod really does some good.
Though, I still want an S&B Intake, they are so darn good looking.
With LED inside it, under the plexiglass cover, that light up, whenever the hood is opened.
Oh yeah !!
How I wanted and S&B Intake.
I mean, I really , really wanted it.
Even more than a Red Rider BB Gun.
Just look at this thing.

It has a HUGE air inlet piece that goes down, which is monstrously bigger than the one that goes to the inner fender well, like OEM's only air intake.
$300?
Man, I still want it. However, there were other, more practical things the truck needed.
Then, I came across this thread.
http://www.ramforum.com/f75/modded_stock_air-box_snorkle_more_airflow-37123/
Does the same thing, ie: get cold air from down below the engine bay.
Just slightly modify the stock air box? Under $30?
Time to get Creative!
Here is the stock air inlet. Not to bad but, more air, equals more power, at higher RPM's.

First thing to do is to remove the two top hoses, that are on the stock Air Box, towards the engine. Smaller one just pulls off, Big one needs to have the clamp, loosened, then pries off.

Now, pop the clips off the back side

Take the bottom of the box, out, then cut a 3" hole in the corner, using a hole saw. Fetch a Basement type floor drain and remove the criss-cross drain catches. Then, slap down some silicone, if you are so inclined, and put your drain, in the hole.

This is a picture of teh under side, of the cold air box, with the floor drain sticking out the bottom.
Slip the Aluminum flexible, painted black, Dryer Vent over the drains lip.
Tighten with a hose clamp.

Snake your hose, down, Try to get it to go besides the frame, right to the bottom edge.

This will allow your truck to get cool air, from just below the frame, as you go down the road.
In this picture, I am standing directly in front of the radiator, aiming the camera straight down.
You can see, on the upper left side corner, is the original fender vent inlet, which runs to the Cold Air Intake box.
Then the inner fender well liner. My Painted dryer vent hose and, on the Bottom right side, you can even see the frame itself.

.
Now, does this Truly, do anything?
Are there, really, any improvements?
Performance, Mileage or otherwise?
Well, I think it gives the truck a lot more power, when already cruising at 70mph, for passing.
Seems like the truck literally leaps, when my foot hits the pedal.
Know the thing that blew me away, the most, about this Mod?
Wife came in, three days ago or so, after I finally got around to modding the air box, and wakes me up from my *****.
Wife: Hey, remember that 3" dryer vent tube thing you did?
Said it was going to make your truck pass easier, at highway speeds?
ME: Uh, yeah . . .
Wife: Well, it works.
Me: Uh, Okay. (thinking) Why would my Sunday School teaching, slow poke wife EVER need to pass someone?
Crap, she's getting Menopausal.
Crap, crap, crap. She's driving the truck too!
SO, yeah, I think this mod really does some good.
Though, I still want an S&B Intake, they are so darn good looking.
With LED inside it, under the plexiglass cover, that light up, whenever the hood is opened.
Oh yeah !!
Last edited:
gofishn
Senior Member
- Joined
- Sep 12, 2014
- Posts
- 5,082
- Reaction score
- 10,142
- Location
- Iowa
- Ram Year
- 2022 Ram 1500 5th Gen, Big Horn, 4X4, Crew Cab, 6'4" Box
- Engine
- hemi 5.7L, 345 cu in
Painted Engine Cover Mod
Decided to have a go at painting my Engine Cover.
Had been wanting to do this, since I got the truck, and saw how nice others have turned out
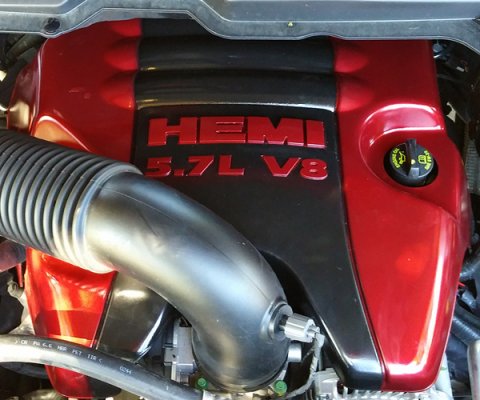
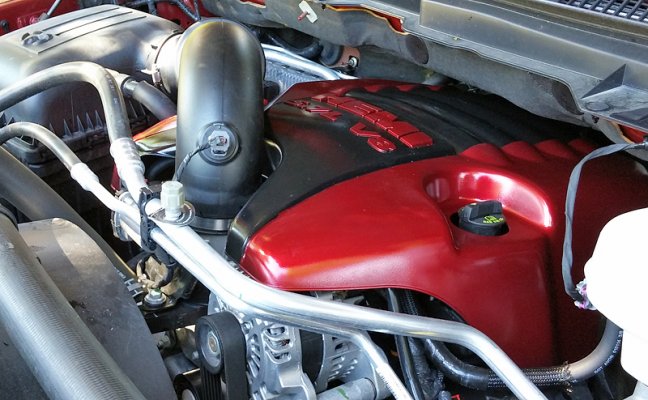
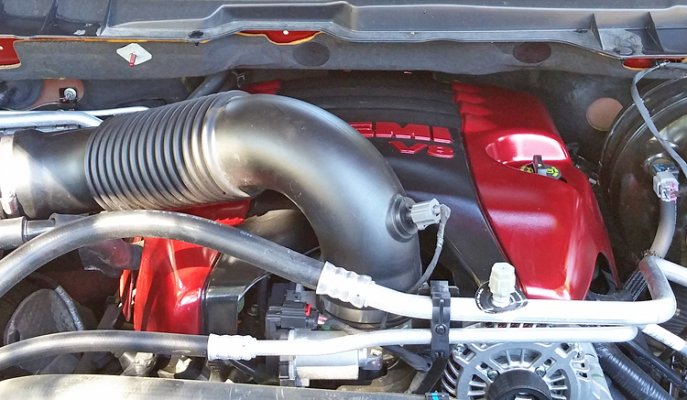
First, I got some of those plastic gloves, not unlike what you see in a doctors office. Skin has oils and those oils will cause paint issues. Fish eyes and the like.
Next, I used a quality paint thinner and a clean linen rag.
Old T-shirts work well.
Then used those, liberally doused with paint thinner, to clean the entire engine cover. Once cleaned, allowed it to dry.
Grabbed a can of plastic adhesive promoter, which can be bought at wal-mart or automotive parts store. (NOTE: Try to stay within the same brand for all your paints. Just makes things a little easier, since they are designed to work together, I do not recommend one, over another.)
Sprayed very light coats, on the well cleaned engine cover, according to directions on the can.
Figured it was far better to lay down the adhesive promoter, LIGHTLY, LIGHTLY, LIGHTLY. And allowing it plenty of time to dry, properly.
I want that STICK, to the engine cover, so my paint can stick, to it.
Once the adhesive promoter was dry. I then did the same with the Primer.
Applying light coats, according to the can itself.
Did more than a few coats of Primer, since I was going to sand this down, to try and smooth out the texture of the engine cover. If you look closely, it has a slightly bumpy surface. I wanted it smooth as a baby's bottom.
After sanding the primer, needed to re-clean the engine cover, as stated above. Then applied final coat of primer.
After that final coat of primer dried, started in on paint.
Now, some guys have gone all out, using lots of colors, some have even done fine artwork. I;m not an Artist and figured two colors was plenty. The color of my truck and good old black, everything matches black.
Masked off & painted the middle section, first.
Once dry, taped it off and painted the sides.
(NOTE: If you are planning on doing two different colors, in your middle section. Say, Gloss black and flat black, this is the time to do second color.)
Once the completed middle section was done and dry, taped it off.
Simply too my time, used good paint tape.
Letters could have been bought, on ebay , as perfect fit stickers but then it is only the top of the letter that has color. I decided to tape off the letters allowing me to get paint on the sides of the letters too.
Once everything was painted, clear coat everything.
I used four coats of paint, followed by four coats of clear.
Decided to have a go at painting my Engine Cover.
Had been wanting to do this, since I got the truck, and saw how nice others have turned out


First, I got some of those plastic gloves, not unlike what you see in a doctors office. Skin has oils and those oils will cause paint issues. Fish eyes and the like.
Next, I used a quality paint thinner and a clean linen rag.
Old T-shirts work well.
Then used those, liberally doused with paint thinner, to clean the entire engine cover. Once cleaned, allowed it to dry.
Grabbed a can of plastic adhesive promoter, which can be bought at wal-mart or automotive parts store. (NOTE: Try to stay within the same brand for all your paints. Just makes things a little easier, since they are designed to work together, I do not recommend one, over another.)
Sprayed very light coats, on the well cleaned engine cover, according to directions on the can.
Figured it was far better to lay down the adhesive promoter, LIGHTLY, LIGHTLY, LIGHTLY. And allowing it plenty of time to dry, properly.
I want that STICK, to the engine cover, so my paint can stick, to it.
Once the adhesive promoter was dry. I then did the same with the Primer.
Applying light coats, according to the can itself.
Did more than a few coats of Primer, since I was going to sand this down, to try and smooth out the texture of the engine cover. If you look closely, it has a slightly bumpy surface. I wanted it smooth as a baby's bottom.
After sanding the primer, needed to re-clean the engine cover, as stated above. Then applied final coat of primer.
After that final coat of primer dried, started in on paint.
Now, some guys have gone all out, using lots of colors, some have even done fine artwork. I;m not an Artist and figured two colors was plenty. The color of my truck and good old black, everything matches black.
Masked off & painted the middle section, first.
Once dry, taped it off and painted the sides.
(NOTE: If you are planning on doing two different colors, in your middle section. Say, Gloss black and flat black, this is the time to do second color.)
Once the completed middle section was done and dry, taped it off.
Simply too my time, used good paint tape.
Letters could have been bought, on ebay , as perfect fit stickers but then it is only the top of the letter that has color. I decided to tape off the letters allowing me to get paint on the sides of the letters too.
Once everything was painted, clear coat everything.
I used four coats of paint, followed by four coats of clear.
Last edited:
gofishn
Senior Member
- Joined
- Sep 12, 2014
- Posts
- 5,082
- Reaction score
- 10,142
- Location
- Iowa
- Ram Year
- 2022 Ram 1500 5th Gen, Big Horn, 4X4, Crew Cab, 6'4" Box
- Engine
- hemi 5.7L, 345 cu in
OEM Door Cup Holders
Noticed GYSOT was selling those Door Cup Holders for $30.
http://www.ramforum.com/f21/door_cup_holders-78293/
FYI, in case he runs out, the Passenger side is Mopar part # 1LD23XXXAA - Drivers side is part # 5NN24XXXAA
Figured $30 sounded like a great deal so bought a set. Am surprised by how much the Wife and Kids like having them.
I still prefer the cup holders in the center console but, to each their own.
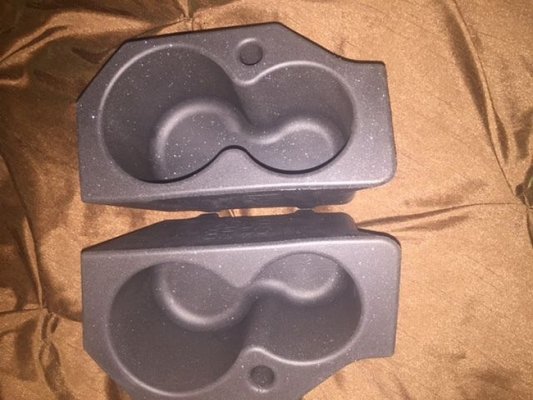
Just slip into the door openings.
Sure are handy little things.
Noticed GYSOT was selling those Door Cup Holders for $30.
http://www.ramforum.com/f21/door_cup_holders-78293/
FYI, in case he runs out, the Passenger side is Mopar part # 1LD23XXXAA - Drivers side is part # 5NN24XXXAA
Figured $30 sounded like a great deal so bought a set. Am surprised by how much the Wife and Kids like having them.
I still prefer the cup holders in the center console but, to each their own.

Just slip into the door openings.
Sure are handy little things.
gofishn
Senior Member
- Joined
- Sep 12, 2014
- Posts
- 5,082
- Reaction score
- 10,142
- Location
- Iowa
- Ram Year
- 2022 Ram 1500 5th Gen, Big Horn, 4X4, Crew Cab, 6'4" Box
- Engine
- hemi 5.7L, 345 cu in
Bilstein 5100 Shocks & Mevotech Upper Control Arms
Got Bilstein 5100 series shocks, Mevotech Upper Control Arms 7 TufTruck 1211 Springs.
Decided to play it safe and set the front shocks , at 2.1.
Seems like most who do use the 2.8 setting, add 3/4" or 1" rear spacer.
I didn;t really want to fool around that. Truck is high enough, for me. Just wanted to level it out and reduce Sag, when pulling the boat.
That, and I was worried about the front CV axle angle and the issue some have reported, at 2.8, with a wobble, while in 4X4 hi and running down the Interstate.
Now, while all Bilstein issues are extremely rare, I am very Lucky, in being Unlucky, so played it safe. Also I mostly use 4X4, on the Interstate and I did NOT want to have any vibration issues pop up.
Hence, 2.1
Front Drivers side(?) Bilstein and Mevotech UCA
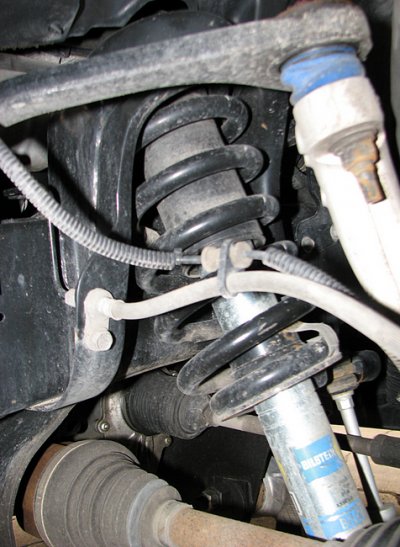
Had my Son-in-Law do the install and never really paid much attention to the ball joint. Looks kind of like it needs more grease.
Looks liek Passenger side needs some more grease too.
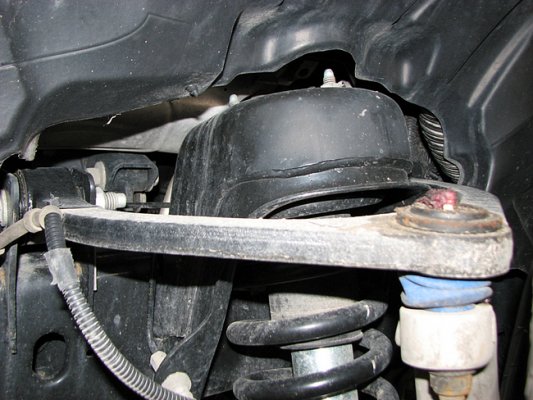
If you look close, you can see where the spring rest on the bottom of the spring mount. a lot of guys have installed these upside down and it lifted their trucks 4 inches or more. This is how it should be installed.
Also, if you look underneath that black mount. You will see the retaining ring that it rests upon. there are 5 total positions or grooves within the shock housing, from which one can select the desired height. I chose #4, or one below the highest setting.
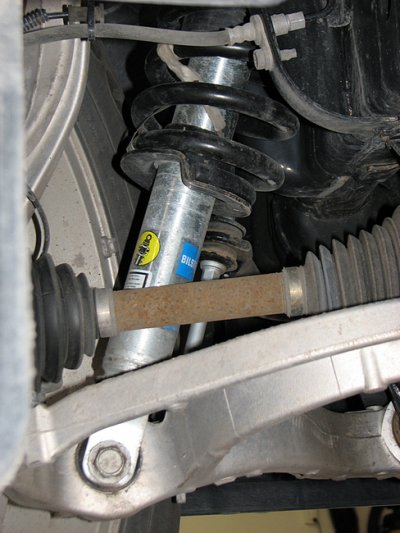
Also, if you look at teh above picture, you can see the Front CV axle Shaft has not really changed it;s angle much at all.
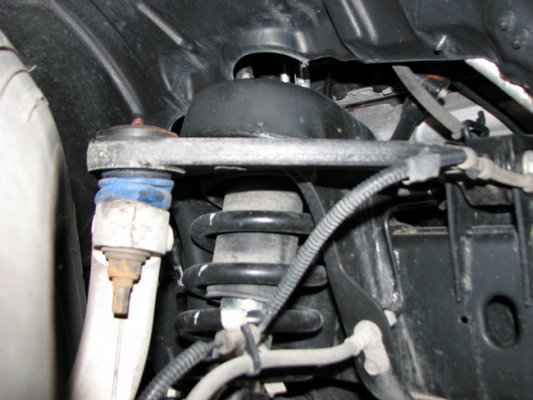
Not a very good shot of the TufTruck 1211 Springs.
I LOVE these Springs. Makes the truck feel like a truck.
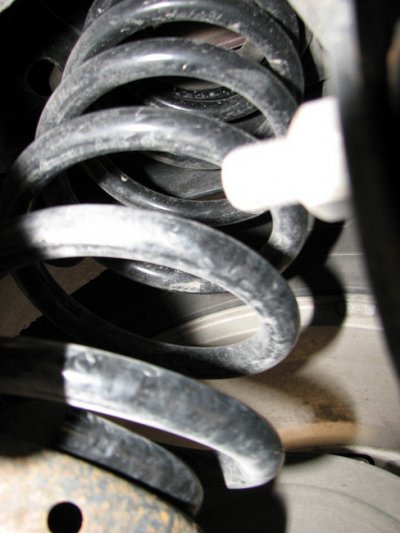
Slightly better picture. These springs are thicker than OEM. Have a couple more twists of coils, than OEM and are definitely much stronger than OEM.
they are about a 1/2 shorter than OEM but , once the trucks weight is on them, my truck actually gained in height. Of course, I have the extra weight of a Topper. Others should see no difference in height vs OEM.
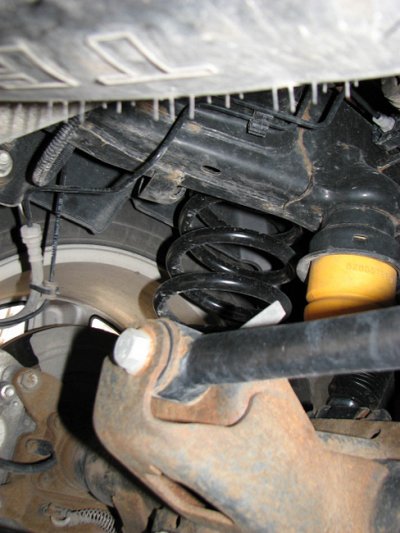
Got Bilstein 5100 series shocks, Mevotech Upper Control Arms 7 TufTruck 1211 Springs.
Decided to play it safe and set the front shocks , at 2.1.
Seems like most who do use the 2.8 setting, add 3/4" or 1" rear spacer.
I didn;t really want to fool around that. Truck is high enough, for me. Just wanted to level it out and reduce Sag, when pulling the boat.
That, and I was worried about the front CV axle angle and the issue some have reported, at 2.8, with a wobble, while in 4X4 hi and running down the Interstate.
Now, while all Bilstein issues are extremely rare, I am very Lucky, in being Unlucky, so played it safe. Also I mostly use 4X4, on the Interstate and I did NOT want to have any vibration issues pop up.
Hence, 2.1
Front Drivers side(?) Bilstein and Mevotech UCA

Had my Son-in-Law do the install and never really paid much attention to the ball joint. Looks kind of like it needs more grease.
Looks liek Passenger side needs some more grease too.

If you look close, you can see where the spring rest on the bottom of the spring mount. a lot of guys have installed these upside down and it lifted their trucks 4 inches or more. This is how it should be installed.
Also, if you look underneath that black mount. You will see the retaining ring that it rests upon. there are 5 total positions or grooves within the shock housing, from which one can select the desired height. I chose #4, or one below the highest setting.

Also, if you look at teh above picture, you can see the Front CV axle Shaft has not really changed it;s angle much at all.

Not a very good shot of the TufTruck 1211 Springs.
I LOVE these Springs. Makes the truck feel like a truck.

Slightly better picture. These springs are thicker than OEM. Have a couple more twists of coils, than OEM and are definitely much stronger than OEM.
they are about a 1/2 shorter than OEM but , once the trucks weight is on them, my truck actually gained in height. Of course, I have the extra weight of a Topper. Others should see no difference in height vs OEM.

gofishn
Senior Member
- Joined
- Sep 12, 2014
- Posts
- 5,082
- Reaction score
- 10,142
- Location
- Iowa
- Ram Year
- 2022 Ram 1500 5th Gen, Big Horn, 4X4, Crew Cab, 6'4" Box
- Engine
- hemi 5.7L, 345 cu in
Finally got around to something I have been meaning to do but never found time to get done.
3rd Brake Light Gasket Fix
Like many, I too never noticed any water coming into my truck but thought better to catch it, now, then after a floorboard full of liquid Happiness.
So off to Lowes to fetch some foam sealant.
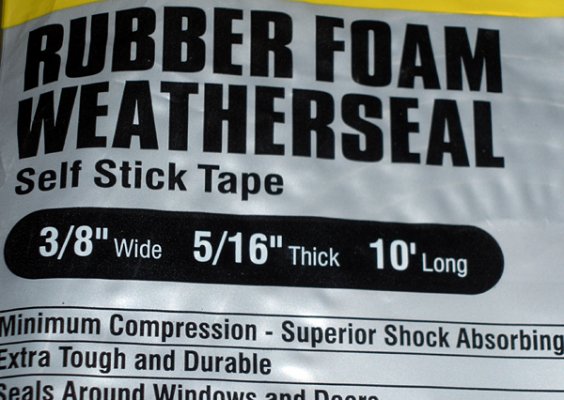
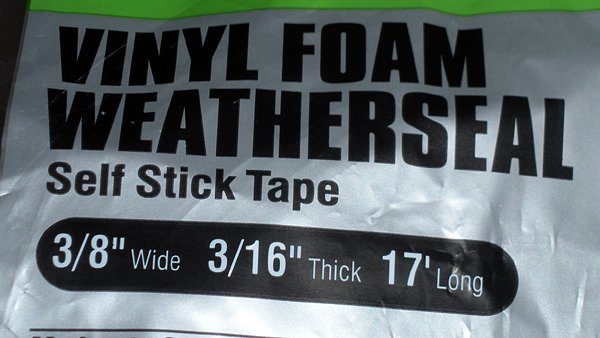
Bought this size to replace the OEM gasket.
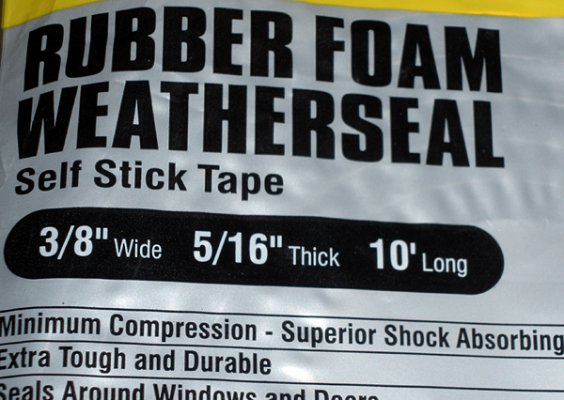
Then figured, if I am going to do it, do it ONCE!
So I grabbed a "Little Friend", to place just outside the OEM gasket placement.
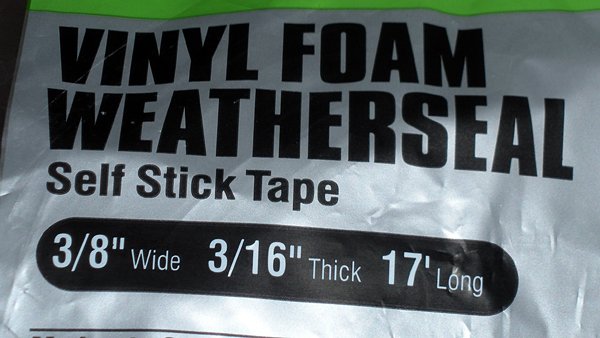
So, with everything ready to go, time to remove my 3rd brake light assembly.
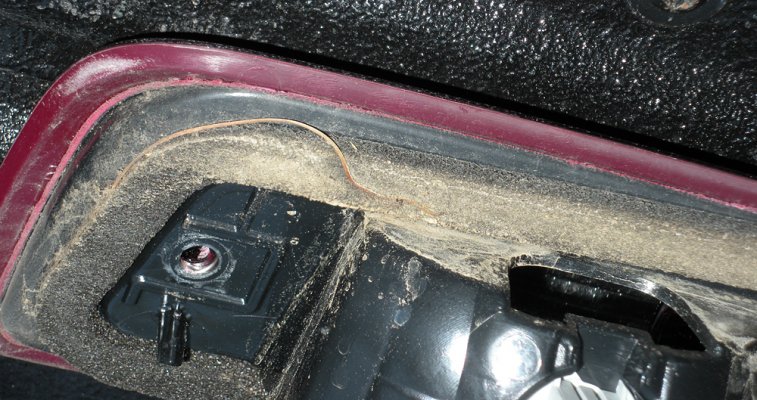
Holy Moly Batman!!
This is what greeted me!

Keep in mind, I had NO inkling that anything was wrong with my gasket.
None, Zip, Nada. This was meant as a preventive measure.
Look at all the dust and dirt, all along the top of the recess and down one side.
Turned the brake light over and inspected the back to find this . . .

Dirt and debris all along the top.
What the heck is that on the top corner?
I know that thing! Comes from my neighbors tree.
Looks like it followed the water flow, right past the gasket!
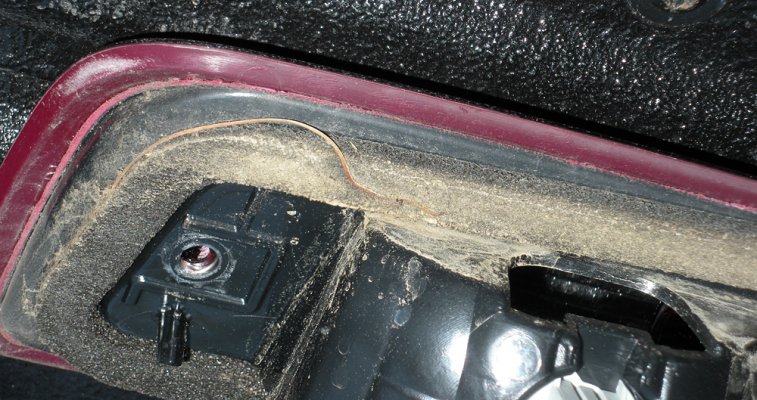
Again, I had no inkling that ANYTHING was actually wrong.
Figured I was going to catch this one, before something bad actually happened.
Oh yeah, Me so smart.....
Well, after a bunch of head shaking and some quality time with my trusty putty knife, I got the old gasket cleaned off. Used some goo be gone to clean off the gum and get everything, nice and neat, for the new gaskets.
Laid the big one down, first, pretty much along the OEM placement.
Then the smaller one, just beyond that.
Ain;t nothing going to get past my gaskets now.

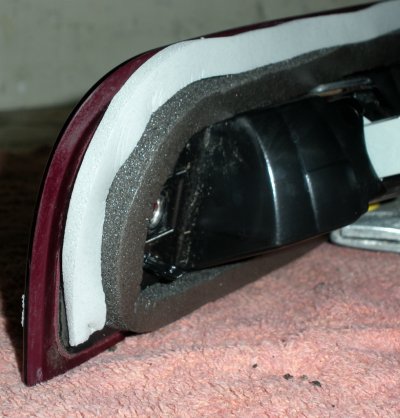
Note, when placing the first gasket, start at the bottom, in the very middle & then run along the sides. up and over the top and back to the bottom middle.
DO NOT stretch the gasket , just lay it down and press firmly.
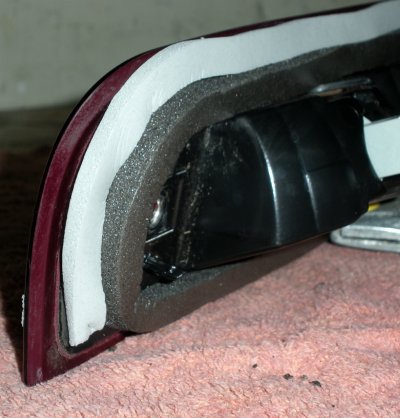
used the smaller gasket as some insurance for the first. When remounted the light assembly, pressed it firmly down, as I screwed it back in place and the light gray gasket was just barely visible, from above.
Cant believe this thing was leaking, as bead as it was, after less than two years.
Really can't believe I never noticed it, either.
SO, FYI, if you have not done this mod, just yet, I recommend you get right to it.
3rd Brake Light Gasket Fix
Like many, I too never noticed any water coming into my truck but thought better to catch it, now, then after a floorboard full of liquid Happiness.
So off to Lowes to fetch some foam sealant.
Bought this size to replace the OEM gasket.

Then figured, if I am going to do it, do it ONCE!
So I grabbed a "Little Friend", to place just outside the OEM gasket placement.

So, with everything ready to go, time to remove my 3rd brake light assembly.
Holy Moly Batman!!
This is what greeted me!

Keep in mind, I had NO inkling that anything was wrong with my gasket.
None, Zip, Nada. This was meant as a preventive measure.
Look at all the dust and dirt, all along the top of the recess and down one side.
Turned the brake light over and inspected the back to find this . . .

Dirt and debris all along the top.
What the heck is that on the top corner?
I know that thing! Comes from my neighbors tree.
Looks like it followed the water flow, right past the gasket!

Again, I had no inkling that ANYTHING was actually wrong.
Figured I was going to catch this one, before something bad actually happened.
Oh yeah, Me so smart.....
Well, after a bunch of head shaking and some quality time with my trusty putty knife, I got the old gasket cleaned off. Used some goo be gone to clean off the gum and get everything, nice and neat, for the new gaskets.
Laid the big one down, first, pretty much along the OEM placement.
Then the smaller one, just beyond that.
Ain;t nothing going to get past my gaskets now.


Note, when placing the first gasket, start at the bottom, in the very middle & then run along the sides. up and over the top and back to the bottom middle.
DO NOT stretch the gasket , just lay it down and press firmly.
used the smaller gasket as some insurance for the first. When remounted the light assembly, pressed it firmly down, as I screwed it back in place and the light gray gasket was just barely visible, from above.
Cant believe this thing was leaking, as bead as it was, after less than two years.
Really can't believe I never noticed it, either.
SO, FYI, if you have not done this mod, just yet, I recommend you get right to it.
lonestar21
Senior Member
- Joined
- Oct 20, 2014
- Posts
- 719
- Reaction score
- 174
- Location
- CA
- Ram Year
- 2019 Ram 1500 Big Horn
- Engine
- Hemi 5.7
Finally got around to something I have been meaning to do but never found time to get done.
3rd Brake Light Gasket Fix
Like many, I too never noticed any water coming into my truck but thought better to catch it, now, then after a floorboard full of liquid Happiness.
So off to Lowes to fetch some foam sealant.
Bought this size to replace the OEM gasket.
Then figured, if I am going to do it, do it ONCE!
So I grabbed a "Little Friend", to place just outside the OEM gasket placement.
So, with everything ready to go, time to remove my 3rd brake light assembly.
Holy Moly Batman!!
This is what greeted me!
Keep in mind, I had NO inkling that anything was wrong with my gasket.
None, Zip, Nada. This was meant as a preventive measure.
Look at all the dust and dirt, all along the top of the recess and down one side.
Turned the brake light over and inspected the back to find this . . .
Dirt and debris all along the top.
What the heck is that on the top corner?
I know that thing! Comes from my neighbors tree.
Looks like it followed the water flow, right past the gasket!
Again, I had no inkling that ANYTHING was actually wrong.
Figured I was going to catch this one, before something bad actually happened.
Oh yeah, Me so smart.....
Well, after a bunch of head shaking and some quality time with my trusty putty knife, I got the old gasket cleaned off. Used some goo be gone to clean off the gum and get everything, nice and neat, for the new gaskets.
Laid the big one down, first, pretty much along the OEM placement.
Then the smaller one, just beyond that.
Ain;t nothing going to get past my gaskets now.
Note, when placing the first gasket, start at the bottom, in the very middle & then run along the sides. up and over the top and back to the bottom middle.
DO NOT stretch the gasket , just lay it down and press firmly.
used the smaller gasket as some insurance for the first. When remounted the light assembly, pressed it firmly down, as I screwed it back in place and the light gray gasket was just barely visible, from above.
Cant believe this thing was leaking, as bead as it was, after less than two years.
Really can't believe I never noticed it, either.
SO, FYI, if you have not done this mod, just yet, I recommend you get right to it.
I'm just like you on this one, no issues yet but I'm still procrastinating it
Good job tho your truck looks great
Similar threads
- Replies
- 0
- Views
- 161
- Replies
- 0
- Views
- 229
- Replies
- 15
- Views
- 1K
Members online
- FJ Mike
- Black-Wolf
- Longhorn1500
- Curtis MacConnell
- KeithP
- TNcruise901
- Lsujker
- RamDiver
- Treburkulosis
- Paulnrld
- BucketGruntJL
- dyer0908
- Swims43
- Chukbacca
- PDub72
- Mx10rs
- nunyabiznes
- 06 Dodge
- RBT1
- michaelcarlson2
- MJP81
- Sheapdog
- G-Ride990
- UAQDADDY
- mikeru
- 97RedRam
- caulk04
- brendan185
- shmedley
- TRK_GANG74
- RamCares
- OHHemi
- StateOfMind
- photoguynorth
- VOwens
- Musky Mike
- Kilo
- icecoldak
- netshadoe
- maxmedic73
- Got 1
- s_wall98
- Dodge trucker
- RJR83
- Renegade17
- Douggie
- Bmags
- crackerjack1957
- Griffin
- Warlock2024
Total: 1,279 (members: 55, guests: 1,224)
Robots: 1,539
Robots: 1,539


