Rough Country 3" 2WD install instructions?

Disclaimer: Links on this page pointing to Amazon, eBay and other sites may include affiliate code. If you click them and make a purchase, we may earn a small commission.

DrInfested

Junior Member
Joined
Aug 6, 2016
Posts
13
Reaction score
8
Location
USA
Ram Year
2007
Engine
5.7
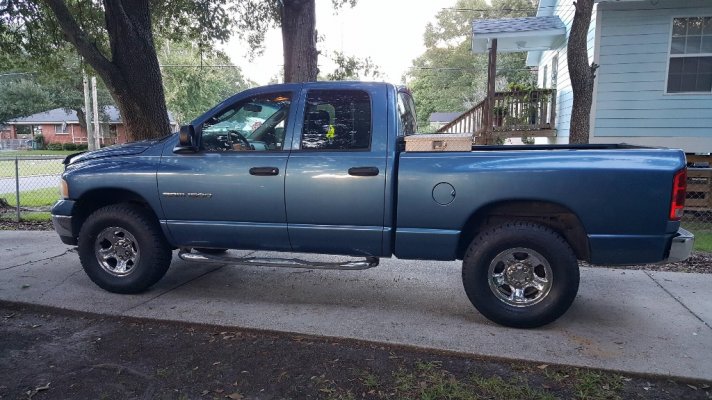
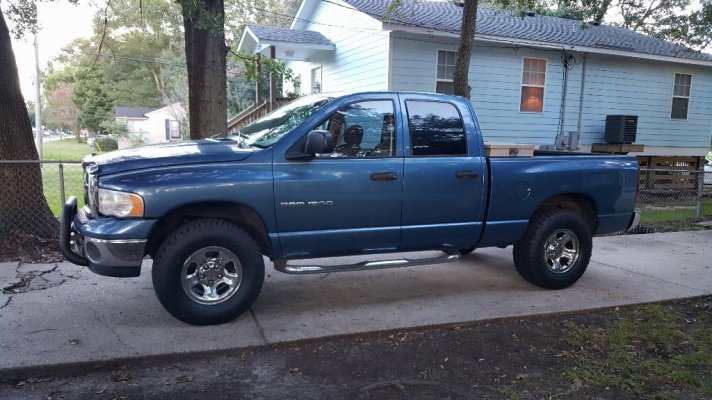
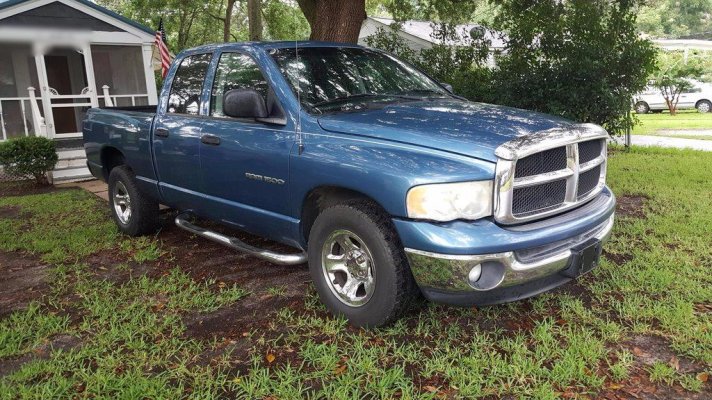
Hey all. Love Ram trucks, finally got a 2003 Dodge Ram 1500, 2WD, quad-cab, blue. It's sexy as hell. :)

I'm putting a 3" lift/level and 305 tires on it. I have the lift kit right now, and it only has a few components obviously. I was hoping the kit would include a set of instructions so I could do it right without guesswork, but it didn't.

I looked on the website and it seems like the 3" 2WD kit is the ONLY one without instructions. What do yall suggest? The nearest shop would charge $370 for install and alignment.
 

derekp

Senior Member
Joined
Mar 10, 2015
Posts
2,131
Reaction score
1,789
Location
Buda, Tx
Ram Year
2007
Engine
1990 5.9 Cummins
Is it just spacers?
 

derekp

Senior Member
Joined
Mar 10, 2015
Posts
2,131
Reaction score
1,789
Location
Buda, Tx
Ram Year
2007
Engine
1990 5.9 Cummins
Sounds pretty straight foward. Have you ever unbolted suspension before?
 

Ceri

Senior Member
Joined
Jun 2, 2016
Posts
108
Reaction score
22
Ram Year
2005
Engine
Hemi 5.7
#1 rule of suspension is to know where your energy is stored at all times. Respect the spring energy and you'll be fine.

If you look around online, I'm certain you can find another brand of either long coils or coil spacers that have instructions that should be 95% the same as any other kit. Daystar makes spacers and usually has good walkthroughs for example.

Same applies to the rear block install. If you see a picture of one installed, you should be able to figure it out, but there must be dozens of walkthroughs out there for blocking leaf springs.
 
Last edited:
OP
OP
DrInfested

DrInfested

Junior Member
Joined
Aug 6, 2016
Posts
13
Reaction score
8
Location
USA
Ram Year
2007
Engine
5.7
No I've never unbolted a suspension before. That's a great suggestion though about other product instructions. I'll look those up. Thanks!
 

Bullitt5339

Senior Member
Joined
Jul 5, 2015
Posts
920
Reaction score
514
Location
St Pauls, NC
Ram Year
2004
Engine
3.7
The blocks are really easy for the rear. Get the rear end of the truck up on jackstands as high as you can get it and place a good floor jack under the pumpkin on the rear end. Just raise the jack enough to take any slack out, you're not trying to lift the truck or compress the leaf springs, just support the rear.

Take the 8 nuts off the leaf spring u-bolts and remove the lower plates and u-bolts. Let the jack that's supporting the rear end down just enough to make room for the blocks. Align the centering pin on the blocks with the hole in the rear end. Doing both sides at the same time is usually a lot easier. Have someone raise the jack slowly while you line the centering pin on the springs up with the hole in the blocks. Once they're lined up and the jack starts to compress the spring, put the new u-bolts back on, put the lower plate back on and tighten the nuts to 110 ft lbs. Retorque the nuts after driving a couple times.
 

Bullitt5339

Senior Member
Joined
Jul 5, 2015
Posts
920
Reaction score
514
Location
St Pauls, NC
Ram Year
2004
Engine
3.7
The front springs are marginally more difficult, but not too bad. I'm going off of memory here, so if I left anything out, feel free to ask questions or someone will come in and correct me.

Put the front end on jackstands as high as you can get it. I don't want to admit how many times I've had to stop in the middle and raise the truck because I didn't give myself enough room to account for a longer and expanded spring.

Remove the wheels and then the brake caliper and tie it up out of the way. Remove the swaybar endlinks and flip the swaybar up out of the way. If you have ABS, go ahead and unhook the sensor at this time also. Place your jack under the spring pocket in the lower control arm and take the pressure off the suspension. Make sure this jack is secure, it will be retaining all the spring pressure while you disconnect everything.

There's 2 ways to proceed from here, the right way and the easy way........lol

I would check the upper control arm bushings and all the balljoints while I was in there because they are probably worn out on an 03 and it's easier to replace while you have everything apart. Because I'm normally replacing upper control arms, I will remove the spindle at this point completely by taking off the upper and lower mounting nuts and then just using a pickle fork, knock the balljoints loose. If you're not replacing them, you need to be more careful, because it is easy to destroy a balljoint while you are trying to get them to seperate.

Because you haven't taken off the caliper mounting bracket, rotor or hub assembly, the spindle is going to be heavy. Make sure that you have help because when you break the balljoints loose, it's going to likely try to drop out because the balljoint is mounted through the top. I did mine by myself, so I just put a 2nd smaller floor jack under the spindle to support the weight and didn't completely unhook the upper balljoint until I had both broken loose to keep it from falling. It's no big deal, it's just pretty heavy.

Once you have the spindle gone, you'll have a straight shot to the spring. Slowly let your jack under the control arm down which will release the tension on the spring and allow it to come out safely. This is where getting the truck up high will come in handy. You'll usually have to push down on the control arm to make enough room for the stock spring to slide out. I've found it much easier to step on the control arm and the spring will usually just fall out.

Installation is just the reverse, but because the new spring is longer, you'll have to use a lot more force to get the new spring into the pockets. I'm pretty leery of destroying the bushings by forcing the control arm so far down that I will typically loosen the control arm mounting bolts so that there's not as much pressure on them and they can spin freely. Just remember to tighten them back up when the installation is done.

The only other trick for reassembly is getting both balljoints connected while supporting the heavy spindle. Again, an extra hand comes in handy here, but I've done it by myself by supporting the spindle assembly with my legs while putting the balljoint nuts on. In fact, I'd suggest if you're working by yourself, strip the caliper mounting brackets and rotors off to lighten it up quite a bit and make it a lot more manageable.
 

Ceri

Senior Member
Joined
Jun 2, 2016
Posts
108
Reaction score
22
Ram Year
2005
Engine
Hemi 5.7
The front springs are marginally more difficult, but not too bad. I'm going off of memory here, so if I left anything out, feel free to ask questions or someone will come in and correct me.

Put the front end on jackstands as high as you can get it. I don't want to admit how many times I've had to stop in the middle and raise the truck because I didn't give myself enough room to account for a longer and expanded spring.

Remove the wheels and then the brake caliper and tie it up out of the way. Remove the swaybar endlinks and flip the swaybar up out of the way. If you have ABS, go ahead and unhook the sensor at this time also. Place your jack under the spring pocket in the lower control arm and take the pressure off the suspension. Make sure this jack is secure, it will be retaining all the spring pressure while you disconnect everything.

There's 2 ways to proceed from here, the right way and the easy way........lol

I would check the upper control arm bushings and all the balljoints while I was in there because they are probably worn out on an 03 and it's easier to replace while you have everything apart. Because I'm normally replacing upper control arms, I will remove the spindle at this point completely by taking off the upper and lower mounting nuts and then just using a pickle fork, knock the balljoints loose. If you're not replacing them, you need to be more careful, because it is easy to destroy a balljoint while you are trying to get them to seperate.

Because you haven't taken off the caliper mounting bracket, rotor or hub assembly, the spindle is going to be heavy. Make sure that you have help because when you break the balljoints loose, it's going to likely try to drop out because the balljoint is mounted through the top. I did mine by myself, so I just put a 2nd smaller floor jack under the spindle to support the weight and didn't completely unhook the upper balljoint until I had both broken loose to keep it from falling. It's no big deal, it's just pretty heavy.

Once you have the spindle gone, you'll have a straight shot to the spring. Slowly let your jack under the control arm down which will release the tension on the spring and allow it to come out safely. This is where getting the truck up high will come in handy. You'll usually have to push down on the control arm to make enough room for the stock spring to slide out. I've found it much easier to step on the control arm and the spring will usually just fall out.

Installation is just the reverse, but because the new spring is longer, you'll have to use a lot more force to get the new spring into the pockets. I'm pretty leery of destroying the bushings by forcing the control arm so far down that I will typically loosen the control arm mounting bolts so that there's not as much pressure on them and they can spin freely. Just remember to tighten them back up when the installation is done.

The only other trick for reassembly is getting both balljoints connected while supporting the heavy spindle. Again, an extra hand comes in handy here, but I've done it by myself by supporting the spindle assembly with my legs while putting the balljoint nuts on. In fact, I'd suggest if you're working by yourself, strip the caliper mounting brackets and rotors off to lighten it up quite a bit and make it a lot more manageable.

A few of small things I would add to that:

1. Take the caliper bridge off the spindle. Its two bolts per side. Not a big deal, and he's right that it can be frustrating getting the spindle reconnected.

2. When you pop the ball joints, buy a pickle fork that is physically tall. A standard size CAN work, but you may also just destroy the joint or at least the boot. Having a tall fork will help them pop easier when you get it in there good. Buy the bigger one, even if its a few dollars more. If you like working on vehicles get a sturdy pickle fork. I've been through 4 or 5 cheapies until I bought a better grade of metal. The kind with teeth make it easier, but might kill the boot. When I'm popping joints, I usually replace them regardless. They aren't that expensive and trucks chew through them.

3. A sledgehammer IS the right tool for popping ball joints. A few good smacks on the end of the pickle fork and you'll wonder why people complain about it.

4. While popping them, leave the nut with about 2 threads until it pops. That way it doesn't freefall to the ground when you finish bashing it with a hammer.

5. While you're in there, remove the lower control arm and check its frame mount bushings. These trucks wear the lowers out on a regular basis and it makes a difference to the tightness of the steering and tire lifespan.

6. You'll need an alignment when you're done. Do it within the same week, and preferrably immediate after. Driving with too much camber will wear a tire out quick. You also won't have ideal traction if it rains.

7. Check everything for torn boots or worn out rubber. Replace as necessary. If you've never had any suspension components replaced, and you're over 100k miles, I'd buy all of it and do it at the same time. You'll already have everything apart, so you might as well make sure its all tight for the next 5 years.

8. Spray all bolts and joints with PB Blaster and let it sit for 15 minutes once you get the wheel off. It will help you break loose the bolts.

9. You may need to buy taller jackstands for trucks. You can make due with wide lumber to give yourself extra height, but respect the weight of the vehicle always. It will cripple you if your leg is under it when it falls. Its not hard to do this stuff. Frustrating at times, sure, but also satisfying and less expensive. Safety first.
 
Last edited:

Bullitt5339

Senior Member
Joined
Jul 5, 2015
Posts
920
Reaction score
514
Location
St Pauls, NC
Ram Year
2004
Engine
3.7
And make sure you have deep well 18mm, 21mm and 24mm sockets and wrenches before you begin along with a breaker bar. Those and the pickle fork are the only tools I can think of that most people don't have before they do suspension work.
 

Bullitt5339

Senior Member
Joined
Jul 5, 2015
Posts
920
Reaction score
514
Location
St Pauls, NC
Ram Year
2004
Engine
3.7
When I did the front of my truck, I realized as soon as I took the spindle off that every wear part in the front end was shot, so I replaced everything except for 1 ball joint that didn't look or feel bad. Now, 6 months later, that ball joint is bad......

if I were going to do it again, I would buy the following parts and install everything at the same time. You can get deals on rockauto, carparts.com or Amazon to make the cost manageable:

Upper Control Arms - You get new bushings and upper balljoints for a minimal cost and the stockers are likely shot. Then you don't have to be careful pulling it apart, which is when the balljoints normally get damaged.

Lower Control Arms - You can get the ball joints and bushing separately for a little cheaper, but if you don't have a press at the house, you'll end up spending just as much money with a lot more aggravation. Replacing the entire lower control arm is a piece of cake, I can do both control arms in 1/2 the time it takes to replace one ball joint. The shock mounting studs on these trucks are also a little flimsy and like to rust and break during install and it's $60 for a set of 4 tiny studs on their own, so it's actually a good deal for $100 each from rockauto.

Wheel hubs - These trucks go through wheel hubs every 120k miles or so, so if you're close, go ahead and replace them while you have the spindle off. It's a lot easier than trying to do it with them still on the truck. Minimal cost and if you're lifting the truck, you're likely going with larger wheels and tires, which puts more stress on them anyway.

Tie Rods - At least do outers, since they are the first to wear out. I replaced both, but the inners require a special tool to remove.

Swaybar bushings and endlinks - Get new bushings, and if the kit doesn't address the endlinks, I'd look into some longer ones to fix the geometry, since the lift is going to put the swaybar at an unnatural angle.

I know it seems like a lot of extra crap to buy, but if you replace these things, it'll make the install go 4 times faster and give you the peace of mind that everything is new and good for many more miles. It'll also save you in the long run, because nothing is more frustrating than having to pull everything back apart to replace a part in a couple months and having to pay for another alignment.
 
OP
OP
DrInfested

DrInfested

Junior Member
Joined
Aug 6, 2016
Posts
13
Reaction score
8
Location
USA
Ram Year
2007
Engine
5.7
I'm not sure I can afford to replace all that, but I might look into a few of those components at least.

Thank you all for the instructions on this install. I think I should be able to manage it with a little elbow grease now. :)
 

Lil_Ram

Senior Member
Joined
Apr 10, 2015
Posts
1,303
Reaction score
661
Ram Year
2003
Engine
Power tech 3.7L
Just a bit of advice since I've got hat kit on there you probably won't ever get it perfect on alignment because it's to much for the stock mounting position. And you don't really need the rear blocks of you want to level it. Our trucks are 2.5" lower in the front I believe and it will settle with time.


Sent from my iPhone using Tapatalk
 
OP
OP
DrInfested

DrInfested

Junior Member
Joined
Aug 6, 2016
Posts
13
Reaction score
8
Location
USA
Ram Year
2007
Engine
5.7
Took about 6 hours but I finally managed to install the front coil springs. Thank GOD I followed advice and purchased new tie rod ends, upper control arms, and other stuff because that helped me a lot. I didn't have to worry about busting the ball joints. Complete pain in the ass job, but definitely worth it. I didn't realized how long it would take though, I had to get my wife to run to Lowe's to buy me a heavy-duty light to finish the job. LOL!

All in all, I got it done AND I learned a lot about my truck in the process. Thanks for all the help!
 

Lil_Ram

Senior Member
Joined
Apr 10, 2015
Posts
1,303
Reaction score
661
Ram Year
2003
Engine
Power tech 3.7L
Post up some pics or it didn't happen


Sent from my iPhone using Tapatalk
 
OP
OP
DrInfested

DrInfested

Junior Member
Joined
Aug 6, 2016
Posts
13
Reaction score
8
Location
USA
Ram Year
2007
Engine
5.7
Will do! It's in the shop now getting bigger tires installed and an alignment. I will post some pictures when it's out. I'm pretty happy with the results.
 
OP
OP
DrInfested

DrInfested

Junior Member
Joined
Aug 6, 2016
Posts
13
Reaction score
8
Location
USA
Ram Year
2007
Engine
5.7
BEFORE, stock 2WD with 265/70 tires

tZYoiiV.jpg

EsgSNww.jpg

AFTER. 3" Rough Country, 305/70 Nitto Terras

cvPS5dv.jpg
 
Top