How To Install Amp Research Power Steps

Disclaimer: Links on this page pointing to Amazon, eBay and other sites may include affiliate code. If you click them and make a purchase, we may earn a small commission.

RamblinRod

Senior Member
Joined
Jan 2, 2016
Posts
127
Reaction score
42
Location
Crawford, CO
Ram Year
2016 Ram 2500 CC LB 4x4
Engine
6.7 Cummins
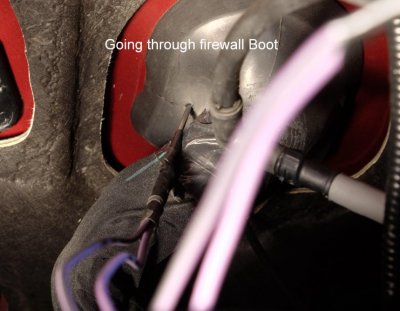
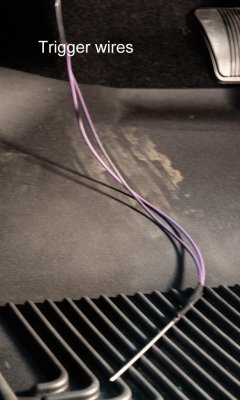
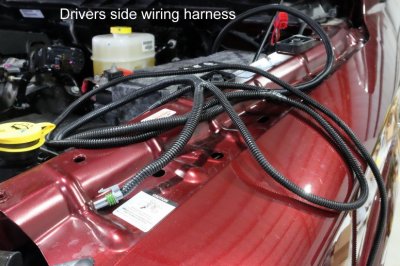
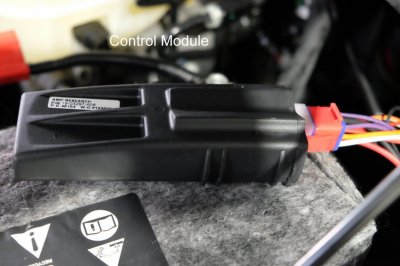
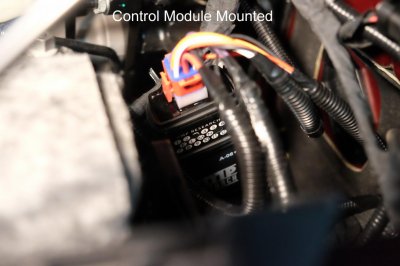
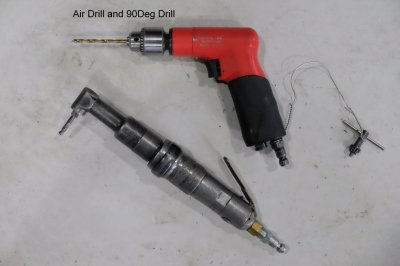
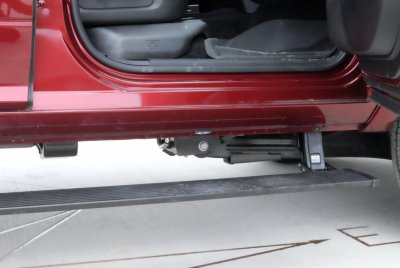
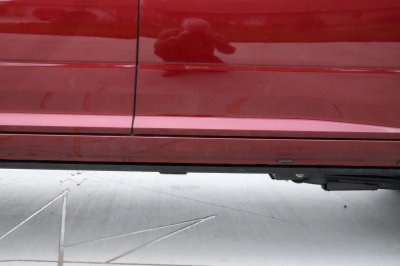
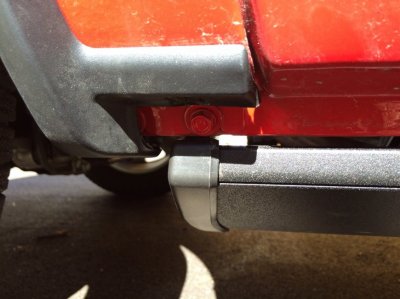
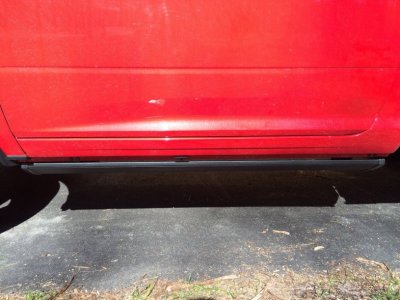
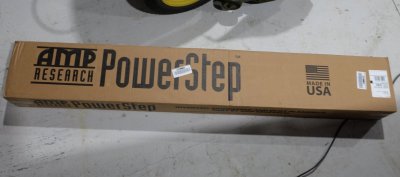
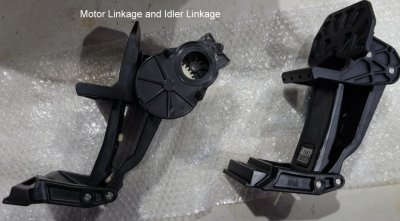
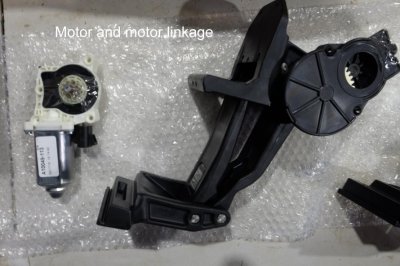
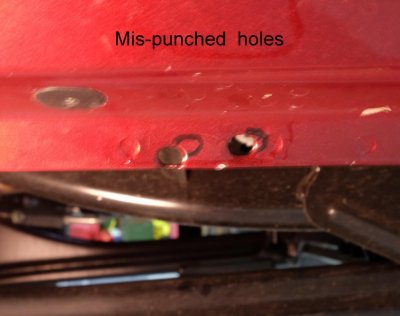
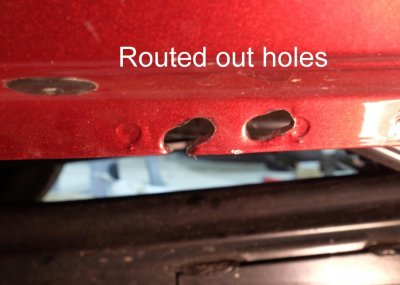
Just got these installed. Thought I would post some tips/info for others considering them. If you have a 2013 to 2016 without the new drivers side brace you want part #76138-A. That is the plug and play version. If you have the rear air suspension like I do, you need a tank relocate kit part #10-79102-01A. If you have a Mega Cab, the tank and compressor get relocated and its a different part #. The tank relocate is no big deal, two brackets that move the tank rearward 2" and up 1 1/2". Nothing gets disconnected. I paid $30 for it on Amazon. You can read the directions online. I will just cover some things I ran into. The linkage arms are attached with two bolts on mounting points on the inside of the rocker panel, two screws through punched holes in the pinch weld and two pop rivets at the top of the brackets. The directions say you may have to file some on the punched holes to line up with the screw holes in the linkage brackets. That was a major understatement. 5 of the 8 holes had to be enlarged. One set was badly mis-punched and I had to more than double the size of the holes. I was glad to have a die grinder with a burr to use. You have to run the two trigger wires through the firewall to connect to the OBD port. Directions said to cut a small hole in the rubber boot, lube up the wires and slide them through the other end of the boot into the cab. On my truck the inner boot where the wires exited was so wrapped up with tape I didn't want to mess with it. I put a needle point on a tig electrode, taped the wires to it and pushed it through both rubber boots. I cut Xs where it entered and exited to allow the wires to pass through. Worked like a charm. One of the last steps in the directions is measure and drill 9/16" holes through the pinch welds for the LED light wires. This can be one of the first things you do, put some primer on them and work on other things while it is drying. The control module mounts near the battery, the power lead is connected to the battery and the ground to the frame. There was a stud with a ground wire near the battery that the module ground wire fit on. I bought a 6mm 1.0 thread nut to secure it. One problem I read several times was people having their steps hang up on the pinch weld, especially the end caps, even have to disconnect the motors to get them back down. Some people have even ground some off the bottom edge of the pinch welds or bent them over with a hammer to get clearance. The directions have you mount the motors, then mount the steps and activate them. If they are hanging up they tell you to jump up and down on them to set the linages . I decided to mount the steps before mounting the motors. I did this after I had routed all the wiring harness, and had hooked up the LED lights. Without the motors installed I was able to move the steps and check the clearance. Initially both of mine were catching on the end caps but nowhere else. I jumped up and down four or five times at each linkage location and checked again. The steps were now 1/4 to 3/8" lower and totally clearing everything. Then I mounted the motors. I think that sequence makes much more sense. The last step is drilling 3/16" holes and installing pop rivets in the top of the idler arm brackets. Not even sure why they are needed. The idler linkages were not a big problem, I was able to get at them with a small air drill, but the motor linkages each had a hole that required a 90 deg drill to get too. On the passenger side I could not install the pop rivets on the motor linkage until I unbolted the air tank and lowered it, so I could get the rivet squeezer in above it. Instructions said 3-5 hr installation, I took about 12 hours to get it done but saved over $600 the dealer would have charged. Total cost was $1220 with the relocate kit on Amazon.
 

Attachments

  • PS1.jpg
    PS1.jpg
    93.7 KB · Views: 437
  • PS2_1.jpg
    PS2_1.jpg
    99.3 KB · Views: 349
  • PS20.jpg
    PS20.jpg
    94 KB · Views: 337
  • PS4.jpg
    PS4.jpg
    88.3 KB · Views: 341
  • PS5.jpg
    PS5.jpg
    87.4 KB · Views: 303
Last edited:
OP
OP
R

RamblinRod

Senior Member
Joined
Jan 2, 2016
Posts
127
Reaction score
42
Location
Crawford, CO
Ram Year
2016 Ram 2500 CC LB 4x4
Engine
6.7 Cummins
Even more pictures, inclluding finished product. The floor of my cab is 28" off the ground. The top of the extended step is 13" off the ground. When retracted you only see the 3/4" black edge of the step. You can get a stainless strip to cover it, that would make it much more noticeable. I looked long and hard at all the steps/running boards available and just wasn't happy with any. I think the truck has a nice clean look without visible steps.
 

Attachments

  • PS22.jpg
    PS22.jpg
    93.3 KB · Views: 640
  • PS13.jpg
    PS13.jpg
    86.5 KB · Views: 313
  • PS14.jpg
    PS14.jpg
    96.7 KB · Views: 418
  • PS16.jpg
    PS16.jpg
    91.1 KB · Views: 337
  • PS15.jpg
    PS15.jpg
    96.8 KB · Views: 450
Last edited:

matt.davidson09

Senior Member
Joined
Jul 31, 2014
Posts
343
Reaction score
148
Location
Texas
Ram Year
2013 RAM 2500 Laramie Mega Cab
Engine
6.7L Cummins
Great write up! I need (want) these steps but the price is $$$. Waiting for the right deal to pop up. Thanks for providing this!


Sent from my iPhone using Tapatalk
 

Ricks Ram

Senior Member
Joined
May 1, 2015
Posts
4,411
Reaction score
3,388
Ram Year
2014
Engine
Hemi 5.7
Yea they are pricey. I installed the plug and play version on my 14 Quad Cab 4X4 and they work great. I didn't have any issues with my holes being offset wrong and I don't have air supension so my install went pretty smooth. You do need to cut 7" off the end of each board for the Quad Cab install.
 

HemiPower36

Senior Member
Joined
May 16, 2014
Posts
1,424
Reaction score
839
Location
CA
Ram Year
2014 Ram 1500 Laramie 4x4 3.92 8-speed
Engine
hemi 5.7
Nice $1220. Power of DIY. I paid $1500 for parts and labor. These steps are awesome. Had them for about two years now.
 

InvictusII

Member
Joined
Nov 10, 2015
Posts
43
Reaction score
7
Ram Year
2015
Engine
6.4L
Thanks for the great write up. I'm going to order mine this week to get the free bed step.
 

ColdCase

Senior Member
Joined
Mar 11, 2016
Posts
672
Reaction score
210
Ram Year
2016
Engine
5.7
I had these steps professionally installed as recommended by AMP, $1470. A couple notes for the DIYer.

The installer noted that the usual motor stops did not come in the new 7613901 kit for 2016. You may have to fabricate stops if needed. He used the stops to keep the steps from folding too far under and rubbing the pinch weld. (AMP indicted that when installed and adjusted properly, additional stops are not needed. The tech says he doesn't want to take the chance.)

The instructions now identifies the harness bracket and how to install it.

The crash bracket accommodation looks like they put a notch/rabbit in the motor brackets to provides clearance for the crash plate. If you don't have the bracket, a spacer is provided to fill the gap. Otherwise the kit is identical to the 76138-01A part. (The spacers were missing from my kit)

The little fender protector (mini mud guard) needed a notch for clearance, especially the driver's side. (The installer cut the boards to ~55 inches to provide reg cab length, the specified length is 50 inches, ~5 inches shorter has less chance of interference).

They lost the silencer panel under the instrument panel drivers side, so if you have one, double check its there before leaving the shop. I was just going to go out an buy a replacement, but I can't seem to find the part on-line.

I noticed they did not install the pop rivets called for in the last couple of steps. AMP says the motor bracket pop rivets are necessary for long term stability. The installer says the aluminum pop rivets provided by AMP corrode and fall apart in 3-4 New England winters, so they don't install them. With two bolts through the body and two through the pinch weld, the RAM is more solid than other makes I guess. That being said, he also did not screw in one of the bolts through the pinch weld, the hole didn't line up
 

Attachments

  • IMG_5029 edge gallery.jpg
    IMG_5029 edge gallery.jpg
    93.5 KB · Views: 220
  • IMG_5030 edge gallery.jpg
    IMG_5030 edge gallery.jpg
    97.7 KB · Views: 225
Last edited:

ivey_usmc

Senior Member
Military
Joined
Sep 12, 2013
Posts
409
Reaction score
275
Location
Austin ,TX
Ram Year
2017
Engine
5.7 hemi
good write up. Im picking mine up today and will install them soon.
 

ocwill1

Senior Member
Joined
Feb 23, 2016
Posts
295
Reaction score
129
Location
Severn, MD
Ram Year
2023
Engine
5.7 eTorque
I installed mine on a 16 2500 and did not use the upper pop rivets either. One thing they do not stress enough is the bouncing up and down on them at the bracket points. I had to do a lot before they did not rub. Install took about 3 hours for me, but I had some experience since I put them on my F250 before I got my Ram...
 

ivey_usmc

Senior Member
Military
Joined
Sep 12, 2013
Posts
409
Reaction score
275
Location
Austin ,TX
Ram Year
2017
Engine
5.7 hemi
I installed mine on a 16 2500 and did not use the upper pop rivets either. One thing they do not stress enough is the bouncing up and down on them at the bracket points. I had to do a lot before they did not rub. Install took about 3 hours for me, but I had some experience since I put them on my F250 before I got my Ram...

did you wire the command wires under the dash or the fuse box?
 

hunter99

Senior Member
Joined
Jan 2, 2013
Posts
284
Reaction score
35
Ram Year
2018
Engine
5.7
I had these steps professionally installed as recommended by AMP, $1470. A couple notes for the DIYer.

The installer noted that the usual motor stops did not come in the new 7613901 kit for 2016. You may have to fabricate stops if needed. He used the stops to keep the steps from folding too far under and rubbing the pinch weld. (AMP indicted that when installed and adjusted properly, additional stops are not needed. The tech says he doesn't want to take the chance.)

The instructions now identifies the harness bracket and how to install it.

The crash bracket accommodation looks like they put a notch/rabbit in the motor brackets to provides clearance for the crash plate. If you don't have the bracket, a spacer is provided to fill the gap. Otherwise the kit is identical to the 76138-01A part. (The spacers were missing from my kit)

The little fender protector (mini mud guard) needed a notch for clearance, especially the driver's side. (The installer cut the boards to ~55 inches to provide reg cab length, the specified length is 50 inches, ~5 inches shorter has less chance of interference).

They lost the silencer panel under the instrument panel drivers side, so if you have one, double check its there before leaving the shop. I was just going to go out an buy a replacement, but I can't seem to find the part on-line.

I noticed they did not install the pop rivets called for in the last couple of steps. AMP says the motor bracket pop rivets are necessary for long term stability. The installer says the aluminum pop rivets provided by AMP corrode and fall apart in 3-4 New England winters, so they don't install them. With two bolts through the body and two through the pinch weld, the RAM is more solid than other makes I guess. That being said, he also did not screw in one of the bolts through the pinch weld, the hole didn't line up

ColdCase, would you mind providing more info on your install. I have a Reg Cab as well and you are the first person I have seen that installed the steps. If you any other pictures that would be great too.

My truck is just a 2wd and while I am not height challenged, I still have to pull myself up. Not incapable of getting in and out but these trucks do sit high and it makes it easier for myself and any passengers to get in a little more gracefully.
 

Dirty from upstate NY

Senior Member
Joined
Nov 26, 2016
Posts
104
Reaction score
144
Location
Rochester, NY
Ram Year
2016
Engine
Hemi 5.7L
My install on the 1500 QC went great until the boards didn't clear. I did everything possible, minus grinding/hammering on my pintch welds. I refuse to do so, as this kit should fit with enough clearance without heavy modifications. My pintch weld holes were perfectly punched. About 4mm from the bottoms all around. I thought I had it easy and shouldn't have any issues. By the time I mounted the boards and checked the clearance.....it was way beyond even clearing. I bounced on the boards at the linkages over and over again. Even had a neighbor come over and we BOTH bounce in these things. Did not make any difference. 10 hours total of installing and trying to make these work. The disappointment in how I'd need to cut up or mutilate either the truck or the amp research kit made me sick. So I uninstalled EVERYTHING and put my oem full length boards back on. Now I'm sitting here with the boards cut to length and unable to return this kit. I did months of searching and researching before I pulled the trigger. My truck has laser straight pintch welds and all holes lined up without any modifications, I thought I got lucky! I guess not. What to do now?
 

hunter99

Senior Member
Joined
Jan 2, 2013
Posts
284
Reaction score
35
Ram Year
2018
Engine
5.7
My install on the 1500 QC went great until the boards didn't clear. I did everything possible, minus grinding/hammering on my pintch welds. I refuse to do so, as this kit should fit with enough clearance without heavy modifications. My pintch weld holes were perfectly punched. About 4mm from the bottoms all around. I thought I had it easy and shouldn't have any issues. By the time I mounted the boards and checked the clearance.....it was way beyond even clearing. I bounced on the boards at the linkages over and over again. Even had a neighbor come over and we BOTH bounce in these things. Did not make any difference. 10 hours total of installing and trying to make these work. The disappointment in how I'd need to cut up or mutilate either the truck or the amp research kit made me sick. So I uninstalled EVERYTHING and put my oem full length boards back on. Now I'm sitting here with the boards cut to length and unable to return this kit. I did months of searching and researching before I pulled the trigger. My truck has laser straight pintch welds and all holes lined up without any modifications, I thought I got lucky! I guess not. What to do now?

Fully understand the frustration. I have been in that position before and was just pissed. I have found that if I wait a few days, take my time, and walk through it I usually can come up with a solution. Have you tried to contact AMP. I would be surprised if they have not seen this issue themselves and may have a solution.
 

Dirty from upstate NY

Senior Member
Joined
Nov 26, 2016
Posts
104
Reaction score
144
Location
Rochester, NY
Ram Year
2016
Engine
Hemi 5.7L
Fully understand the frustration. I have been in that position before and was just pissed. I have found that if I wait a few days, take my time, and walk through it I usually can come up with a solution. Have you tried to contact AMP. I would be surprised if they have not seen this issue themselves and may have a solution.

Given the overwhelming amount of people that I've seen on multiple sites, I can assume that the answers from Amp would be the same as the ones that have come before me. I was planning on tackling this again, once we get a few straight days of dry weather. I know I can get these on, but most likely will need to be creative and do some grinding as well. I've purchased some thick washers to push the pinch weld mounting location back. Would gain a little more clearance and align the brackets more on a 90 degree angle. Besides that, I'm prepared to grind away! But I will give it another shot with the "jumping on the boards at the linkage locations" again and go from there. Thank you for the response, it's much appreciated!

PS,
I'm also going to document this install with videos and photos. So there will be some sort of reference visable online for everyone else who has been put in this position!
 

ivey_usmc

Senior Member
Military
Joined
Sep 12, 2013
Posts
409
Reaction score
275
Location
Austin ,TX
Ram Year
2017
Engine
5.7 hemi
I jumped on the boards 5 times on each and never had a problem.
 

Dirty from upstate NY

Senior Member
Joined
Nov 26, 2016
Posts
104
Reaction score
144
Location
Rochester, NY
Ram Year
2016
Engine
Hemi 5.7L
I jumped on the boards 5 times on each and never had a problem.

I did also, with a lot of weight on them. When you say"jumped", like really jumped or just bounced? Maybe Myself and my neighbor were being too gentle with these things? Just trying to get other peoples experiences and see what I can try different! Thanks for the info!
 

Dirty from upstate NY

Senior Member
Joined
Nov 26, 2016
Posts
104
Reaction score
144
Location
Rochester, NY
Ram Year
2016
Engine
Hemi 5.7L
Well, round two was a friggin success! Didn't have to grind, pound or mutilate the pintch welds at all. Just had to jump on these things..... like JUMP on these things. Clearance was perfect and the remaining portion of the install went as smooth as the first time around. Thank you everyone for the tips and I greatly appreciate this forum. All of you guys really make a difference in helping people like myself, get though all the sh*t that comes my way. Anyways, LOVE these steps!!!! But for us guys that have that crash bracket or vibration bracket on the drivers side, the white housing on the drive motor needs to be grooved out. When I tried mounting the drivers side motor, I couldn't get the holes lined up. Inspected the motor to find the area in which it was rubbing that bracket. So I took a box knife and V grooved that portion. Went back under to install it again and fit perfectly.
 

CROD

Junior Member
Joined
Jun 28, 2017
Posts
19
Reaction score
6
Ram Year
2015
Engine
Hemi 5.7L
Hello all. New to the forum. I have a late model 2015 1500 and I installed the 76139-01A a few weeks ago. Couldn't pass them up for the price I found them for. No crash bracket, but the holes were there for it. At first I was worried I needed the 76138 but if your truck was manufactured after June or July of 2015 and has the threaded holes for the crash bracket it will work. Initially I had issues with the pinch weld and ended up grinding it up until the steps would deploy. All seemed to be well until I noticed how aggressively the drivers side was retracting from an audible standpoint and feeling it as well. The passenger side is perfect and quiet other than the motor itself. The driver side step is making contact with the bottom of the gear housing on the idler. Somehow the foam wedges or stops are not stout enough to keep it from closing too far. I swapped motors from one side to another to see if maybe that was the issue but it didn't help. Just wanted to see if anyone else is having that issue and maybe knows a fix. Thx for any and all help

CROD
 
Top