

You are using an out of date browser. It may not display this or other websites correctly.
You should upgrade or use an alternative browser.
You should upgrade or use an alternative browser.
Turn Signal Camera Install
- Thread starter mcheath
- Start date
Disclaimer: Links on this page pointing to Amazon, eBay and other sites may include affiliate code. If you click them and make a purchase, we may earn a small commission.
very nice install! Could you link the cameras you bought? I'm planning on doing the same mod, I bought the same lock pick and 3 of these cameras
http://www.amazon.com/gp/product/B0081GZDQQ/ref=oh_aui_detailpage_o00_s00?ie=UTF8&psc=1
but I don't think they're going to work because of the way they mount. The ones you have look much better and the swiveling in the housing in a major plus. I may try to make one of the ones I have work for the front though as I'd like to have the marker lines on the front cam for parking")
http://www.amazon.com/gp/product/B0081GZDQQ/ref=oh_aui_detailpage_o00_s00?ie=UTF8&psc=1
but I don't think they're going to work because of the way they mount. The ones you have look much better and the swiveling in the housing in a major plus. I may try to make one of the ones I have work for the front though as I'd like to have the marker lines on the front cam for parking
DavidRam
Senior Member
- Joined
- Feb 19, 2014
- Posts
- 9,094
- Reaction score
- 3,920
- Location
- SoCal - Redondo Beach
- Ram Year
- 2012 RCSB
- Engine
- Hemi 5.7
Wow, awesome write-up and very cool mod! Thanks for posting!
EagleChief
Senior Member
- Joined
- Jan 6, 2015
- Posts
- 1,884
- Reaction score
- 887
- Location
- Oklahoma
- Ram Year
- 2014 Big Horn
- Engine
- 5.7 Hemi
Very interesting! That takes some know how and ingenuity to come up with that idea and make it work. I can see those being useful in a high traffic/congested area.
mcheath
Member
Thanks for the comments ya'll.
Here's the link to the camera's I bought:
CCD 360 Car Front View Camera Parking Kit HD Waterproof Cam Without Mirror Image | eBay
I decided that I wanted to do this mod when we were driving to dinner a few months ago in a friends new new Accord, and when he hit the turn signal a blind spot cam was displayed on the nav screen. Dang, that's cool and useful. So I thought I'd see if I could figure out how to do it on my new Ram.
Just took a trip to the coast and back, a few hundred miles, and the blind spot cams are great! They catch vehicles right in that sweet spot where they aren't in the mirrors and are hard to see if you don't really turn your head and look.
Front cam got some bugs splattered on it during the trip.
I like the V2 air unit, it simply works like it's supposed to. I do wish it would shut off the front cam after sitting at a stop light for a moment and return to the radio. I'm going to write an email to the company and see if they have any fix for that, they've been real responsive about other questions I've had.
And after doing this install I can't see any reason that Ram does not offer this option from the factory. For them it'd be cheaper than dirt, and a super easy install. If they really wanted to scoop the other guys they could make it standard on all trucks, rear view cam and blind spot cams.
darthdzl
Senior Member
- Joined
- Oct 27, 2014
- Posts
- 828
- Reaction score
- 253
- Location
- Phoenix, AZ
- Ram Year
- 2017 Tradesman RCSB
- Engine
- V6
I wonder how hard it would be to wire up all 4 cameras and make a DIY "dashcam" recorder with all 4 views at once.
cptwing
Senior Member
- Joined
- Aug 14, 2014
- Posts
- 1,446
- Reaction score
- 494
- Location
- The Soviet State of Connecticut
- Ram Year
- 2014 3500 ST DRW REG CAB
- Engine
- 6.4l Hemi
Very nice
jadocs
Senior Member
- Joined
- Mar 23, 2014
- Posts
- 689
- Reaction score
- 140
- Ram Year
- 2014
- Engine
- 6.7
I have a 8.4AN:
Is there a lockpic for this radio? and is there a way to enable the bed cam and the reverse cam to come on when either turn signal is activated? I think that would be all I need because the bed cam covers the blind spots pretty well. The reverse cam would just be a bonus.
Is there a lockpic for this radio? and is there a way to enable the bed cam and the reverse cam to come on when either turn signal is activated? I think that would be all I need because the bed cam covers the blind spots pretty well. The reverse cam would just be a bonus.
mcheath
Member
This Lockpick is supposed to work with the 8.4AN. It will allow you to input navigation info while you drive.
As for hooking it up with the cargo cam to activate with the turn signals, hmm, it probably could be jury rigged to do that.
Probably if you plugged the cargo cam feed into a splitter so that it could be input into the turn signal jacks on the Lockpick router it would work. That's a guess though.
As for hooking it up with the cargo cam to activate with the turn signals, hmm, it probably could be jury rigged to do that.
Probably if you plugged the cargo cam feed into a splitter so that it could be input into the turn signal jacks on the Lockpick router it would work. That's a guess though.
jadocs
Senior Member
- Joined
- Mar 23, 2014
- Posts
- 689
- Reaction score
- 140
- Ram Year
- 2014
- Engine
- 6.7
Thanks buddy
cptwing
Senior Member
- Joined
- Aug 14, 2014
- Posts
- 1,446
- Reaction score
- 494
- Location
- The Soviet State of Connecticut
- Ram Year
- 2014 3500 ST DRW REG CAB
- Engine
- 6.4l Hemi
Did you ever consider adding the OEM chsmsl cam, I have both the tailgate and cargo cam along with the front cam I have been thinking about adding the side cams as well. My only issue is I have the rotating tow mirros. Adding the cams to the bottom of the mirror she'll would be an issue if I wanted to rotate them. I'm curious to know how seamless the turn signals cam work. I am finding controlling the lock pick air is sometimes glitchy. Though I have not tried the remote yet still fiddling with it a bit.
Anyway I see you are using the RA1 / RA2 radio bezel l am trying to sell my OEM autoparts bezel for your 8.4 will make it look like it came that way from the factory. Pics in the for sale section
Anyway I see you are using the RA1 / RA2 radio bezel l am trying to sell my OEM autoparts bezel for your 8.4 will make it look like it came that way from the factory. Pics in the for sale section
Last edited:
- Joined
- Jan 8, 2015
- Posts
- 9,073
- Reaction score
- 4,760
- Location
- St. Louis
- Ram Year
- 2014
- Engine
- 3.6 Pentastar
Great write-up....FYI, there appears to be the same camera on amazon with free prime shippeing for $17.99.
http://www.amazon.com/Buyee-Reversi...qid=1429537579&sr=8-5&keywords=car+360+camera
I may be doing this addition now that I've seen your write-up.
Question for the OP: I used one set of power wires (ACC,Constant,Ground) to power my Blackvue Power Magic Pro for my dashcam DVR (front/rear). Without opening up my dash again, I'm trying to remember if the wiring of the lockpick Air v2 has seperate plugs for the turn signal and front cameras or if you have to wire them into the supplied harness. Can you tell me how yours plugged into the lockpick? Did I miss it in the write-up?
mcheath
Member
Did you ever consider adding the OEM chsmsl cam.....
Anyway I see you are using the RA1 / RA2 radio bezel l am trying to sell my OEM autoparts bezel for your 8.4 will make it look like it came that way from the factory. Pics in the for sale section
Thanks for the heads up on the parts. I think I'm going to go with another one of the cameras I used for this mod as my cargo cam, installing it into my third brake light.
I like what you guys have come up with for adapting the bezel for the higher trim level trucks to use with our upgraded RA3/4 head units and am planning to do that.
Great write-up....FYI, there appears to be the same camera on amazon with free prime shippeing for $17.99.
Almost. This one has permanent guide lines whereas the ones I used don't have them at all. It also has a shorter wire coming out of the camera to the connector for the AV input wire. The ones I used have a very long wire from the camera so that I had the ability to snake the cord all the way into the dash before having to plug in the AV connector section.
I'm trying to remember if the wiring of the lockpick Air v2 has seperate plugs for the turn signal and front cameras or if you have to wire them into the supplied harness. Can you tell me how yours plugged into the lockpick? Did I miss it in the write-up?
There is a harness supplied with wires for cameras so you can wire everything, even the grounds, directly into the Lockpick. I've attached a pic with an arrow showing the harness plugged into the Lockpick unit. Also, there were not enough ground or + feeds from the harness so I had to piggyback using ordinary wire connectors. I've circled a couple of those. So far it all works fine.
I'm curious to know how seamless the turn signals cam work. I am finding controlling the lock pick air is sometimes glitchy. Though I have not tried the remote yet still fiddling with it a bit.
The cameras activate within 2 seconds when you hit the turn signals. The backup camera also seems to be 2 seconds or less from shifting to reverse. I mainly use the remote to control the unit, and they had to send me a second remote as my first one was not working right. Controlling the Lockpick through the steering wheel controls seems inconsistent as well, but my remote always works.
Attachments

mcheath
Member
I wonder how hard it would be to wire up all 4 cameras and make a DIY "dashcam" recorder with all 4 views at once.
I don't know, but it sure could be useful for catching who's messing with the truck eh?
saintsreturn
Senior Member
- Joined
- Mar 27, 2014
- Posts
- 1,357
- Reaction score
- 259
- Location
- Home in St. Pete, FL
- Ram Year
- 2015 Longhorn
- Engine
- EcoDiesel
Love the write up. Great job!
Sent from my iPhone using Tapatalk
Sent from my iPhone using Tapatalk
- Joined
- May 9, 2015
- Posts
- 168
- Reaction score
- 21
- Location
- Las Vegas
- Ram Year
- 2014 Sport
- Engine
- Hemi 5.7
ok, I got the camera, I got all the cables, I am ready and then I see it- my mirrors are painted! agghhhhh, now what?> can even risk drilling hole in the bottom without the plan cracking and chipping everywhere?
- Joined
- May 9, 2015
- Posts
- 168
- Reaction score
- 21
- Location
- Las Vegas
- Ram Year
- 2014 Sport
- Engine
- Hemi 5.7
one more question- I am putting in all new door speakers at the same time, so the panels will be off. I am freaked the hell out about popping that mirror off. Can I drill the hole from below and snake the wire into the truck you think? from that triangle piece where the power from the mirrors goes thru?
- Joined
- Jan 8, 2015
- Posts
- 9,073
- Reaction score
- 4,760
- Location
- St. Louis
- Ram Year
- 2014
- Engine
- 3.6 Pentastar
You should be fine drilling into the paint. Keep the drilling moving fast and apply steady , gentle pressure to avoid cracking. I did it on my bumper to route the wires into my license plate and the paint was not cracking. I've only noticed the paint cracking on metal factory holes.one more question- I am putting in all new door speakers at the same time, so the panels will be off. I am freaked the hell out about popping that mirror off. Can I drill the hole from below and snake the wire into the truck you think? from that triangle piece where the power from the mirrors goes thru?
I found it easiest to remove the mirror entirely (the whole mirror assembly) but before you do, take the mirror itself off by spraying the two clips with WD40. Do not skip this step, if you do the mirror will not come out (alone anyway). It's easier to take off while it is still attached to the truck so you don't need an extra set of hands.
On my 2014 their is a foam backing/packing (waterproofing materials) on the mirror where the wires run that made it impossible to run the cables while the mirror is attached.
Finally, there are grommets in the door frame cab side that make routing the wires much easier then try to get the accordion boot off. On the door side, run the cables under the weather stripping and under the flap of the accordion boot to keep it pretty, protected and professional looking.
Sent from my HTC One using Tapatalk
mcheath
Member
Thanks to SitKneelBend's advice I've rerouted my wires from the mirrors where they enter the cab. Instead of going through the door seal weatherstripping I've used the grommet he advised.
Here's a write up.
Passenger side is easier. Pull the grommet under the accordion harness out, remove the lower passenger floorboard kick panel (it just snaps off) and the dash side panel trim piece. (also snaps off)
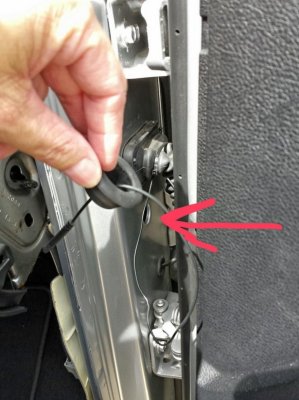
The picture shows the route I followed with the wire with the red arrow where the grommet goes.

Here's a write up.
Passenger side is easier. Pull the grommet under the accordion harness out, remove the lower passenger floorboard kick panel (it just snaps off) and the dash side panel trim piece. (also snaps off)
The picture shows the route I followed with the wire with the red arrow where the grommet goes.
Attachments
mcheath
Member
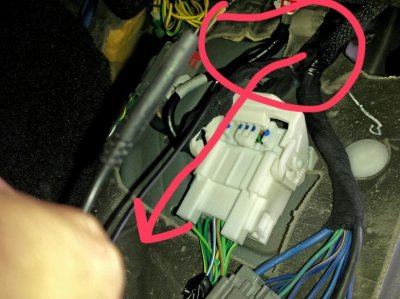
Finding the wire on the inside of the cab is a little tricky, there is a double wall. I used my phone flashlight function and shined it through the outside grommet hole to find where the wire would enter.
By prying up the inside insulation piece I was able to grab the wire and pull it through. The red circle shows where the wire enters from the outside, under that panel.

Then I simply routed the wire back behind the glovebox and reconnected it to my harness. Pushed the grommet back in and was done with the passenger side.
By prying up the inside insulation piece I was able to grab the wire and pull it through. The red circle shows where the wire enters from the outside, under that panel.
Then I simply routed the wire back behind the glovebox and reconnected it to my harness. Pushed the grommet back in and was done with the passenger side.
Attachments
Similar threads
- Replies
- 44
- Views
- 4K
- Replies
- 5
- Views
- 3K
- Replies
- 2
- Views
- 1K
Staff online
-
 G-Ride990Administrator
Members online
- Madmav79
- G-Ride990
- mdc1990zr1
- Mike R
- HarryS
- AZ MARK
- Mb7640
- raggydoo
- Wild one
- BWL
- crackerjack1957
- gilleydog
- olyelr
- Rkruzeski
- La Ramie
- AllMoparParts.com
- diymirage
- skates15
- DoughRat19
- Docwagon1776
- Neilr5515
- stevenP
- crazzywolfie
- duckman631
- ILLXJ
- Edward Hands
- Slinge
- Craze82eny
- Ger_Frank
- Julivxu
- StephenTack
- AustiNelsi
- Bandit517
- Atcer2018
- yakalong
- Danielwilliams081
- Lsujker
- shiznat
- Thendrix
- hdog33
- WY-Dave
- Ponyboy
- 6speed4.7
- rick1201
- italiancanuck89
- indept
- BenWade
- Lstadelmeier
- rewd1
- BucketGruntJL
Total: 1,289 (members: 60, guests: 1,229)
Robots: 1,688
Robots: 1,688