loki223
Senior Member
- Joined
- Apr 11, 2012
- Posts
- 746
- Reaction score
- 105
- Location
- Spokane, WA
- Ram Year
- 2018
- Engine
- Cummins 6.7
Alright, so first things first. This mod does involve ALOT of cutting your fenders, and if you want to suck them in more than i did, you need will need a welder. My suggestion is take it slow, make small cuts, test fit, more cuts, test fit, and so on. That being said, bumper modifications will most likely be needed. I have a large aftermarket heavy duty bumper, which allowed my to just cut out what i needed to remove. another option would be to cut the plastic on your stock bumper, and tuck the lights behind your stock bumper, or upgrade to a third gen bumper as well, and make any modifications you need to with some height adjustments. If you have any reservations about this mod, and think you might want to go back to 2nd gen lights, know that you WILL NOT be able to get 2nd gen lights back in there, because you will cut away all of the supports for the stock lights. I love the look of these, but there is a decent amount of work that you will need to do to make these work, so this is basically saying this is a disclaimer, i'll show you how i did it, but thats not to say you might not do it better, or worse than i did. that being said, lets get to the good part....

Items Needed.
4 1/2 inch angle grinder with both grinding wheel and cutting disc.
basic socket set
Power drill
Heat gun.
misc tools we all have....ie screw drivers and what not...
Nice level work area
Step by step.....
Disconnect and remove batteries. (mine is a diesel, so i had to remove both)
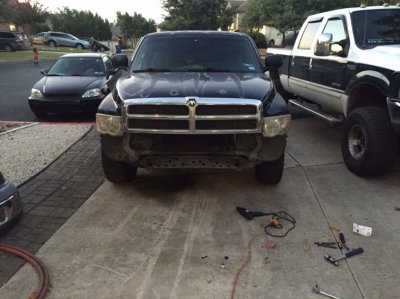
remove bumper and stock headlights
Now, you should be looking at your stock headlight mounting supprots that are built into the fender, they gotta go....so take a good look and say good...


this is done by carefully holding up the light, and looking to see what needs to go, i'll give you a hint, all of it....

take your time, make small cuts on your first side, that way you don;t take to much, and be careful not to grind or cut your fender as you are right next to the actual fender skins...


now that you think your close, lets test fit it again....

and hey check that out, it finally fits after a TAKING YOUR TIME TO CUT AND TEST FIT.....

wait a second, it doesn't quite fit perfect, but its close. and you have cut and ground the metal all the way from the core support to the fender...what to do now? well, since we cut up our perfectly good fender, why not modify the light housing? To get it around the core supprot you need to melt in the inside lower corner because it hits against the core support...we used a specialty screw driver that had a socket on the end so it was nice and round. so take your time, heat it nice and slow, and once it is nice and soft slowly press it in. you don't need much, and it would be better to do this twice, than to screw up your housing...so take your time...


alright! sweet, now that doesn't interfere, and hey look, it slides in perfectly and the top mounting spot eve lines up with a mounting bolt into the core support, isn't that nice, but it is pretty far out....and the grill on the hood won't close...damnit.....time fro more modifications. back to the heat gun and a pair of channel locks. Heat the mounting bracket supprots. the parts that come out, have the vertical supports under the horizontal piece for stability, heat from the bottom. with the channel locks slowly bend it down once it is soft enough to move without braking.....take it nice and slow. you need about an inch or so, but again, better to do this twice than brake something. Also while you do this, make sure you keep the mounting wholes straight out so the bolts will go straight through, and not be sitting at an angle when its mounted. When this is at the right angle it should sit in against the core support mounting bracket that lines up.....

now lets try that hood again....still won't close. So what now? lets trim the grill mounts! you only need to trim the lower mount on the outside of each side about a 1/8 of an inch. unbolt it, swing the sheet metal nut around so its not sitting around the piece your trimming, widen the mounting hole so it can be as far forward as possible, than trim the excess off in the back. and boom...grill closes now....

now you have 1 out of 3 mounting spots done...the next 2 are more tricky. If you notice the lower mounting hole on the lights completely miss the core support, so your options are build a bracket, or move the hole. I chose to move the hole. just go up, and it lines up with core support. Get a 2 inch sheet metal screw, 1 1 inch spacer, and 1 1/2 inch spacer. as you might guess, there is an inch and a half between the headlight and the core support. drill a pilot hole straight back from where you put your new mounting hole, and put it together. put the 2 spacers totalling an inch and a half long in between the core support and the headlight mounting bracket and there you go, that is secure. When you get the spacers, make sure you get the right size, and the right size is th size that just barely fits over your sheet metal screw. you don't need or want some huge spacer, just enough to give to support so you can tighten it down nice and good.
--------<second mount pics to come>-------------
now the third support, which may or may not be needed. If you do the first two good, you will notice that it is held in very secure already. but for the sake of safety, lets make the third support work. take a good look, notice how it is about 3 inches below the fender? well a piece of flat steel will work perfectly. i had some that was 1/8 inch thick by 1 inch wide laying around, so i used that for this bracket. You can get creative too..needs to be atleast 4 inches long, bend in a 90 about 1 inch from one end. now hold it up and check everything. as long as you didn't cut to much, you should be able to mount the top in there with some sheet metal screws nice and easily, (open up the mount all the way, than a pilot whole in the fender) i used 2 screws to hold it in. now for the headlight, lets bolt it in. drill a hole where your mount lines up to the headlight mount. (mark it, remove your mount from the vehicle and drill it off the vehicle) ) now bolt it all in. and see how she looks.
-----------<third mount pic to come>------------
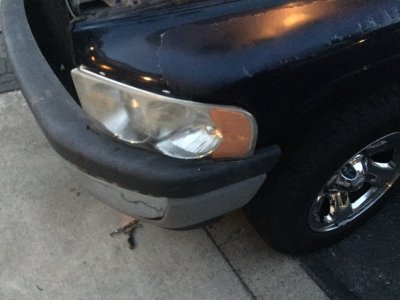
when you are doing your mounts, make sure the lights are sitting in there level, and not angled, it would be horrible to get everything together to find out your lights are angled like the top lights on the mid 2000s Chevy's....
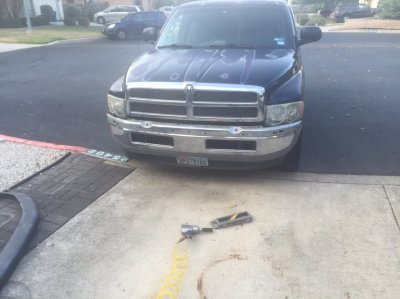
repeat on the other side, and than you should be looking at something like this....


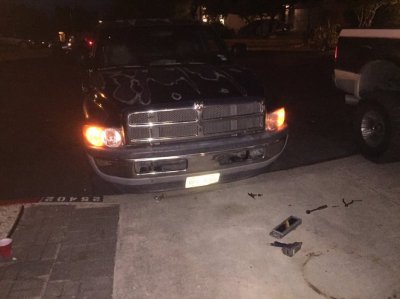
so now its onto the bumper. I will show you what i did, but you will need to figure out your own bumper since i don't have a stock bumper any more.....
i lined it up, and cut it to where i would have clearance, nice and easy. except for it being so freaking heavy......

lined it up again, and perfect. mounted everything back on...and now i have 3rd gen lights on my second gen truck, and freaking love them. hope someone else follows suit and can help improve the walk through. This is something that takes alot of time, and effort, but it worth it. You also can't go back to the stock lights, so you better like these more, otherwise you need new fenders.....
Items Needed.
4 1/2 inch angle grinder with both grinding wheel and cutting disc.
basic socket set
Power drill
Heat gun.
misc tools we all have....ie screw drivers and what not...
Nice level work area
Step by step.....
Disconnect and remove batteries. (mine is a diesel, so i had to remove both)
remove bumper and stock headlights
Now, you should be looking at your stock headlight mounting supprots that are built into the fender, they gotta go....so take a good look and say good...
this is done by carefully holding up the light, and looking to see what needs to go, i'll give you a hint, all of it....
take your time, make small cuts on your first side, that way you don;t take to much, and be careful not to grind or cut your fender as you are right next to the actual fender skins...
now that you think your close, lets test fit it again....
and hey check that out, it finally fits after a TAKING YOUR TIME TO CUT AND TEST FIT.....
wait a second, it doesn't quite fit perfect, but its close. and you have cut and ground the metal all the way from the core support to the fender...what to do now? well, since we cut up our perfectly good fender, why not modify the light housing? To get it around the core supprot you need to melt in the inside lower corner because it hits against the core support...we used a specialty screw driver that had a socket on the end so it was nice and round. so take your time, heat it nice and slow, and once it is nice and soft slowly press it in. you don't need much, and it would be better to do this twice, than to screw up your housing...so take your time...
alright! sweet, now that doesn't interfere, and hey look, it slides in perfectly and the top mounting spot eve lines up with a mounting bolt into the core support, isn't that nice, but it is pretty far out....and the grill on the hood won't close...damnit.....time fro more modifications. back to the heat gun and a pair of channel locks. Heat the mounting bracket supprots. the parts that come out, have the vertical supports under the horizontal piece for stability, heat from the bottom. with the channel locks slowly bend it down once it is soft enough to move without braking.....take it nice and slow. you need about an inch or so, but again, better to do this twice than brake something. Also while you do this, make sure you keep the mounting wholes straight out so the bolts will go straight through, and not be sitting at an angle when its mounted. When this is at the right angle it should sit in against the core support mounting bracket that lines up.....
now lets try that hood again....still won't close. So what now? lets trim the grill mounts! you only need to trim the lower mount on the outside of each side about a 1/8 of an inch. unbolt it, swing the sheet metal nut around so its not sitting around the piece your trimming, widen the mounting hole so it can be as far forward as possible, than trim the excess off in the back. and boom...grill closes now....
now you have 1 out of 3 mounting spots done...the next 2 are more tricky. If you notice the lower mounting hole on the lights completely miss the core support, so your options are build a bracket, or move the hole. I chose to move the hole. just go up, and it lines up with core support. Get a 2 inch sheet metal screw, 1 1 inch spacer, and 1 1/2 inch spacer. as you might guess, there is an inch and a half between the headlight and the core support. drill a pilot hole straight back from where you put your new mounting hole, and put it together. put the 2 spacers totalling an inch and a half long in between the core support and the headlight mounting bracket and there you go, that is secure. When you get the spacers, make sure you get the right size, and the right size is th size that just barely fits over your sheet metal screw. you don't need or want some huge spacer, just enough to give to support so you can tighten it down nice and good.
--------<second mount pics to come>-------------
now the third support, which may or may not be needed. If you do the first two good, you will notice that it is held in very secure already. but for the sake of safety, lets make the third support work. take a good look, notice how it is about 3 inches below the fender? well a piece of flat steel will work perfectly. i had some that was 1/8 inch thick by 1 inch wide laying around, so i used that for this bracket. You can get creative too..needs to be atleast 4 inches long, bend in a 90 about 1 inch from one end. now hold it up and check everything. as long as you didn't cut to much, you should be able to mount the top in there with some sheet metal screws nice and easily, (open up the mount all the way, than a pilot whole in the fender) i used 2 screws to hold it in. now for the headlight, lets bolt it in. drill a hole where your mount lines up to the headlight mount. (mark it, remove your mount from the vehicle and drill it off the vehicle) ) now bolt it all in. and see how she looks.
-----------<third mount pic to come>------------
when you are doing your mounts, make sure the lights are sitting in there level, and not angled, it would be horrible to get everything together to find out your lights are angled like the top lights on the mid 2000s Chevy's....
repeat on the other side, and than you should be looking at something like this....
so now its onto the bumper. I will show you what i did, but you will need to figure out your own bumper since i don't have a stock bumper any more.....
i lined it up, and cut it to where i would have clearance, nice and easy. except for it being so freaking heavy......
lined it up again, and perfect. mounted everything back on...and now i have 3rd gen lights on my second gen truck, and freaking love them. hope someone else follows suit and can help improve the walk through. This is something that takes alot of time, and effort, but it worth it. You also can't go back to the stock lights, so you better like these more, otherwise you need new fenders.....
Last edited: