2003 OTIS swap

Disclaimer: Links on this page pointing to Amazon, eBay and other sites may include affiliate code. If you click them and make a purchase, we may earn a small commission.

HemiLonestar

Senior Member
Military
Joined
Jun 1, 2012
Posts
6,007
Reaction score
2,966
Location
MD
Ram Year
2016
Engine
5.7 hemi
Yeah was hoping for less than $150 at least. Thanks though
Can hope all ya want lol, these were few, far between and expensive years back when I got mine. Comes down to how bad ya want it lol. I've never seen a used one for sale or in another Ram for that matter.

Sent from my HTC U11 using Tapatalk
 

2quic4u

Junior Member
Joined
Jan 14, 2018
Posts
10
Reaction score
2
Location
PA
Ram Year
2004
Engine
5.7 Hemi
Ok so here’s an odd one. With the evic installed, its showing i get 14.9 mpg, whereas the otis is showing around 6.5. I went to the dealer to verify that the tank size is set correctly, which it was (26 gallon, i have a regular cab ram). Is there another section within the DRBIII to change the overhead computer settings? I’m just confused how they can be that far off?!
 

HemiLonestar

Senior Member
Military
Joined
Jun 1, 2012
Posts
6,007
Reaction score
2,966
Location
MD
Ram Year
2016
Engine
5.7 hemi
Did you reset each one to zero prior to watching them? Keep in mind, they both take the average over time, it's not "instant" mileage.
 

2quic4u

Junior Member
Joined
Jan 14, 2018
Posts
10
Reaction score
2
Location
PA
Ram Year
2004
Engine
5.7 Hemi
With the evic yes, the otis no. I have read that the otis modules tend to be very innacurate though, so maybe my mileage is higher than i thought. Other thing is that miles until empty seems awfully high as well with the evic. On a full tank its always over 300. Will be monotoring and reporting back
 

HemiLonestar

Senior Member
Military
Joined
Jun 1, 2012
Posts
6,007
Reaction score
2,966
Location
MD
Ram Year
2016
Engine
5.7 hemi
The DTE can vary widely between gas stations and how much you top off. I've gotten a range of 350 miles to over 400.
 

LESchwartz

Junior Member
Joined
Mar 30, 2019
Posts
5
Reaction score
1
Location
Sunny Minnesota
Ram Year
2003
Engine
5.9
MANY THANKS TO ALL WHO CONTRIBUTED TO THIS THREAD!

I just finished swapping out my 56045573AE (w/o Homelink) for a 56049707AF (w/ Homelink) on my 2003 Dodge 1500 SLT. Everything appears to work, plus my garage door opens and shuts using the Homelink button.

The only weird thing was that the temperature seemed "stuck" at 26F, whereas the old unit was displaying the current temperature of 46F. When I unpluged the temp sensor and with the vehicle running, the new unit displayed 130F -- which I assume is the "open" value on the sensor. After I plugged the senso back in, my new unit displayed the current temp.

Thanks again,

Larry
 

Bheezy27403

Junior Member
Joined
Apr 2, 2019
Posts
28
Reaction score
5
Location
Triad NC
Ram Year
2008
Engine
Hemi 5.7
Yeah I may have to look into this. It looks like the evic has a way to turn off the auto lock when the truck starts rolling. I f'n hate that. I've only had the truck for a couple weeks but I can't count how many times I've went to get my son out and..wait, it's locked. Ugh.

Could use the sunglasses holder too.
 

RumbleBee1063

Junior Member
Joined
Aug 19, 2020
Posts
1
Reaction score
1
Location
NY
Ram Year
2004
Engine
Hemi 5.7
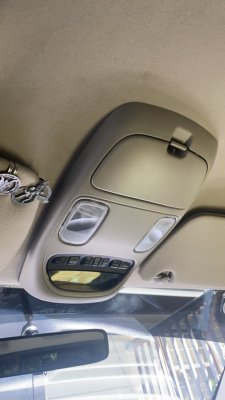
Okay everyone, I know it has been 2 years but I have done this to a 2004 single cab 1500 that had OTIS. I want to put a step by step thread so everyone knows how to do it if they wish.
First of all, I bought part number 56045574AE. This is going to be EVIC with sunglasses holder.

1. Take your map light lenses off and in there, you will find 2 torx screws that need to be removed.
2. Pull the overhead console down from the front near the windshield. There will be 2 clips there.
3. There will be a plug harness for the screen that is black. Its a little tricky to get to as the the release for it faces down but it is doable. There is also a white clip for the lights that shouldn't be a problem.
4. There is a black "tray" or bracket that holds the overhead console into the vehicle on the other side of the headliner. You will at some point think to yourself that the entire headliner has to come down but that is NOT true. It is going to be held in with a little bit of glue and 2 more torx screws, so you will have to wiggle it side to side until it breaks free after you take out the screws. Then you can take it out at an angle.

Now the old console is completely removed and next is putting in the new one. Prepare yourself here. You will need the bracket from the longer console and you will need to cut the headliner. Theres no way around this I promise I tried. The sunglasses holder has a bump that won't let you avoid cutting and the tray is also a part of the holder. Make sure you test everything before you install. There are 4 new twist bulbs for the new buttons so check those too. This is PLUG & PLAY!

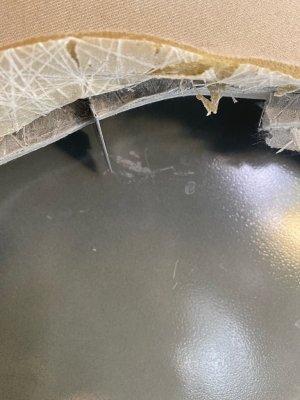
5. Cutting the headliner isn't so tricky. I tried my best to leave all of the fabric because it just doesn't feel right cutting into fabric. So pull back about an inch of fabric and you will expose the fiberglass covered foam. What I did was take a regular razor blade and slice in at a 90 degree angle so I wouldn't over cut. Once I made my vertical cuts i would cut a straight line going across and pull out the squares. KEEP IT NARROW. Its important that you dont follow the width of the console, its unnecessary and its better off that you cut less. After the first inch you should be able to get the new bracket into the headliner. Cut in the same way until you get to the screw holes in the new bracket and then stop cutting. Use the bracket as a guide and every so often mock up the overhead console to see what and where you have to cut. It took me about 35 minutes. Lots of fiberglass on my face and fingers. I took out about a handful of fiberglass chunks.

6. Now that you have test fitted, make sure everything works, installed the new bracket (Dont forget to reinstall the torx) its time to plug everything back in and install the new console. The torx screws that you had once found behind the lenses will now be in the sunglasses holder once you open it. If you have problems getting the screws in, take the console down and install it from the back (screws) first. You can get your head in there to line up the holes. Just dont tighten all the way until the clips are in on the front of the console. If your sunglasses holder doesn't close, loose the screws holding the console up. over tightening messes up the clearance.

You're all done. I think this is a decent write up for my first one. Sorry its long but I want to be thorough. I hate when directions aren't complete and dont answer all the little questions I might have.

All of the evic menus work. Shows me when the doors open, bulbs are out, instant mpg, etc... you guys saw this somewhere in this thread.
upload_2020-8-19_2-23-18.jpeg

upload_2020-8-19_2-21-20.jpeg
 

HemiLonestar

Senior Member
Military
Joined
Jun 1, 2012
Posts
6,007
Reaction score
2,966
Location
MD
Ram Year
2016
Engine
5.7 hemi
So, I take it that the '06-'08trucks use a different console due to CAN bus?
Yes. You guys literally only have two options, one with Homelink and the same one without Homelink.

Screenshot_2021-01-23 2006 Dodge Ram Parts Manual pdf.png

I guess it isn't a bad thing if it has the same capabilities; I've never seen an 06-08 up close. What I do know is that my 03 Ram EVIC is vastly more useful and capable than the EVIC that was in either of my 05-06 LX's lol.
 
Top