Merc225hp
Senior Member
Fuel pump module replacement 94-2002
I prefer to drop the tank others will opt out to move/remove the truck box.
This was done on a lifted 4wd truck so getting to my tank was easy, some might have to jack up there truck to do this job.
*So I need to point out the obvious; NO SMOKING, NO GRINDING, NO SPARKS OF ANY KIND, NO OPEN FLAME. You are working around fuel and its flammable be smart.
* Gas fumes will fill a garage faster than you think.
* I prefer to use a sealed led trouble light.
* Wear appropriate safety gear, gloves and goggles etc.
*A buddy is a good thing to have over at this time
Tool list:
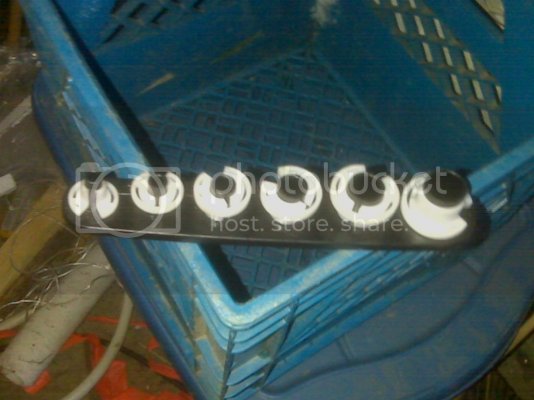
Fuel line disconnect tools.
Small Torx screwdriver driver set.
15mm deep socket, two 12” extensions, ratchet, 3/8 drive min.
5/16 nut driver
½ wrench.
Flat blade screw driver
Piece of rope/ratchet strap to wrap around the tank to hold shield
Jack and jack stands.
Small LED flashlight
LED work light
Siphon hose approx. 6’ long 1/2”diameter
Clean white 3 gallon pail
A few 5 gallon gas cans (depends on how much gas is in the tank)
Hammer and a piece of hardwood 1”x 1” x 12” long
Strap wrench
Milk crate or two, opt helps with lifted trucks.
*Approximate time to do this job 2-3hrs
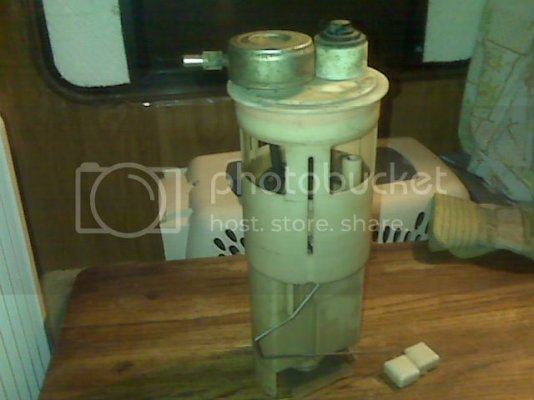
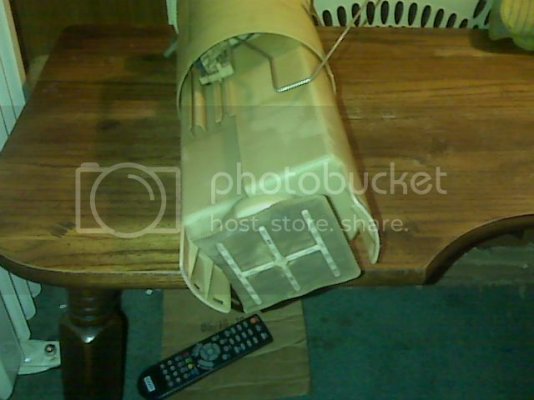
This is what you are going to be replacing.
*Disconnect the negative cable from the battery (1/2”wrench).
* Set the parking/E brakes, block the front tires; remove the driver’s side rear tire and put the truck on a jack stand.
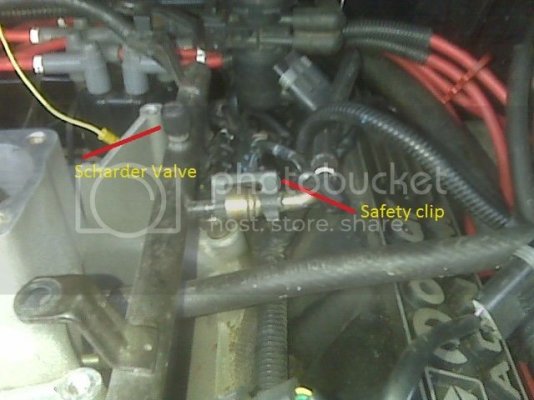
1 On the driver’s side of the intake you will find a Schrader valve for the fuel system, place a rag over it and use a small screw driver to release the pressure. Be careful the fuel may be under pressure. Remove the metal safety clip from the fuel line. Install the fuel line disconnect tool over the metal part of the fuel line, slide the tool into the disconnect fitting and separate the two lines.
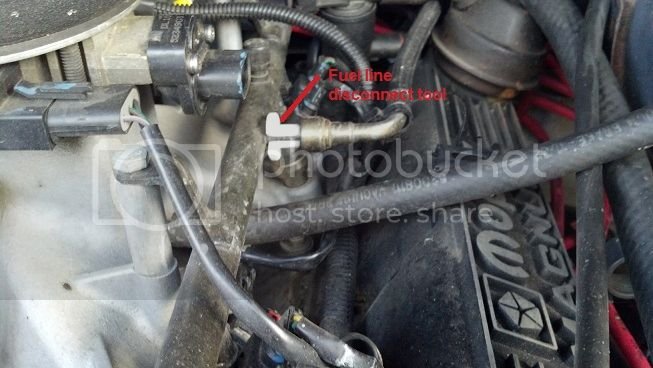
Fuel line disconnect tools.
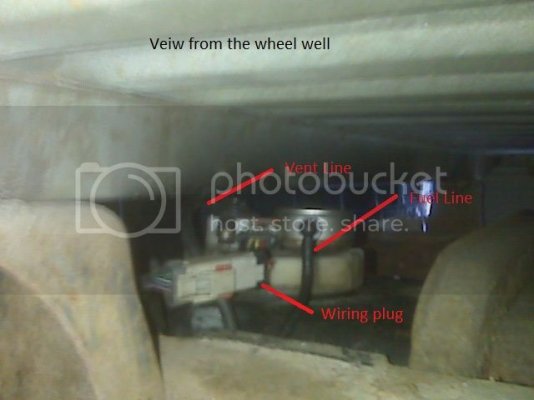
2 Remove the plastic wheel well liner, this will give you access to the pump, and fuel filler neck. It’s a tight area to work in but it is doable.
3 Remove the hose clamps on the fuel filler neck (5/16 nut driver), and separate the vent hose & the fill hose from the neck. Leave the hoses on the gas tank side. If you still have the factory hose clamps they can be a pita, I use a pair of tin snips to cut the clamps up by the heads and the use a screwdrivers to pry them off. Once separated I remove the metal fill and vent tubes from the box.
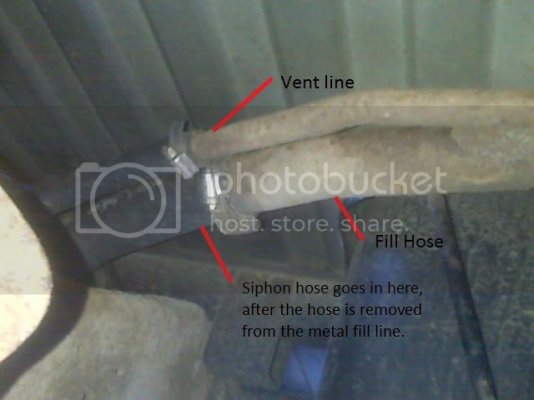
4 Insert a siphon hose into the big fill hose and down into the gas tank and start a siphon of gas into gas cans. You won’t get all the fuel out; about two gallons will remain in the tank. Find some type of clean plugs you can put in the ends of the hoses to help keep dirt out of the tank.
5 Disconnect the fuel line from the pump by squeezing the plastic tabs together; up where the line attaches to the fuel filter/psi regulator. I use a big plastic tub under the fuel tank to catch any fuel when the line is disconnected from the fuel pump. This fuel should not be reused dispose of it in a proper manner.
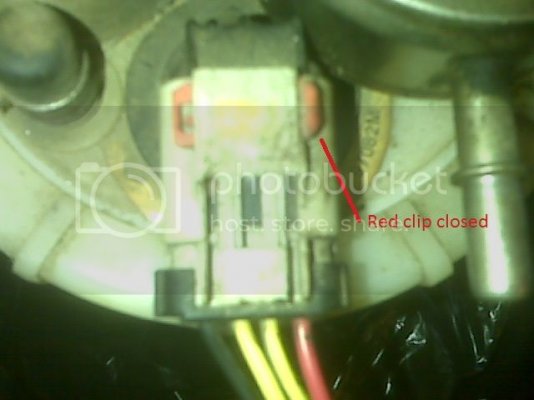
5a For the wiring there is a red tab that needs to be put in the open position; I use a pair of small water pump pliers to move this clip, then you must push the other clip down, the plug can then be separated from the pump.
The rollover /vent valve hose can be removed at this time as well.
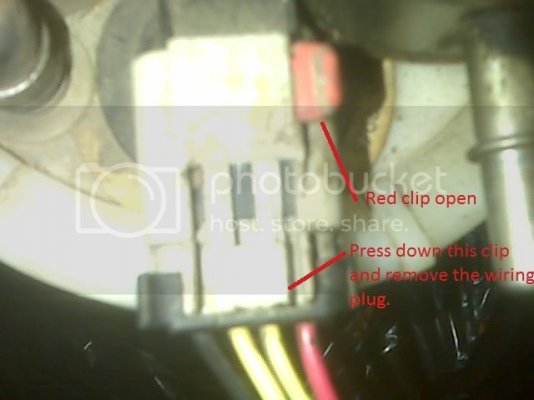
6 Put the truck in neutral and remove the rear drive-shaft bolts (10mm box end wrench); then move the drive-shaft out of the way, be sure to use masking tape to keep the cross joint bearing caps on the cross joint. This gives you allot more room to work.
7 Start to remove the gas tank strap nuts up near the frame (15mm deep socket) loosen both at first then remove the back strap and let the tank rest on a milk crate, and then remove the front strap.
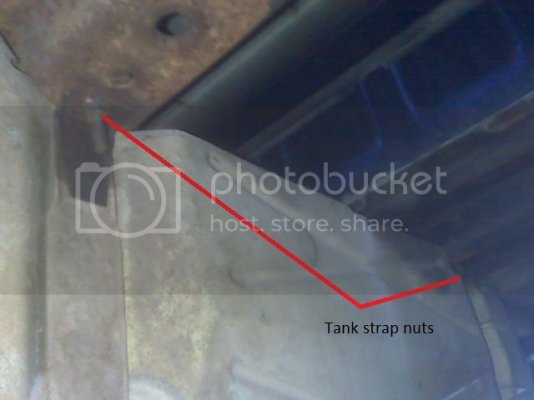
8 Lower the tank to the ground.
9 Wash the outside of the fuel tank with soap and water.
10 To remove the fuel pump from the tank you need to loosen the big locking ring that holds the pump in the tank. You can try a strap wrench; if that does not work I use a piece of hardwood and a hammer to get the ring moving. Counter clockwise to remove ring and clock wise to tighten ring.
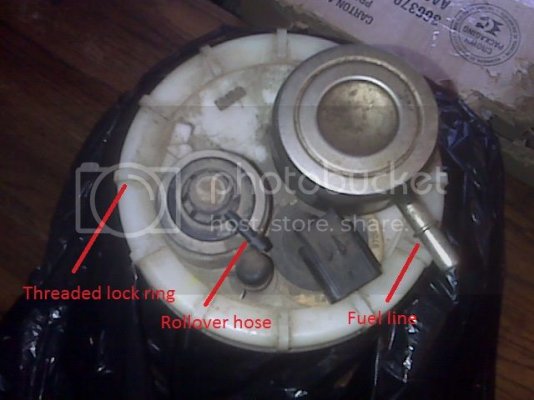
11 Using a grease pencil mark a reference spot on the tank were the wiring and fuel lines aim. Pull the pump up and out of the tank, there will be about a ½ gallon of gas in the pump itself so be careful.
Tank out and pump module removed.
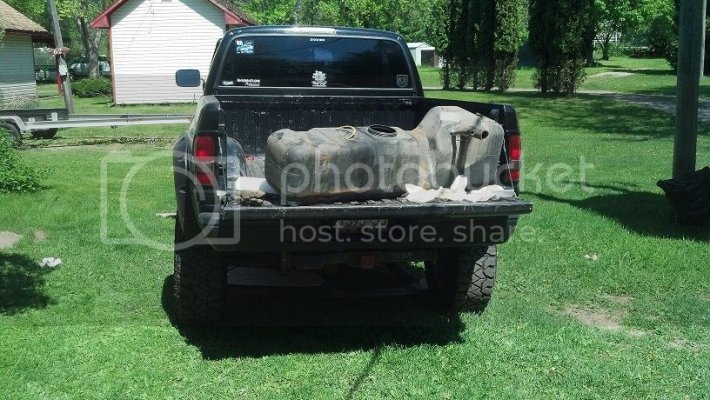
12 Using a led water proof flashlight inspect the inside of the fuel tank for contamination (water, dirt).
13 Stand the tank on end up on a table/bench and siphon the rest of the gas out of the tank into a clean white pail; look for contamination in the pail. If the fuel is clean in the pail then reuse the fuel, if dirty don’t reuse the fuel.
14 Clean out the inside of the tank with clean rags or wash it out with hot water, dry it out with clean lint free rags after washing.
15 Install your new fuel pump in the tank, pay close attention to the rubber sealing ring make sure it’s between the tank and the pump. Aim the wiring and fuel lines to your grease mark and then start the locking ring, if you’re happy with the fit; tighten down the ring.
16 Reinstall the fuel tank, no tricks here it’s just the opposite of removal.
It helps to use a piece of rope/ratchet strap to hold the shield in place while installing it and the fuel tank.
Make sure the fuel line is clipped on the pump right; you should hear it click when put on right.
Install the wheel well liner and rear tire after you have checked the fuel lines for leaks.
Your truck might not start on the first try it needs to prime the system; it might even have a miss for a couple of minutes.
I prefer to drop the tank others will opt out to move/remove the truck box.
This was done on a lifted 4wd truck so getting to my tank was easy, some might have to jack up there truck to do this job.
*So I need to point out the obvious; NO SMOKING, NO GRINDING, NO SPARKS OF ANY KIND, NO OPEN FLAME. You are working around fuel and its flammable be smart.
* Gas fumes will fill a garage faster than you think.
* I prefer to use a sealed led trouble light.
* Wear appropriate safety gear, gloves and goggles etc.
*A buddy is a good thing to have over at this time
Tool list:
Fuel line disconnect tools.
Small Torx screwdriver driver set.
15mm deep socket, two 12” extensions, ratchet, 3/8 drive min.
5/16 nut driver
½ wrench.
Flat blade screw driver
Piece of rope/ratchet strap to wrap around the tank to hold shield
Jack and jack stands.
Small LED flashlight
LED work light
Siphon hose approx. 6’ long 1/2”diameter
Clean white 3 gallon pail
A few 5 gallon gas cans (depends on how much gas is in the tank)
Hammer and a piece of hardwood 1”x 1” x 12” long
Strap wrench
Milk crate or two, opt helps with lifted trucks.
*Approximate time to do this job 2-3hrs
This is what you are going to be replacing.


*Disconnect the negative cable from the battery (1/2”wrench).
* Set the parking/E brakes, block the front tires; remove the driver’s side rear tire and put the truck on a jack stand.
1 On the driver’s side of the intake you will find a Schrader valve for the fuel system, place a rag over it and use a small screw driver to release the pressure. Be careful the fuel may be under pressure. Remove the metal safety clip from the fuel line. Install the fuel line disconnect tool over the metal part of the fuel line, slide the tool into the disconnect fitting and separate the two lines.


Fuel line disconnect tools.

2 Remove the plastic wheel well liner, this will give you access to the pump, and fuel filler neck. It’s a tight area to work in but it is doable.

3 Remove the hose clamps on the fuel filler neck (5/16 nut driver), and separate the vent hose & the fill hose from the neck. Leave the hoses on the gas tank side. If you still have the factory hose clamps they can be a pita, I use a pair of tin snips to cut the clamps up by the heads and the use a screwdrivers to pry them off. Once separated I remove the metal fill and vent tubes from the box.

4 Insert a siphon hose into the big fill hose and down into the gas tank and start a siphon of gas into gas cans. You won’t get all the fuel out; about two gallons will remain in the tank. Find some type of clean plugs you can put in the ends of the hoses to help keep dirt out of the tank.
5 Disconnect the fuel line from the pump by squeezing the plastic tabs together; up where the line attaches to the fuel filter/psi regulator. I use a big plastic tub under the fuel tank to catch any fuel when the line is disconnected from the fuel pump. This fuel should not be reused dispose of it in a proper manner.
5a For the wiring there is a red tab that needs to be put in the open position; I use a pair of small water pump pliers to move this clip, then you must push the other clip down, the plug can then be separated from the pump.
The rollover /vent valve hose can be removed at this time as well.


6 Put the truck in neutral and remove the rear drive-shaft bolts (10mm box end wrench); then move the drive-shaft out of the way, be sure to use masking tape to keep the cross joint bearing caps on the cross joint. This gives you allot more room to work.
7 Start to remove the gas tank strap nuts up near the frame (15mm deep socket) loosen both at first then remove the back strap and let the tank rest on a milk crate, and then remove the front strap.

8 Lower the tank to the ground.
9 Wash the outside of the fuel tank with soap and water.
10 To remove the fuel pump from the tank you need to loosen the big locking ring that holds the pump in the tank. You can try a strap wrench; if that does not work I use a piece of hardwood and a hammer to get the ring moving. Counter clockwise to remove ring and clock wise to tighten ring.

11 Using a grease pencil mark a reference spot on the tank were the wiring and fuel lines aim. Pull the pump up and out of the tank, there will be about a ½ gallon of gas in the pump itself so be careful.
Tank out and pump module removed.

12 Using a led water proof flashlight inspect the inside of the fuel tank for contamination (water, dirt).
13 Stand the tank on end up on a table/bench and siphon the rest of the gas out of the tank into a clean white pail; look for contamination in the pail. If the fuel is clean in the pail then reuse the fuel, if dirty don’t reuse the fuel.
14 Clean out the inside of the tank with clean rags or wash it out with hot water, dry it out with clean lint free rags after washing.
15 Install your new fuel pump in the tank, pay close attention to the rubber sealing ring make sure it’s between the tank and the pump. Aim the wiring and fuel lines to your grease mark and then start the locking ring, if you’re happy with the fit; tighten down the ring.
16 Reinstall the fuel tank, no tricks here it’s just the opposite of removal.
It helps to use a piece of rope/ratchet strap to hold the shield in place while installing it and the fuel tank.
Make sure the fuel line is clipped on the pump right; you should hear it click when put on right.
Install the wheel well liner and rear tire after you have checked the fuel lines for leaks.
Your truck might not start on the first try it needs to prime the system; it might even have a miss for a couple of minutes.
Last edited:

