The_murdered_warrior
Junior Member
Hey all, This is my first write up so let me know if i can improve on anything, or let me know if you guys have any questions.
I did a doube din install on my 01 ram about a week ago and i love it, so i figured id do a quick writeup, since i dont see too many people with them.
To start, i had a kenwood BT645u single din headunit, pioneer 6x9s in front and pioneer 5 1/4 in the rear. Underneath the rear seat was a custom fit sealed sub box, with 2 Kicker Comp10's in it, hooked to a Polk PA880 amp. Sound quality was killer, but I wanted to update the truck a little.
My friend had a Kenwood DNX5120 double din laying around with the XM module, HD radio module, and Bluetooth module, along with a 10cd changer out of his totaled Altima. Nav, DVD/CD, Bluetooth, HD/XM/Sirius radio.
To install it, I first CAREFULLY took off my front bezel. The bezel was starting to crack above the instrument cluster so i was extremely careful. After it was out, i took out the (2) 10mm bolts that held in the old unit. I disconnected the wiring and RCA preouts to the unit and set it aside.

After that, I tucked the wiring behind the space where the cup holder is. I held up the double din unit and started marking with a marker where to cut. I was originally going to use a jigsaw or the like to cut it, but I ended up using a sawzall blade in a set of vice grips. REMEMBER: YOU CANT ADD MATERIAL AFTER YOU CUT IT. TAKE YOUR TIME AND DO IT RIGHT! I didn't end up using the cage the radio is supposed to sit in, because that would require more cutting than what I was comfortable with doing.
i cut up to the curve under the vents, and stopped about halfway into the radius. The center of my cutout had a support for the vents. make note of this when cutting the dash. Draw a stright line from one of your lengthwise cuts to the other. I didnt have a better way to cut it, so i took a razorblade, heated it up with a propane torch, and used it to cut the top of the radio hole. Follow the line that you had drawn. I was able to wiggle the cut piece back and forth and break the support. IMO the radio will be in there tight enough so it will be fine.
Next, there is a small radiused bump in the bottom shelf of where the radio sits. I took a piece of 60 grit sandpaper on a block of wood and sanded it right down, and finished with 120. Next, test fit the radio. it will be snug, but watch to see where it is hitting the dash. if its too snug, take a flat file or sandpaper and sand it down.
As of now, everything that you have done can be forefitted. if you realize you are way over your head already, you can still bolt in your old radio and call it quits.
Next up is the bezel.
The bezel is the scariest part of this whole deal. This will be your reveal. If it is cut wrong, it'll look like a hackjob. I took measurements about 40 times before i started marking it out. Each head unit will be different, but for mine I cut it in the center of the cutout, aboutt a quarter inch below the hole and a half inch above the hole. To cut it, I simply used an angle grinder with a cutoff wheel. following my line closely, I made the cut.
if the radio is in the truck, make sure it is where you had originally left it. the in/out can be adjusted after. Install the bezel. line it up with the radio, see if it fits. dont mind the holes on the side, we will make it look factory.
Trim the opening to the size of the radio with sandpaper on a stick. this will help you get straight lines while trimming. If it fits, you can leave it like that. Or you can make inserts for the sides. you can do as you please, because not everybody agrees with the method that i used.
Next, get a stiff adhesive backing of some sort. I used metal HVAC tape that i had laying around. Line it up with your cut on the outside, stick it, then fold it inward (towards the dash). Flip it over, fill it with Bondo. it acts as a mold that sets the Bondo into a base of where it can sit. Repeat for the other side.
once it dries you can remove the metal tape (the adhesive should release from the bondo), and flip the bezel over so you are looking at it like you normally would be in the truck.
Fill it in so that the bondo is above the face of the dash. this will give more material than whats needed, and will help hide the old opening. once dried, sand it with 80 grit to knock off the heavy stuff, and then with 120 to finish it off. you can sand it more if you'd like, but i wanted to get it done.
After it looks good, spray it with primer. i used self etching primer from rustoleum, that said it would be good for plastics. After that dried, i used Duplicolor Bumper and trim paint to try and get it back to factory, but for some reason it had a chemical reaction with the primer and they both reliquified , mixed and then dried. it didnt look good at all. I decided to wrap it up for the day with the paint, and went to the truck and installed the radio.
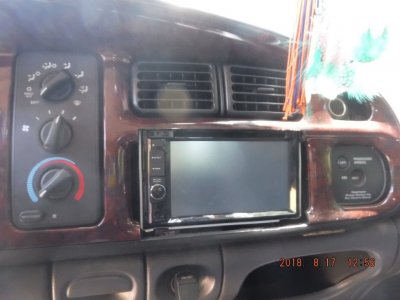
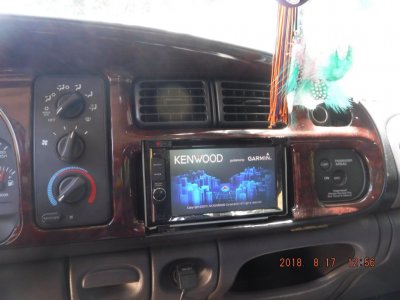
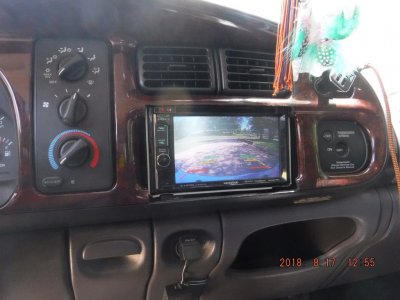
I installed the harness to the adaptor for Chrysler vehicles, and ran the wires for the modules and the GPS antenna, and hooked up my reverse cam and RCAs. The parking brake wire will be looking for a ground. when it senses a ground, it will unlock other options of the unit. since my passengers may want to watch a movie or play a game, i just tied it in with the head unit ground. After that, i turned the key on, and the radio booted up with no flaws.I installed the bezel and i was happy with it. didnt look too bad.

The next day i got the idea to spray it with Aerosol bedliner. it would look factor but have a rougher texture, which i wouldn't mind. Hand sanded it with 320 grit and sprayed it, and it looks really good, IMHO.
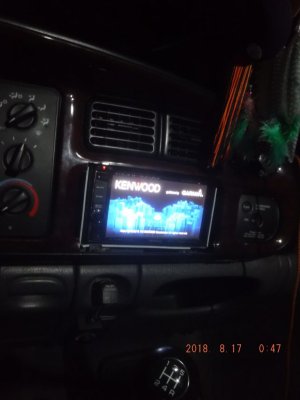
I programmed the new U connect boot screen into it, to look like the 4th gen boot up screen. I also changed the color of the buttons on the unit to blue, because i converted all of my lights to ice blue. i have my HD radio and Bluetooth module on top of the heater box behind my glove box, the 10cd changer under the passenger seat, and the GPS antenna on the back window. I tried to make it look as factory as possible.

Looks good, sounds good, and looks mostly factory. i will get more/better pics as soon as possible.
Thoughts? Comments? Let me know.
I did a doube din install on my 01 ram about a week ago and i love it, so i figured id do a quick writeup, since i dont see too many people with them.
To start, i had a kenwood BT645u single din headunit, pioneer 6x9s in front and pioneer 5 1/4 in the rear. Underneath the rear seat was a custom fit sealed sub box, with 2 Kicker Comp10's in it, hooked to a Polk PA880 amp. Sound quality was killer, but I wanted to update the truck a little.
My friend had a Kenwood DNX5120 double din laying around with the XM module, HD radio module, and Bluetooth module, along with a 10cd changer out of his totaled Altima. Nav, DVD/CD, Bluetooth, HD/XM/Sirius radio.
To install it, I first CAREFULLY took off my front bezel. The bezel was starting to crack above the instrument cluster so i was extremely careful. After it was out, i took out the (2) 10mm bolts that held in the old unit. I disconnected the wiring and RCA preouts to the unit and set it aside.
After that, I tucked the wiring behind the space where the cup holder is. I held up the double din unit and started marking with a marker where to cut. I was originally going to use a jigsaw or the like to cut it, but I ended up using a sawzall blade in a set of vice grips. REMEMBER: YOU CANT ADD MATERIAL AFTER YOU CUT IT. TAKE YOUR TIME AND DO IT RIGHT! I didn't end up using the cage the radio is supposed to sit in, because that would require more cutting than what I was comfortable with doing.

i cut up to the curve under the vents, and stopped about halfway into the radius. The center of my cutout had a support for the vents. make note of this when cutting the dash. Draw a stright line from one of your lengthwise cuts to the other. I didnt have a better way to cut it, so i took a razorblade, heated it up with a propane torch, and used it to cut the top of the radio hole. Follow the line that you had drawn. I was able to wiggle the cut piece back and forth and break the support. IMO the radio will be in there tight enough so it will be fine.
Next, there is a small radiused bump in the bottom shelf of where the radio sits. I took a piece of 60 grit sandpaper on a block of wood and sanded it right down, and finished with 120. Next, test fit the radio. it will be snug, but watch to see where it is hitting the dash. if its too snug, take a flat file or sandpaper and sand it down.
As of now, everything that you have done can be forefitted. if you realize you are way over your head already, you can still bolt in your old radio and call it quits.
Next up is the bezel.
The bezel is the scariest part of this whole deal. This will be your reveal. If it is cut wrong, it'll look like a hackjob. I took measurements about 40 times before i started marking it out. Each head unit will be different, but for mine I cut it in the center of the cutout, aboutt a quarter inch below the hole and a half inch above the hole. To cut it, I simply used an angle grinder with a cutoff wheel. following my line closely, I made the cut.
if the radio is in the truck, make sure it is where you had originally left it. the in/out can be adjusted after. Install the bezel. line it up with the radio, see if it fits. dont mind the holes on the side, we will make it look factory.
Trim the opening to the size of the radio with sandpaper on a stick. this will help you get straight lines while trimming. If it fits, you can leave it like that. Or you can make inserts for the sides. you can do as you please, because not everybody agrees with the method that i used.
Next, get a stiff adhesive backing of some sort. I used metal HVAC tape that i had laying around. Line it up with your cut on the outside, stick it, then fold it inward (towards the dash). Flip it over, fill it with Bondo. it acts as a mold that sets the Bondo into a base of where it can sit. Repeat for the other side.
once it dries you can remove the metal tape (the adhesive should release from the bondo), and flip the bezel over so you are looking at it like you normally would be in the truck.
Fill it in so that the bondo is above the face of the dash. this will give more material than whats needed, and will help hide the old opening. once dried, sand it with 80 grit to knock off the heavy stuff, and then with 120 to finish it off. you can sand it more if you'd like, but i wanted to get it done.
After it looks good, spray it with primer. i used self etching primer from rustoleum, that said it would be good for plastics. After that dried, i used Duplicolor Bumper and trim paint to try and get it back to factory, but for some reason it had a chemical reaction with the primer and they both reliquified , mixed and then dried. it didnt look good at all. I decided to wrap it up for the day with the paint, and went to the truck and installed the radio.
I installed the harness to the adaptor for Chrysler vehicles, and ran the wires for the modules and the GPS antenna, and hooked up my reverse cam and RCAs. The parking brake wire will be looking for a ground. when it senses a ground, it will unlock other options of the unit. since my passengers may want to watch a movie or play a game, i just tied it in with the head unit ground. After that, i turned the key on, and the radio booted up with no flaws.I installed the bezel and i was happy with it. didnt look too bad.
The next day i got the idea to spray it with Aerosol bedliner. it would look factor but have a rougher texture, which i wouldn't mind. Hand sanded it with 320 grit and sprayed it, and it looks really good, IMHO.
I programmed the new U connect boot screen into it, to look like the 4th gen boot up screen. I also changed the color of the buttons on the unit to blue, because i converted all of my lights to ice blue. i have my HD radio and Bluetooth module on top of the heater box behind my glove box, the 10cd changer under the passenger seat, and the GPS antenna on the back window. I tried to make it look as factory as possible.
Looks good, sounds good, and looks mostly factory. i will get more/better pics as soon as possible.
Thoughts? Comments? Let me know.


