meu_21
Junior Member
I've enjoyed reading this forum over the past year with my own attempts at the Homlink and Aux switch mods, but I decided to join and share my DIY mod so that we can all benefit.
First, I didn't feel like ripping apart my truck to install visors with lighted vanity mirrors, but I still have to make the wife happy, so I figured out a battery operated way that still made it look stock with LED lights.
Parts you need:
1. 2-salvaged visors with vanity mirrors having side lights (or you can order the OEM MOPAR version - but I am frugal) *IMPORTANT to cut the wires for the salvaged visors after the connecting splice*
2. 4-button lights. Similar to these: https://www.amazon.ca/Button-LAMP-Adhesive-Light-Package/dp/B0721NYMJN
3. Electrical tape
4. Tools to remove and install visors, and a scissor.
Step 1 - Check that your button lights work!
Step 2 - Remove the light covers from your vanity mirrors and pull out the old bulbs
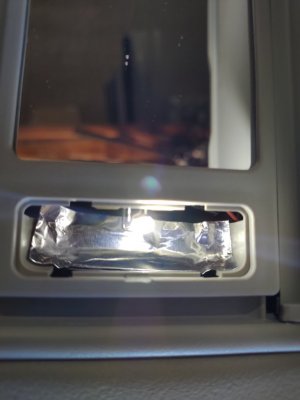
Step 2b - Poor man's upgrade: you can add a larger reflective metallic tape than the ones already provided in the visor's light bulb housing for more reflection (to reduce loss of light and direct where you want it).
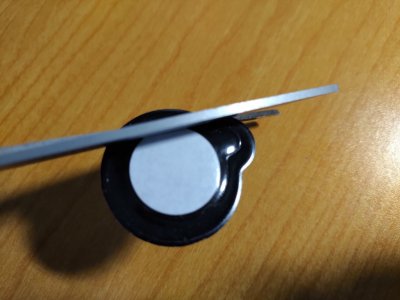
Step 3 - Cut the rims of the button switches. Don't worry, there is no wiring or issues with shorting the batteries (and even if you make a mistake, there are 2-more button lights in the package). *KEEP 2 button switch plastic housings as intact as possible*

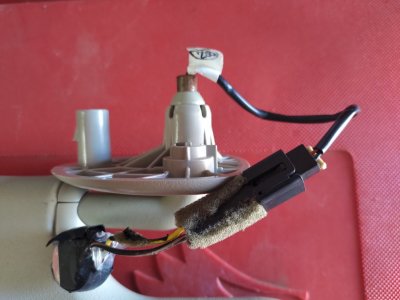
Step 4 - Attach the wires of the salvaged visor to the button light batteries by installing them in the button light housing (for added safety) and taping tightly with electrical tape to ensure a proper connection. It doesn't matter which wire goes to which end of the battery.

Step 5 - Take the LED bulbs from the button lights, fold over the bulb's terminals, but not so tight as to fall out of the lamp socket, and install in your visor. They should be snug enough that you can feel some resistance when pulling out. Careful not to touch both terminals in the socket at the same time! If the LED lights-up, you are good to continue with the next LED bulb on the other side. If it does not light-up, first reverse the LED contacts - turn over the LED (LEDs are omni-directional and are polarity sensitive). If it still doesn't work, check your batter connection (squeeze both ends). Fix as needed. Remember, the mirror lid acts as your switch!

Step 6 - Test the lights by opening and closing the mirror lid. If all is good, reinstall the light covers.
Step 7 - Remove your old visors and replace them with these new ones. When installing the new visors, you will have to push the battery and connecting splice in the cavity between the ceiling and roof to leave the visor attachment bracket unobstructed. Voila!
NOTES: LEDs don't use much power, and since the mirror lid acts as a switch, and the vanity mirror isn't frequently used, this battery set-up should last 3-4 years. The LED lights will practically last forever. After, just change the battery.
Enjoy!
First, I didn't feel like ripping apart my truck to install visors with lighted vanity mirrors, but I still have to make the wife happy, so I figured out a battery operated way that still made it look stock with LED lights.
Parts you need:
1. 2-salvaged visors with vanity mirrors having side lights (or you can order the OEM MOPAR version - but I am frugal) *IMPORTANT to cut the wires for the salvaged visors after the connecting splice*
2. 4-button lights. Similar to these: https://www.amazon.ca/Button-LAMP-Adhesive-Light-Package/dp/B0721NYMJN
3. Electrical tape
4. Tools to remove and install visors, and a scissor.
Step 1 - Check that your button lights work!
Step 2 - Remove the light covers from your vanity mirrors and pull out the old bulbs
Step 2b - Poor man's upgrade: you can add a larger reflective metallic tape than the ones already provided in the visor's light bulb housing for more reflection (to reduce loss of light and direct where you want it).
Step 3 - Cut the rims of the button switches. Don't worry, there is no wiring or issues with shorting the batteries (and even if you make a mistake, there are 2-more button lights in the package). *KEEP 2 button switch plastic housings as intact as possible*

Step 4 - Attach the wires of the salvaged visor to the button light batteries by installing them in the button light housing (for added safety) and taping tightly with electrical tape to ensure a proper connection. It doesn't matter which wire goes to which end of the battery.

Step 5 - Take the LED bulbs from the button lights, fold over the bulb's terminals, but not so tight as to fall out of the lamp socket, and install in your visor. They should be snug enough that you can feel some resistance when pulling out. Careful not to touch both terminals in the socket at the same time! If the LED lights-up, you are good to continue with the next LED bulb on the other side. If it does not light-up, first reverse the LED contacts - turn over the LED (LEDs are omni-directional and are polarity sensitive). If it still doesn't work, check your batter connection (squeeze both ends). Fix as needed. Remember, the mirror lid acts as your switch!

Step 6 - Test the lights by opening and closing the mirror lid. If all is good, reinstall the light covers.
Step 7 - Remove your old visors and replace them with these new ones. When installing the new visors, you will have to push the battery and connecting splice in the cavity between the ceiling and roof to leave the visor attachment bracket unobstructed. Voila!
NOTES: LEDs don't use much power, and since the mirror lid acts as a switch, and the vanity mirror isn't frequently used, this battery set-up should last 3-4 years. The LED lights will practically last forever. After, just change the battery.
Enjoy!

