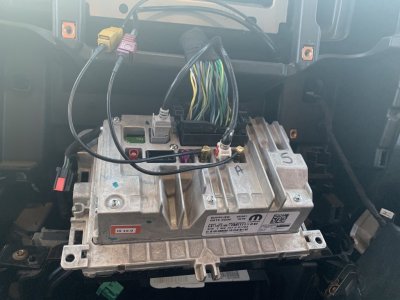
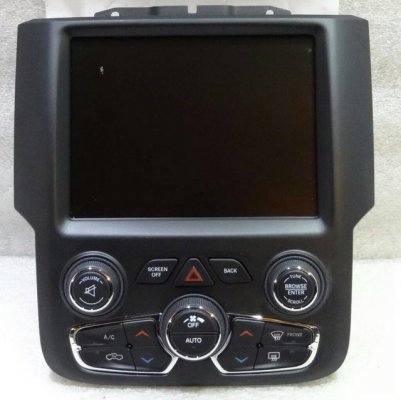
DIY: 2013-2017 RA3/RA4 8.4" Radio Upgrade/HVAC Conversion

Disclaimer: Links on this page pointing to Amazon, eBay and other sites may include affiliate code. If you click them and make a purchase, we may earn a small commission.

Mpgrimm2

Senior Member
Preferred Vendor
Military
Joined
Mar 30, 2014
Posts
6,197
Reaction score
4,339
Location
SC
Ram Year
2022 Ram 1500 (5th Gen)
Engine
5.7L
** THIS IS A WORK IN PROGRESS. PLEASE BE PATIENT WHILE I RECREATE THE DELETED THREAD & ASSOCIATED LINKS AGAIN **
see ... 2013+ radio thread missing.

** Posts 1-12 and 15 are updated with working links and pictures **

I take NO credit for any of this, just wanted to sum this info up for everyone here. All credit goes to Getupkid, Duneflyer, Mondo161, Cptwing, PJW67, and others for getting this project started and all their research.

Be sure to thank Cptwing and Indaram for these original posts wherever you see them as well as the original folks who did all the work to figure this out...

(again, I had nothing to do with it, I'm merely the tech secretary here that put Humpty Dumpty back together again)

Original Thread Posted by Indaram
[/B] recreated/edited below
.
* PSA: see post 344
DO NOT SWAP COMPLETE DASH HARNESSES BETWEEN TRUCKS FOR AN 8.4/HVAC or AUDIO CONVERSION !!!


2018 & 19 CLASSIC OWNERS !]

* It is NOT recommended to install a 13-17 RAx radio in a 2018 or 19 classic!


It 'can' be done but you 'CURRENTLY' can't get rid of Cellular System needs service error message at startup (unless using the recommended 2018/19 classic UAx radio, & you will need ATC w/UAx upgrades to avoid hvac blend door issues).


Ram 2019 Classic RA2 to RA4 Upgrade.

& How To: Install a 2018 4C (UAQ/UAS) Radio in 2013 - 2017 RAM


Gibbs' HVAC Issues w/UAS upgrade (fixed with ATC mod).
& Outback199 's 19Classic w/same issue at post 138.
 
Last edited:
OP
OP
Mpgrimm2

Mpgrimm2

Senior Member
Preferred Vendor
Military
Joined
Mar 30, 2014
Posts
6,197
Reaction score
4,339
Location
SC
Ram Year
2022 Ram 1500 (5th Gen)
Engine
5.7L
Converting a 2013+ (thru 2016) RA1/RA2 MTC bezel
with 7 speed blower

to a RA3/RA4 MTC bezel and Radio.

Indaram said:
Indaram's original post recreated/edited below

NOTE:
There is a confirmed working mod for those that have a 4 speed blower, see Cptwing's posts 3-8 for extra steps/parts for a 4 speed fan conversion.


Parts Required For MOD:

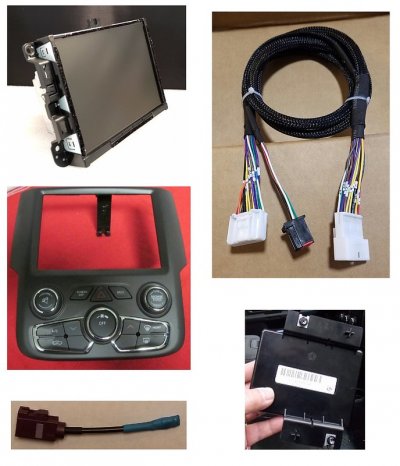
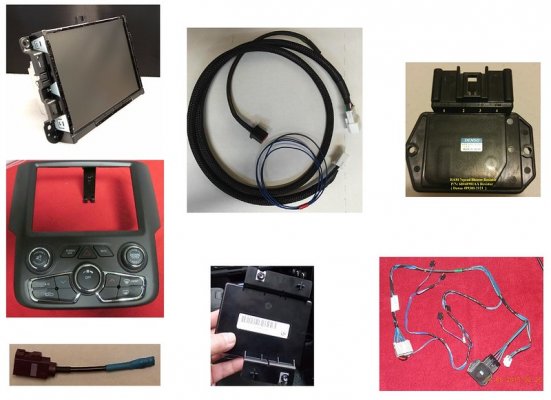
01. 8.4 Uconnect Radio (VP3/RA3 - Non-Nav) or (VP4/RA4 - Nav)

** For Compatible RA4 Radios see here. **Check car-part.com, Schram, ebay, etc.

02. SINGLE ZONE OEM 8.4" (MTC) BEZEL: 1UJ96DX9AF (AC, AD, AE, etc)
** Optional: DUAL ZONE 8.4" (ATC) BEZEL, while not preferred, will work. See POST 15

03. Base to 8.4 Radio Conversion Harness (7 speed Fan specific models):
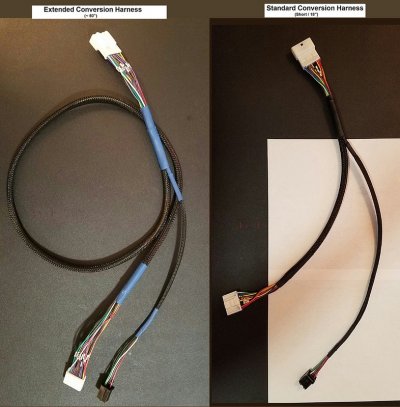
. . See below to make your own in standard or extended length
. . (or get the extended version from: M² Mods )

NOTE: See Posts 6 & 7 (from 4spd conversion) for pictures of factory HVAC Module location using extended harness.

04. HVAC Control Module: 68268186Ax (AB, AC, etc) (7 speed Fan specific models)
** (also replaces 68183973Ax, 68236772Ax, 68239172Ax, etc. See here)

< 10/4/19 edit > 2018/19' Classic w/UAx = 68366552AA HVAC module. See post 89.
** UAx Radio Upgrade has very high likelyhood of HVAC Blend door issues that are fixed by adding the ATC wiring mod with conversion. See links in UAQ/UAS Upgrade thread. **


05. 911 Error Fix/Cell Bypass Plug: (or SharkFin Antenna mod)
. . See note 1 (below) to make your own or get one from M² Mods (or online elsewhere for more).

35617304951_6520b11606_c.jpg

Mpg2's Instruction Sheet References:
- 2013-2017 8.4 Conv for 7 Speed Fan Trucks 7-6-17.pdf v1 <----- RECOMMENDED READING
- 2013-2016 Ram Radio Removal 6-27-16.pdf
- 2013-2016 Ram RearView Mirror (w/mics) Upgrade & Harness install 7-8-16.pdf

Mpgrimm2 said:
Pre-install recommendation to save any headaches...

- pop the 8.4 radio in with the existing bezel to make sure it works.

- resistance check (ohm out with a meter) the conversion harness against the schematic below to make sure it's good to go. (Whether you purchase it or make it yourself, since they are handmade and mistakes do happen)

Optional parts (Verified for 13-16 trucks, for 17/18 see here)
- RA2 style Manual Dim Mirror w/mics: - 68102484AA (Recommended) (2013-2016 Trucks)
. . . (Man. Mirror Mount Covers: Upper - 1ZA38DX9AA & Lower - 1YW11DX9AA )

. . or 911/Assist AutoDimming Mirror: - 68096091AF (Req's Sales Code) (2013-2016 Trucks)
. . . (AutoDim Mirror Mount Covers: Upper - 1ZA39DX9AA & Lower - 1YW13DX9AB )

. . or 911/AutoDim w/AutoHighBeam Mirror: - 68096094AA (Req's Sales Code)
. . . (AutoDim w/AutoHighBeam Covers: Upper - 1ZA39DX9AA & Lower - 1YW14DX9AC )

- Mirror Header harness (Std AutoDim w/o Humidity): - 68207372AB
- Mirror Header harness (Std. AutoDim w/Clearance Lts): - 68186009AC

- Antenna Cable Body Cell & SDARS "QUAD/CREW" (Rear cab Ant): - 68148279AD
- Antenna Cable Body Cell & SDARS (Front Cab Ant): - 68148260AC
- Antenna Jumper Cable: - 68148258AD
- Shark Fin Antenna: - 5091278AC
- SD Card Media Hub: - 68096428AD
- VR/Phone Button (for steering wheel) - 56054449AA

NOTE 1:
You can omit the Antenna body cable, Antenna jumper cable, and shark fin antenna if you get a Bypass Plug from: M² Mods)

Or you can make your own using the following parts (search ebay and amazon for these)
Farka D connector/Pigtail with 2 to 6 inch lead
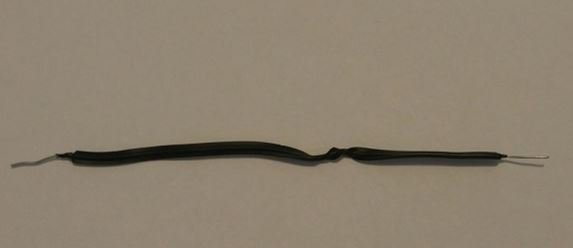
10k Ohm Resistor with 5% tolerance, 1/2 watt.

Just solder one end of the resistor to the center wire and the other end to the wire shielding. Tape it up with electrical tape or heatshrink it.

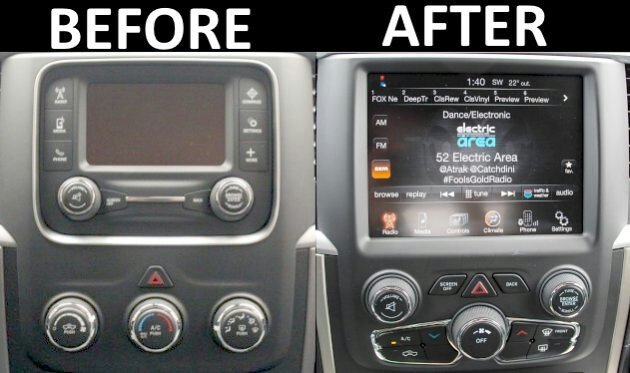
A. RA4 Mod Before & After.jpg
35705382496_ffb4100014_z.jpg


B. Standard vs Extended Conversion Harness.jpg
35705036506_b99507367e_c.jpg


Connectors & Pins to Make Conversion Harness
(Use attached wire diagram and pin-out below)
06. 24 Pin Connector 1: 1318917-1 TE Connectivity | Mouser
07. 24 Pin Connector 1 - (F) Sockets: 1123343-1 TE Connectivity / AMP | Mouser
08. 24 Pin Connector 2: 1376103-1 TE Connectivity | Mouser
09. 24 Pin Connector 2 - (M) Pins: 1376109-1 TE Connectivity / AMP | Mouser
10. 08 Pin Female - Connector: 30700-1081 Molex | Mouser
11. 08 Pin Female - (F) Sockets: 1393366-1 TE Connectivity / AMP | Mouser

Connector/harness Reference:
- 8 Pin Center Stack HVAC Conn 0307001081 AS-30700-000 Series Instruction Sheet.pdf
- 24 Pin HVAC TEconn 025series Instruction Sheet 411-5928_G4.pdf
- Cptwing's harness making notes at Post 9
- Mpgrimm2 Harness Soldering Notes at Post 13

12. 22 AWG stranded wire
.... (Short harness w/HVAC module behind radio bezel = approx. 18" lengths)
.... (Ext'd harness w/module at factory location behind pass. air vent/glove box = approx. 50" main & 18" 8pin lengths)


13. Crimp tool to crimp the pins on the wire. (Check Amazon & Ebay for wire and crimp tool)
.... See post 12 for some notes on possible crimpers.

Harness Pinout
24 Pin Connecter (2014)
Pin 01 to Pin 01 (Also needs to splice over to Pin 4 on 8 Pin Connector)
Pin 02 to Pin 02
Pin 03 to Pin 06
Pin 04 to Pin 05
Pin 05 to Pin 04
Pin 06 Blank
Pin 07 to Pin 13
Pin 08 on Moves to Pin 2 on 8 Pin Connector
Pin 09 to Pin 07
Pin 10 to Pin 08
Pin 11 Blank
Pin 12 to Pin 10
Pin 13 to Pin 9
Pin 14 to Pin 14 (Also needs to splice over to Pin 3 on 8 Pin Connector)
Pin 15 to Pin 15
Pin 16 to Pin 16
Pin 17 to Pin 17
Pin 18 to Pin 18
Pin 19 to Pin 19
Pin 20 to Pin 20
Pin 21 to Pin 21
Pin 22 to Pin 22
Pin 23 to Pin 23 (Also needs to splice over to Pin 5 on 8 Pin Connector)
Pin 24 to Pin 24 (Also needs to splice over to Pin 1 on 8 Pin Connector)

RA4 Conversion Harness layout - 7spd w/Mpg2 Edits 4-16-17.jpg (D/L)

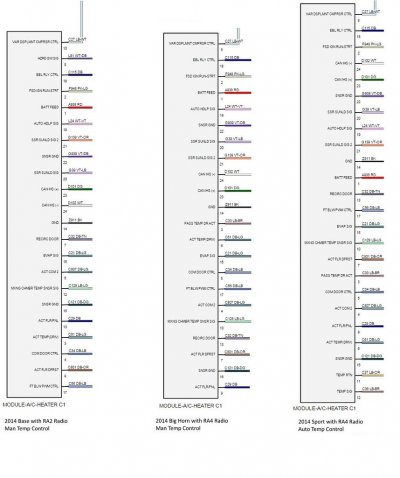
D. Reference for the different HVAC module pinouts per 2014 truck 1500 model:
2014 24 Pin HVAC C1 Conn Compare.jpg
35578237372_1d93fb4b08_b.jpg
 
Last edited:
OP
OP
Mpgrimm2

Mpgrimm2

Senior Member
Preferred Vendor
Military
Joined
Mar 30, 2014
Posts
6,197
Reaction score
4,339
Location
SC
Ram Year
2022 Ram 1500 (5th Gen)
Engine
5.7L
Converting a 2013+ (thru 2016) RA1/RA2 MTC bezel
with 4 speed blower
to a RA3/RA4 MTC bezel and Radio.

** POST 17 : Important note/Caution about using cheap cloned blower resistors **


Cptwing said:
Cptwing's original post recreated/edited below...

It’s been quite a journey developing this harness along with Getupkid, Duneflyer, Mondo myself and several others. We now have a complete DIY solution for upgrading to the RA4 or RA3 from the RA1 and RA2 radios. The basic Radio is PNP now that we can use the 8.4 bezel and HVAC controls.

There are currently two factory setups for the hvac blower: the 7 speed and the 4 speed.

This is how I understand how the trucks were built, if they were equipped with the RA1 or RA2 radios.

2013 1500's have the 4 speed blower setup. (Fixed Displacement Compressor)
2013-2018 2500/3500's have the 4 speed blower set up. (Fixed Displacement Compressor)
2014-2018 1500's have the 7 speed blower set up (Var. Displacement Compressor)

NOTE:
The conversion for the 7 speed factory fan set up while similar is different and involves not only a different HVAC module but the pinouts for the conversion harness are also slightly different, see Post 2.


Parts Required For MOD:

01. 8.4 Uconnect Radio (VP3/RA3 - Non-Nav) or (VP4/RA4 - Nav)

** For Compatible RA4 Radios see here. **Check car-part.com, Schram, ebay, etc.

02. SINGLE ZONE OEM 8.4" (MTC) BEZEL: 1UJ96DX9AF (AC, AD, AE, etc)
** Optional: DUAL ZONE 8.4" (ATC) BEZEL, while not preferred, will work. See POST 15

03. Base to 8.4 Radio Conversion Harness (4 speed Fan specific):
. . See below to make your own in standard or extended length
. . (or get an extended one from: M² Mods )

04. HVAC CONTROL MODULE: 68105017Ax (AA, AB, etc) (4 to 7 speed Fan specific). Replaces 68186216Ax, 68236773Ax, 68268187Ax.
. . ** If you use the wrong/incompatible module (ie xxxx8186Ax = No A/C & 6 vs 7 fan speeds)

< 10/4/19 edit > 2018 2500/3500's w/UAx = 68366553Ax HVAC module. See post 89.
** UAx Radio Upgrade has very high likelyhood of HVAC Blend door issues that are fixed by adding the ATC wiring mod with conversion. See links in UAQ/UAS Upgrade thread. **

05. Fan Motor Power/Resistor Harness: 68048906AA (Req's Modification)
. . (or see DeereGuy's write-up of 00R/T's notes to make your own at roll-up posts 1765-1766 or get the plug-n-play version at M² Mods ... watch out for poorly made ones elsewhere)

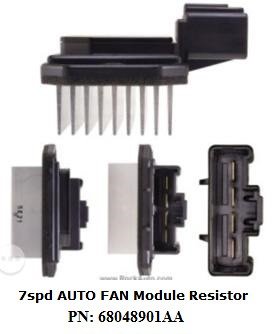
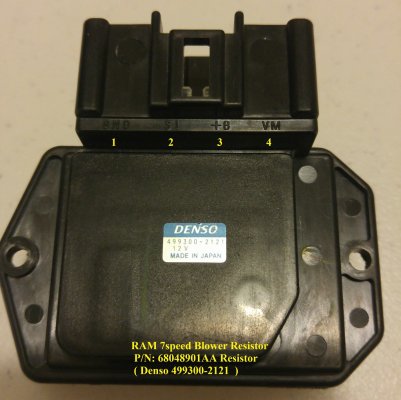
06. 7spd Blower Resistor: 68048901AA (same as Denso PN 499300-2121) See ebay ad and Post 51 )

07. 911 Error Fix/Cell Bypass Plug: (or SharkFin Antenna mod)
. . See note 1 (below) to make your own or get one from M² Mods.

34938934063_70c908b47d_c.jpg

Mpg2's Instruction Sheet References:
- 2013-2017 8.4 Conv for 4 Speed Fan Trucks 7-6-17.pdf v1 <----- RECOMMENDED READING
- 2013-2016 Ram Radio Removal 6-27-16.pdf
- 2013-2016 Ram RearView Mirror (w/mics) Upgrade & Harness install 7-8-16.pdf

Mpgrimm2 said:
Pre- install recommendation to save any headaches...

- pop the 8.4 radio in with the existing bezel to make sure it works.

- resistance check (ohm out with a meter) the conversion harness against the schematic below to make sure it's good to go. (Whether you purchase it or make it yourself, since they are handmade and mistakes do happen)

Optional parts
- PLEASE SEE POST 2

NOTE 1:
You can omit the Antenna body cable, Antenna jumper cable, and shark fin antenna if you get the Bypass Plug from M² Mods

Or you can make your own using the following parts (search ebay and amazon for these)
Farka D connector/Pigtail with 2 to 6 inch lead
10k Ohm Resistor with 5% tolerance, 1/2 watt.

Just solder one end of the resistor to the center wire and the other end to the wire shielding. Tape it up with electrical tape or heat shrink it.

Connectors & Pins to Make Conversion Harness
08. 24 Pin Connector 1: 1318917-1 TE Connectivity | Mouser
09. 24 Pin Connector 1 - (F) Sockets: 1123343-1 TE Connectivity / AMP | Mouser
10. 24 Pin Connector 2: 1376103-1 TE Connectivity | Mouser
11. 24 Pin Connector 2 - (M) Pins: 1376109-1 TE Connectivity / AMP | Mouser
12. 08 Pin Female - Connector: 30700-1081 Molex | Mouser
13. 08 Pin Female - (F) Sockets: 1393366-1 TE Connectivity / AMP | Mouser

Connector/Harness Reference:
- 8 Pin Center Stack HVAC Conn 0307001081 AS-30700-000 Series Instruction Sheet.pdf
- 24 Pin HVAC TEconn 025series Instruction Sheet 411-5928_G4.pdf
- Cptwing's harness making notes at Post 9
- Mpgrimm2 Harness Soldering Notes at Post 13

14. Wire 22 gauge 50.0 inches long QTY of 20
15. Wire 22 gauge 18.0 inches long QTY of 5
16. Electrical tape one roll should be enough
17. Wire ties
18. Heat Shrink
19. Solder/Soldering Iron
20. Split Wire loom or Nylon Braided Sleeving

Along with this you will need the following:
21. Wire strippers..
22. Crimpers double roll type recommend ratchet type
.... See post 12 for some notes on possible crimpers.
23. Heat gun
24. Small awl or similar tool to de pin connector

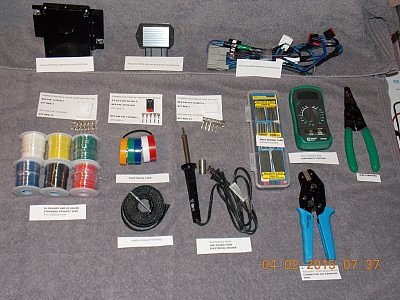
Here is a shot of everything needed except that some tools are not shown.
dscn0418 - 4spd parts layout.jpg
35617437321_28038cf8f6.jpg

The diagram shown below details the conversion harness and pinouts of the various connectors, what is not shown and will be addressed later is how part 1 above ties into it, at pin 17 on the module side.

CptWing RA4 Conversion Harness layout - 4spd w/Mpg2 Edits 4-16-17.jpg


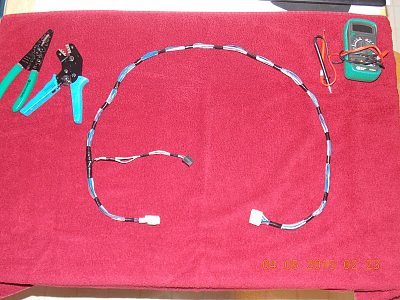
And after a bit of work and eye strain your harness should look something like this...

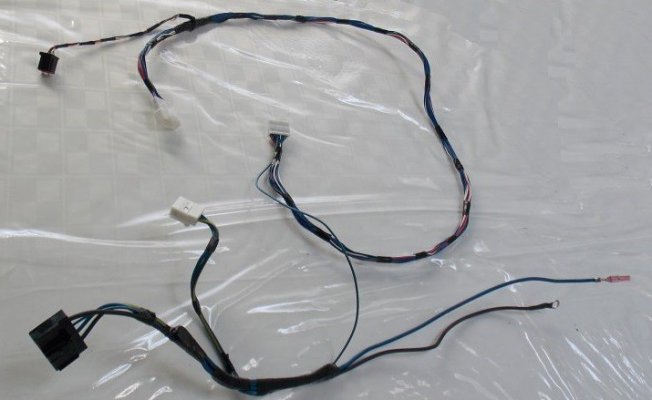
dscn0425 - Complete Extended 4spd Conversion harness.jpg
35617437251_bcc085cabc.jpg
 
Last edited:
OP
OP
Mpgrimm2

Mpgrimm2

Senior Member
Preferred Vendor
Military
Joined
Mar 30, 2014
Posts
6,197
Reaction score
4,339
Location
SC
Ram Year
2022 Ram 1500 (5th Gen)
Engine
5.7L
Post 4

Cptwing said:

Original post recreated/edited below

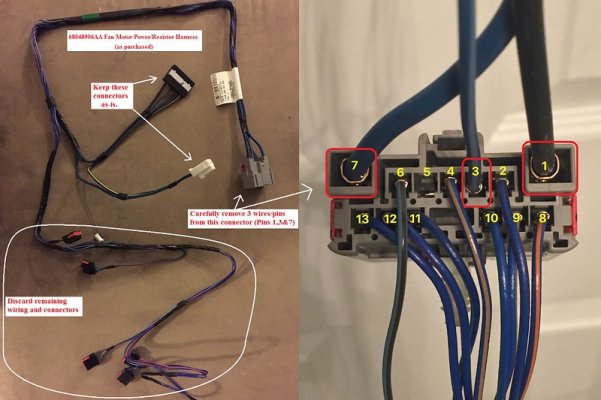
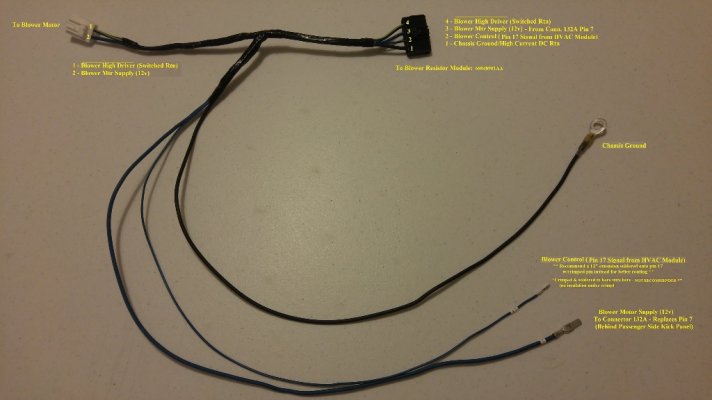
Next, the item 05. harness (purchased Fan Power/Resistor Harness) will need to be stripped down to retain only the needed parts. Here it is before mods...

dscn0471 - 68048906AA - Before - Fan Motor Power Resistor Harness.jpg
(updated picture, thanks JRG18) of the Fan Power Harness (as purchased) with added notes.
35579618172_3b31ebf798_c.jpg

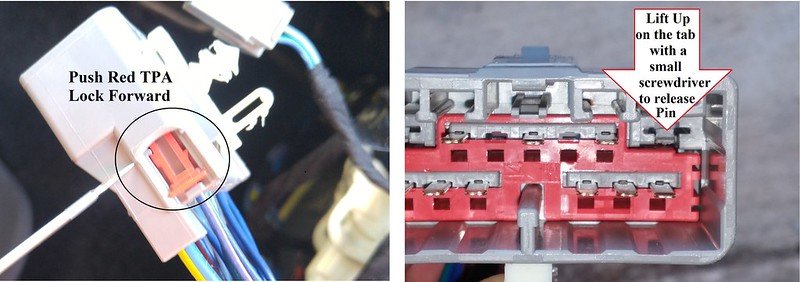
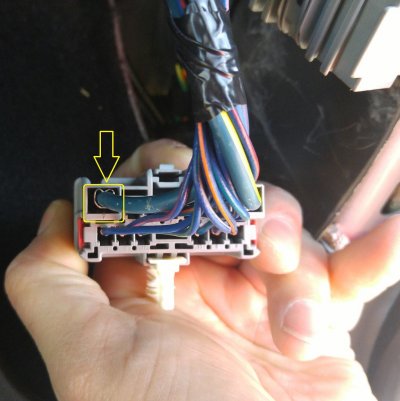
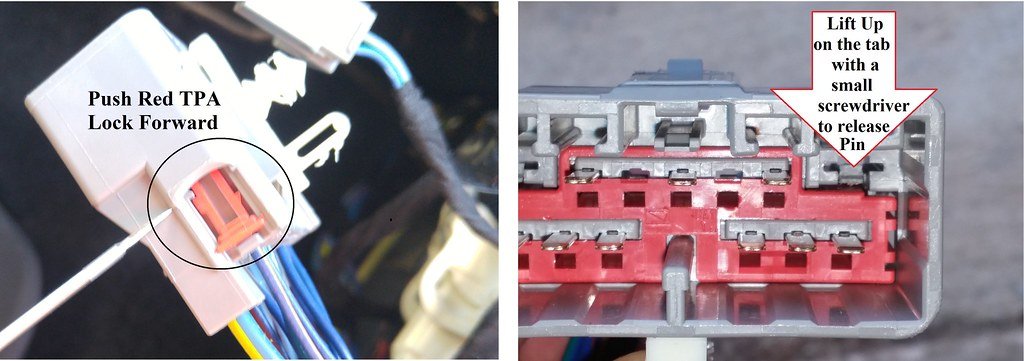
In order to prep the bought harness (item 05), we must de-pin connector i32A (mis-ID'd as 132A), to do this you need to remove (release position) the TPA (terminal position assurance) the red thing. Then using a small jewelers screw driver pry back the locking tab and pull out the wire and pin.

Here is the connector and TPA (From later pictures).
34907649734_ee97d6e68a_c.jpg


Here is the stripped down unpinned harness item 05, this is what you will use the rest will be discarded.
dscn0471 - 68048906AA - MODDED Fan Motor Power Resistor Harness.jpg
35708560756_8022b0c2e7_k.jpg

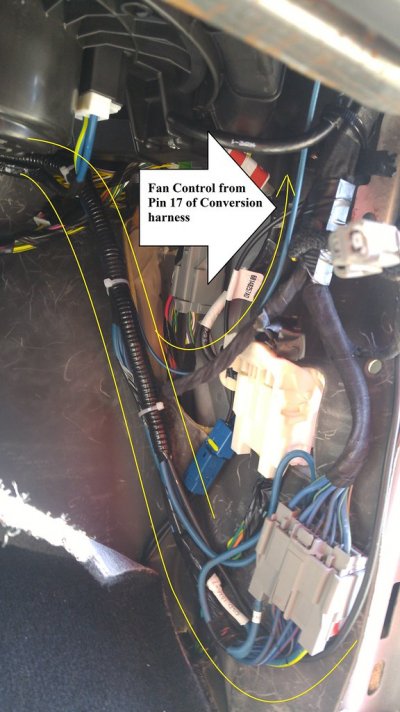
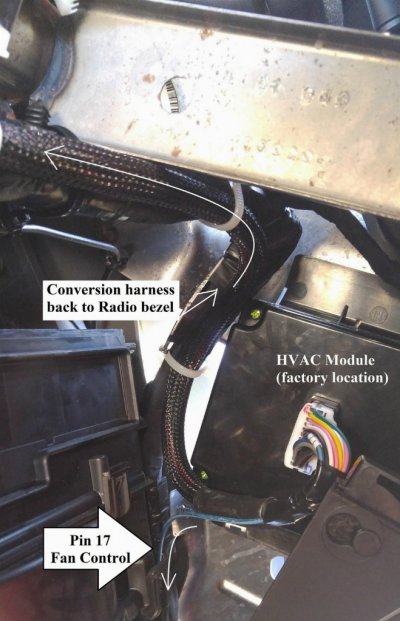
The stripped down Fan Power harness (item 05) connects to the fabbed Conversion Harness (item 03) on the HVAC module side using the DB/LB 16 gauge wire that goes to pin 2 in the resistor plug. I cut this wire to 25.0 inches long and crimped a female pin on it for the 24 pin connector and inserted it into cavity number 17. Note this is a 16 gauge wire and these pins are not designed for wire this thick so you will only be able to crimp the stranded wire into the pin and not the insulation. The other alternative would be to crimp a pin on a smaller 22awg or 24awg wire and solder them together (or butt splice=less reliable).

MPG edit: I think a 12" (i.e. 22Awg) pinned extension for pin 17 would allow better routing of the wire.
Also recommend not shortening the wires.

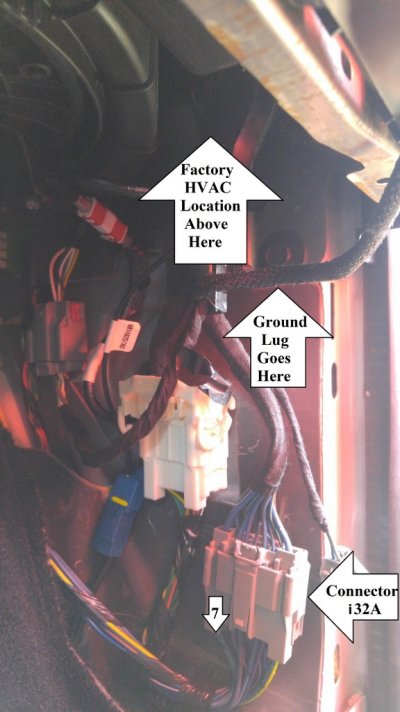
Next I cut the black ground wire coming out of the resistor plug to 20.0 inches long and crimped a 10 gauge ring connector onto the end and shrunk wrapped the connection.

The DB wire coming out of cavity 3 of the resistor plug is not to be cut. This wire is to be used to re-pin the existing i32A (prev. mis-ID'd as 132A) connector on your truck. I looped the excess wire back and taped it off.

. . (or see DeereGuy's write-up of 00R/T's notes to make your own at roll-up posts 1765-1766 {edit: lost with prior thread delete} or get one ready to go at M² Mods)
35579952632_0852778269_z.jpg


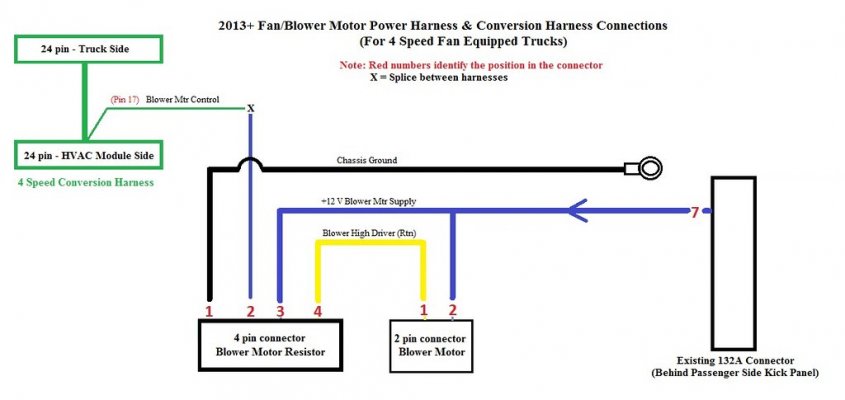
Here is a diagram of how the harnesses are interconnected (thanks Mondo161):
2013-2016 8.4 Blower Mtr & 4Spd ConvHarness Connections - Mpg Edit.jpg

35708868846_1775cfd8f0_b.jpg

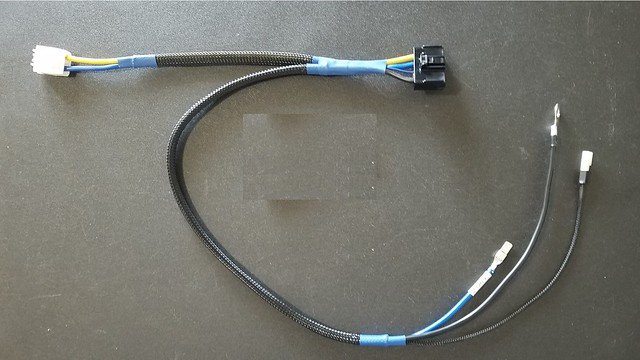
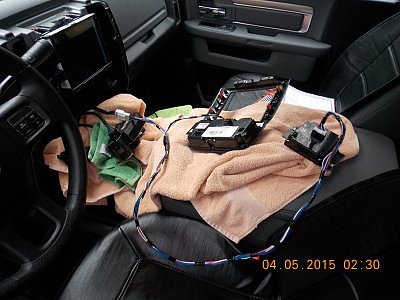
Here is the complete, combined and finished harness ready to be installed
MPG NOTE: You may find it easier to connect the fan harness' Pin 17 to the conversion harness after both are 99% installed
(its up to you)

dscn0494 - Cptwing - RA4 4spd Combined harnesses.jpg
35749390385_b0790a1579_b.jpg


Last edited: Jul 5, 2017
 
Last edited:
OP
OP
Mpgrimm2

Mpgrimm2

Senior Member
Preferred Vendor
Military
Joined
Mar 30, 2014
Posts
6,197
Reaction score
4,339
Location
SC
Ram Year
2022 Ram 1500 (5th Gen)
Engine
5.7L
Post 5

Cptwing said:

Original post recreated/edited below

Now for the install,

First disconnect the battery, remove the following; center stack (and radio for access), cardboard bottom located under lower glove box, lower glove box and upper glove box cavity (door does not need to be removed), passengers side kick panel and passengers side dashboard end trim piece.

Note: Removing/Installing the radio and bezel are not covered here as there are several places on YouTube/internet that cover it (Separate instruction sheet available in post 3).

Mpgrimm2's panel/prep notes:

Radio C1 Connector Latch
35361938310_b5fc205380_b.jpg

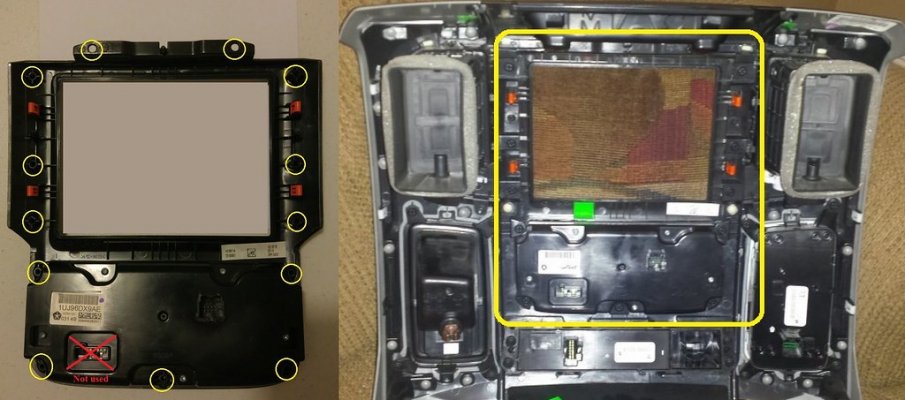
Once the center stack and RA1/RA2 are removed, you will need to swap out the old bezel/HVAC controls for the RA3/RA4 (8.4A/AN) bezel. Set this aside until later.
8.4 Bezel Back2
35709060696_6ab1339434_b.jpg


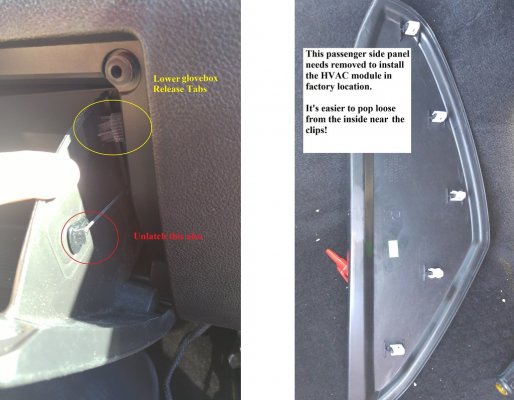
Lower Glovebox release and HVAC Module Passenger Side dash cover
Glovebox & Side Panel
35709062686_f2cd1155e1_b.jpg

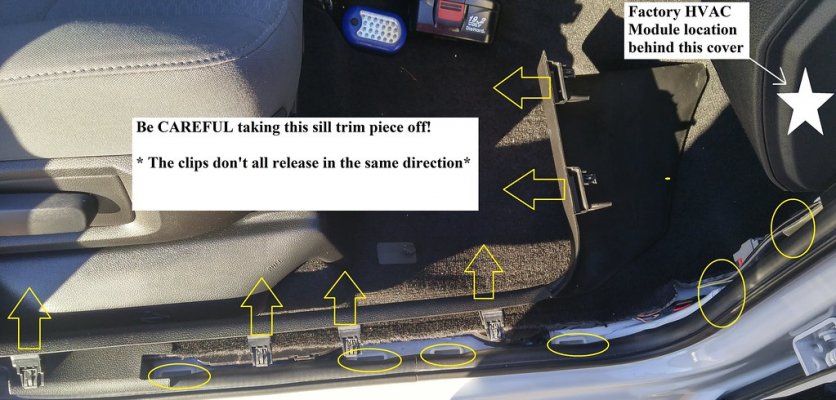
Passenger Side Kick Panel/Door Sill (PAY ATTENTION)
20160102_153909_HDR
35709063636_653c5fa932_b.jpg
 
Last edited:
OP
OP
Mpgrimm2

Mpgrimm2

Senior Member
Preferred Vendor
Military
Joined
Mar 30, 2014
Posts
6,197
Reaction score
4,339
Location
SC
Ram Year
2022 Ram 1500 (5th Gen)
Engine
5.7L
Cptwing said:
Original post recreated/edited below

Now for the parts install...

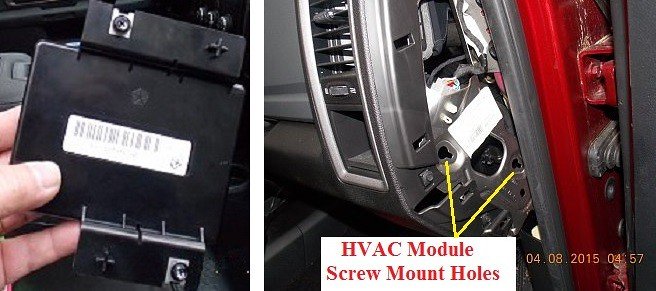
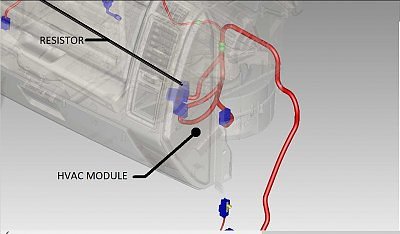
To install module slide it in through the lower glovebox cavity and position the two hex head screw into the keyhole cut outs in the dashboard sub structure and slide forward and tighten see below.

Make sure to orient with plug farthest forward to clear lower glove box when operating, see 3rd photo on this post.


HVAC Module and Factory Location.jpg (Notice the two key hole slots)
35618373961_30d7e88861_b.jpg

Resistor & HVAC Modules factory locations.jpg
34940140733_8367bd59e2.jpg

Now to install the harness we have to first replace the existing resistor with the new one (part 3), remove the 2 phillips head screws securing the existing one and replace it with the new one using the existing screws.


Here is the existing resistor prior to removal
20160102_122844.jpg
35709474436_01b6517d67_b.jpg

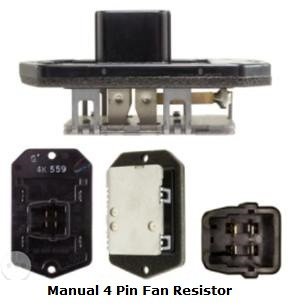
And here are the two resistors...

** POST 17 : Important note/Caution about using cheap cloned blower resistors **

Mondo161 Manual 4 Pin Fan Resistor 2015-03-07 2023_52_27.jpg
35618374331_4d477d112f.jpg

Mondo161 7spd AUTO FAN Module Resistor 2015-03-07 2023_52_01.jpg
35362190590_737ab6d28b.jpg

Mpgrimm2 7spd Blower Resistor 68048901AA w Denso PN 499300-2121.jpg
35618374301_c328daecbd_b.jpg

I took this picture while mocking up the harness.
dscn0427 - Module & harness testing.jpg
35749986275_f45670baba.jpg
 
Last edited:
OP
OP
Mpgrimm2

Mpgrimm2

Senior Member
Preferred Vendor
Military
Joined
Mar 30, 2014
Posts
6,197
Reaction score
4,339
Location
SC
Ram Year
2022 Ram 1500 (5th Gen)
Engine
5.7L
Cptwing said:
Original post recreated/edited below


Now to install the harness:
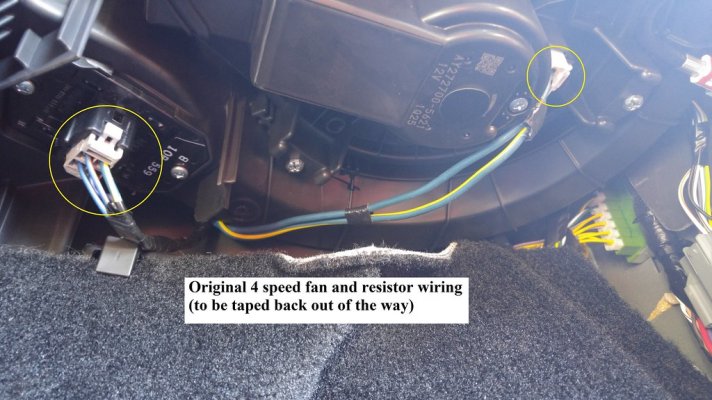
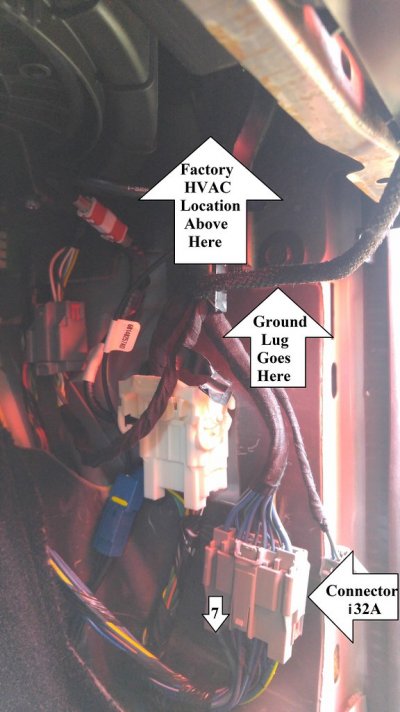
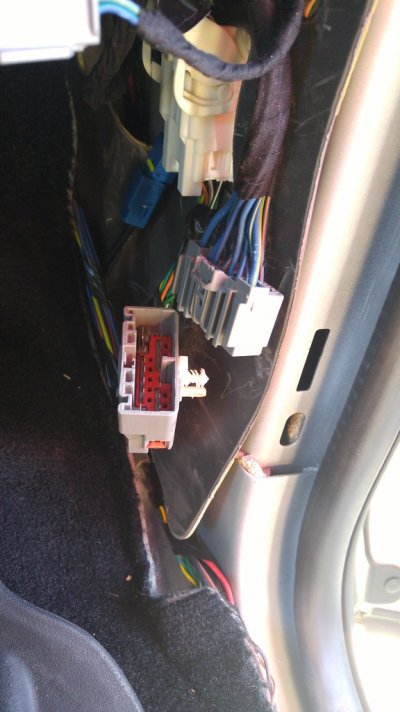
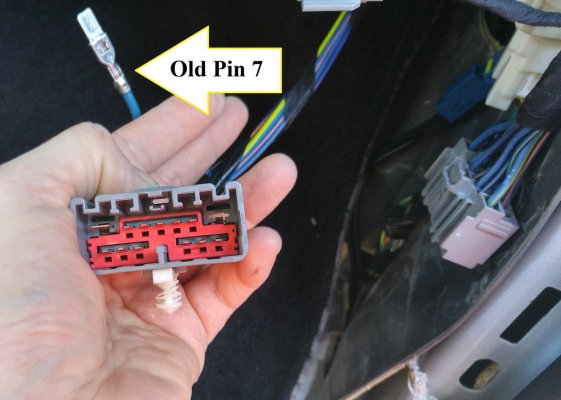
Unplug the existing connector from the motor and tape it off along with the existing resistor plug they will not be used. Then unplug connector i32A (prev. mis-ID'd as 132A) and replace the wire located in cavity 7 with the one in the new harness, this is the 10 gauge wire you unpinned from part 1.

Reference Locations:
20160102_122948

35362580650_70bd58d574_b.jpg

Connector i32A Before:
20160102_123220.jpg

35618773651_f0a5b94aec_b.jpg

Backside view of i32A-7:
20160102_123345.jpg

35750129415_29f12e8987_b.jpg

Connector i32A - TPA lock and Pin7 Release point:
i32A Locks.jpg

34907649734_ee97d6e68a_b.jpg

Connector i32A with pin 7 wire removed
20160102_123953_HDR.jpg

35362591650_958d2a0bb1_b.jpg

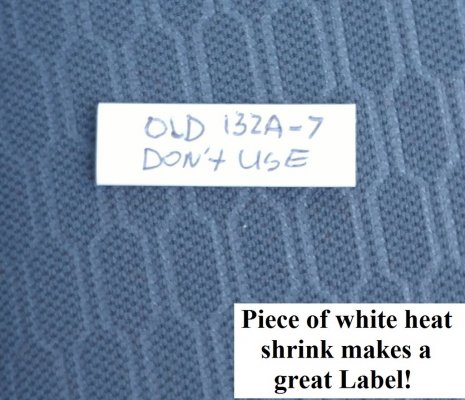
Heat shrink label
20160102_125520.jpg

35750127285_7917491ee1_b.jpg

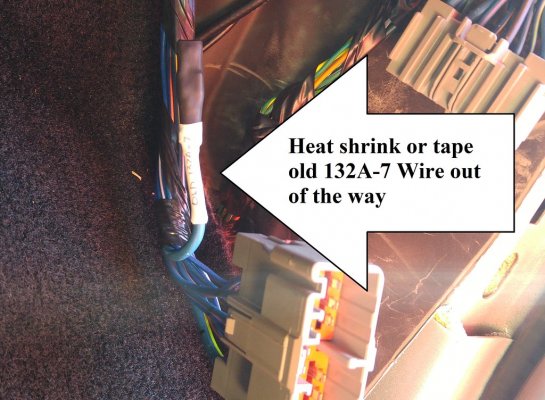
Old i32A-7 taped out of way:
20160102_130345.jpg

35362590860_578681bd15_b.jpg

Here is connector i32A after I switched the wire in cavity 7
20160102_140440.jpg

35362590460_641e420531_b.jpg

Attach black 10 gauge ground wire ring terminal to body bolt location as indicated earlier.
dscn01000.jpg
35362580650_8111100886_h.jpg

Plug new harness into resistor and motor.
dscn0497.jpg
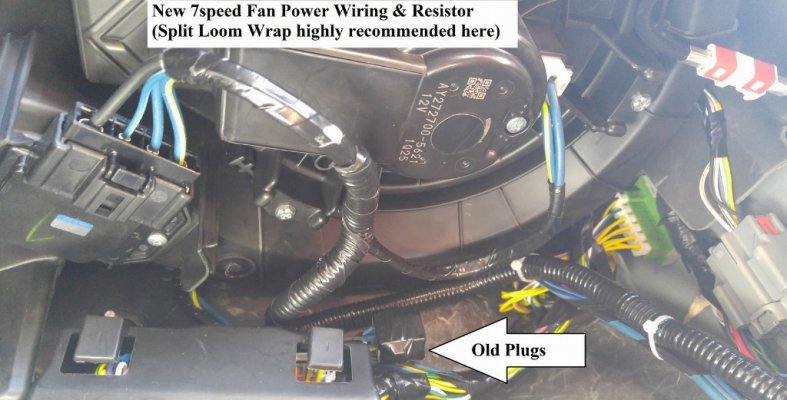
Here is the new fan harness and upgraded resistor to enable 7 speeds.
(NOTE: The split wire loom will protect the wires from damage by nearby bolt/threads)
20160102_140544.jpg

35362589470_39ef7e1743_h.jpg


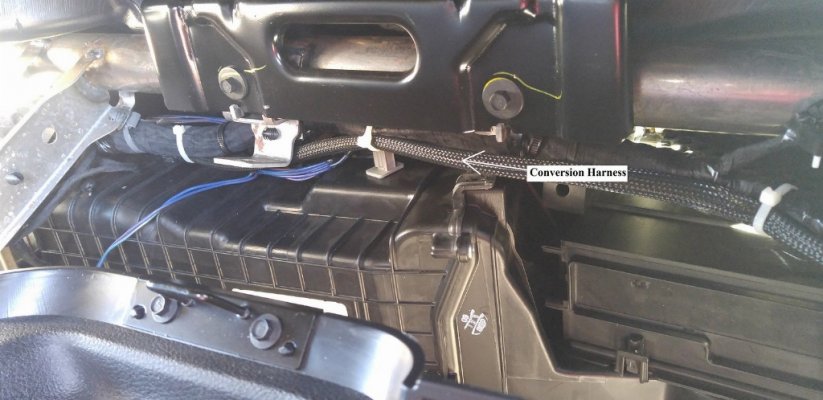
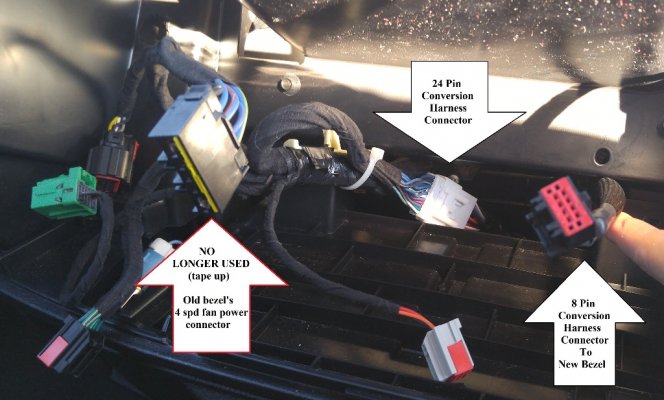
Plug harness into module and begin routing it to radio bezel along the same route as the existing body harness and SDAR / Cell antenna leads. The new harness is shown wrapped in corrugated split loom.
dscn0502.jpg

dscn0463 - - Factory HVAC Module Location Inside View.jpg
20160102_144648.jpg

34940489583_dfbfd9f4ff_h.jpg

dscn0462 - Extended Harness Routing.jpg
20160102_144733.jpg

35362587080_e19df3b379_h.jpg

Another view as routed, looking through the upper glove box.:
20160102_144829_HDR.jpg

35362585520_594f44aeb0_h.jpg
 
Last edited:
OP
OP
Mpgrimm2

Mpgrimm2

Senior Member
Preferred Vendor
Military
Joined
Mar 30, 2014
Posts
6,197
Reaction score
4,339
Location
SC
Ram Year
2022 Ram 1500 (5th Gen)
Engine
5.7L
Cptwing said:
Original post recreated/edited below

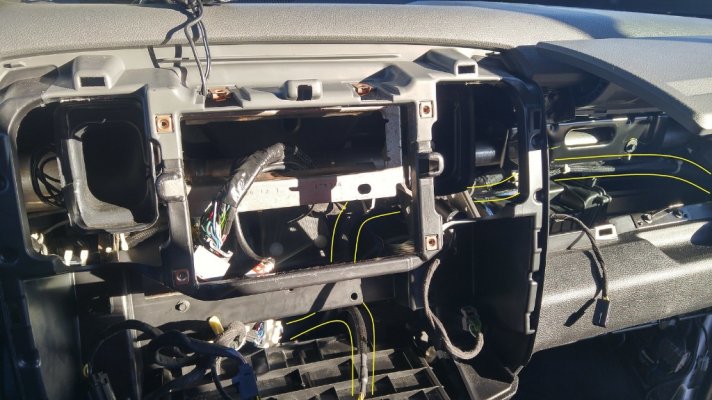
Finish routing the harness into the center stack area and plug the 24 pin connector on the harness into the existing 24 pin connector on the truck. Plug in the connectors you previously unplugged and also plug in the 8 pin plug into you new bezel.

Harness coming in behind bezel:
20160102_144747.jpg
35362586160_984a8e6c1b_k.jpg

Reconnect battery and test everything and ensure it is working correctly. Reassemble your truck

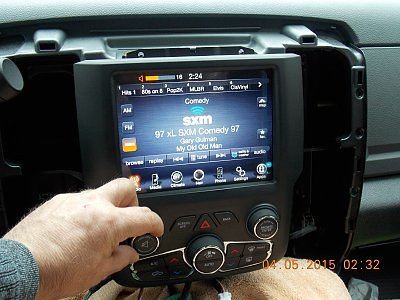
And here is the bezel installed while testing harness showing all 7 fan speeds, yes that's right the fan now has seven speeds it seems to push more air and is quieter.
dscn0430.jpg
34940862973_48e81778ea.jpg

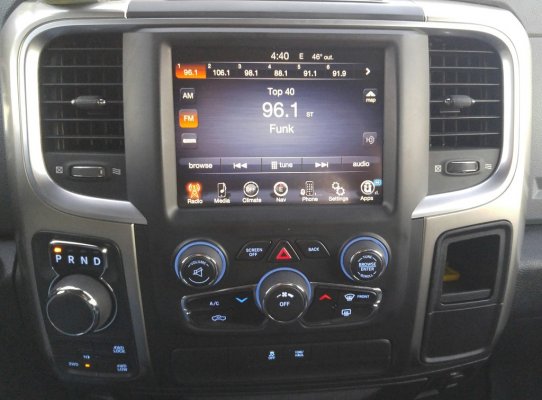
And here is the finished job! Everything on the bezel works as it should. Works perfectly!
20160102_164049.jpg
35581152682_0377132d7d_b.jpg

Oh and prior to bundling it up I tried two other bezels I had. Both are dual zone with auto climate control. They also worked except for the actual dual zone or auto climate control functions. The drivers side temp switches were active to control the temp, but the passengers side temp buttons did nothing. Otherwise they were fully functional. Just something to think about if you already have an auto climate control bezel and do not want to buy another one. SEE HERE.
Enjoy


Attached Thumbnails
original_radio.jpg
20151230_102608.jpg
34940958233_c5876ec096_b.jpg

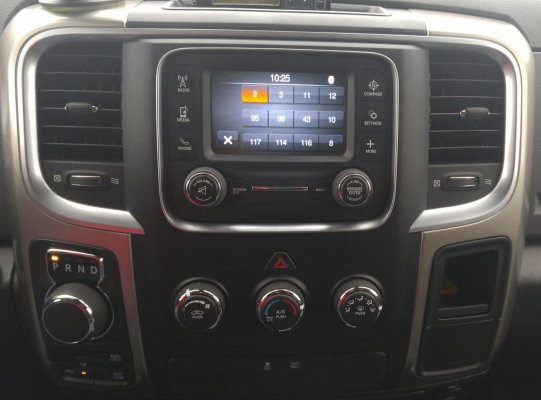
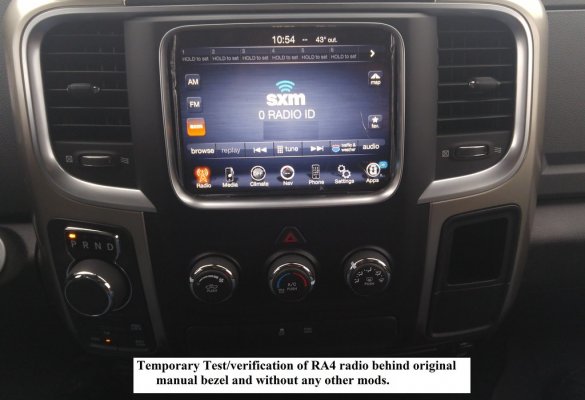
Here is a before shot with OEM bezel (Radio Testing)
20151230_105421.jpg
34940959773_efb3a40425_b.jpg
 
Last edited:
OP
OP
Mpgrimm2

Mpgrimm2

Senior Member
Preferred Vendor
Military
Joined
Mar 30, 2014
Posts
6,197
Reaction score
4,339
Location
SC
Ram Year
2022 Ram 1500 (5th Gen)
Engine
5.7L
Indaram's - DIY - OEM 5.0 Radio to 8.4 Radio Upgrade

Cptwing's notes for making the conversion harness

Cptwing said:

First let me say I am no wiring GURU either! But I want to play one on TV.

The numbers are embossed on the connector shells, they are very small and depending on your age and eyesight you may need to use magnification to see them. Not all the cavaties are numbered just the outside 4 on any given connector, but they run sequential. The 8 pin connector is top row 1 thru 4 and bottom row 5 thru 8. For the 24 pin connector shells the top row is 1 thru 12 and the bottom row is 13 thru 24.

If your vision is normal, I would still recommend a nice pair or magnifying glasses to make thing easier on yourself, these connectors and pins are very small and the extra seeing power will come in handy.
,
As you say it is easy enough, the big key is having the correct crimping tool. The cheap crimping tool that come in the Walmart and Benny's kits will not work. The crimps need to be formed into a double roll, if you just squish them like the cheap crimp tools do they will not fit into the connector shell cavities.

I highly recommend a ratchet type crimper, these are the crimpers I used, they work perfectly, have great reviews and are not that expensive.
http://www.amazon.com/Iwiss-Crimping...molex+crimpers

crimpers.jpg

First remove approx. 1/8 inch of insulation from the wire
Second click the crimper until it just holds the pin in the jaws
Third slide the wire into the terminal pin until it seats and the insulation is inside the pin...
...Note these pins have two separate crimping sections which crimp simultaneously one the inner one is for the
...actual lead and the outer one is for the insulation.
Fourth squeeze the crimping pliers completely in one steady even motion.

The dies in the jaws of these crimpers are for different wire gauges, in addition each of those is a two section die, one is for the crimp with the just the wire and the other is for the crimp with the wire and insulation. In other words they are meant to be used one way, always slide the pins in from the side. The pins are inserted in the jaws from the side shown in the above picture.

Buy extra pins and do a few practice ones. The pins are very cheap, but the shipping is no, having to place an order for more pins would suck.

You could use quick splices, I assume you mean the 3M quick taps I would rather solder and heat shrink them for a more reliable connection, the 3M quick taps are also bulky as you would need to use 5 of them.


Indaram's - DIY - OEM 5.0 Radio to 8.4 Radio Upgrade

Cptwing said:

Ok I finally figured how to take macro pictures with my camera. So I thought I would share some information and examples of crimping pins and how to identify the cavity numbers on a connector.

Here is a picture of the 8 pin plug that plugs into the radio\hvac bezel alongside it is a 20 gauge wire crimped into a pin, note this pin is not for this connector (it is actually for the 3rd brake light connector) , but this gives you an idea of the size.
dscn0818.jpg


Next we have a close up shot of that pin alongside another pin crimped to 18 gauge wire that is used for the overhead map lamps, notice how the crimps are formed into a double roll and the insulation is crimped separate from the stranded wire. One of these is a factory crimp and one I did using the crimpers in the above post. I did the black one, which in my opinion is actually a better crimp notice the roll on the insulation of the two.
dscn0822.jpg

Next is an isometric shot of the 8 pin plug, the red piece is called the TPA (Terminal Position Assurance) or secondary lock. It actually has 10 slots, the outside 4 slots are used to access the locking tabs if you need to remove it. as pictured the TPA is in the unlock position, after all the wires are inserted into the various cavities it is pushed it and locks in place. Note not all connector shells use these, the 24 pin connector shells used to make the rest of the 8.4 conversion harness do not have them.
dscn0826.jpg

Next we are looking down on the connector TPA side which is the end that plugs into the bezel. Notice the numbers 1 and 4 on the top row and 5 and 8 on the bottom row.
dscn0824.jpg

Next we are looking up at the connector cavity side which is the end that the wires are inserted into. Notice the numbers 1 and 4 on the top row and 5 and 8 on the bottom row.
dscn0825.jpg


Last edited: Jan 10, 2016
 
Last edited:
OP
OP
Mpgrimm2

Mpgrimm2

Senior Member
Preferred Vendor
Military
Joined
Mar 30, 2014
Posts
6,197
Reaction score
4,339
Location
SC
Ram Year
2022 Ram 1500 (5th Gen)
Engine
5.7L
Indaram's - DIY - OEM 5.0 Radio to 8.4 Radio Upgrade

Cptwing said:

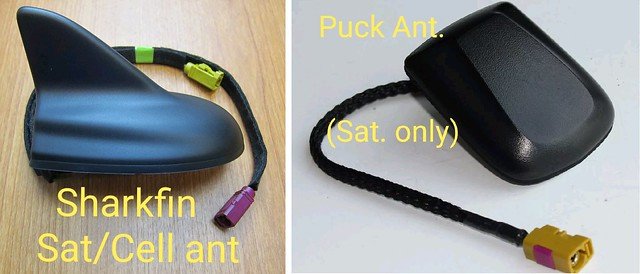
The RA3 and RA4 radios contain a sierra wireless aircard (cellphone), used to talk to 911 and useless connect. Since your current radio RA1 or RA2 does not have that capability your current antenna does not have the cellular antenna in it.

The one you currently have is called a puck and has one plug used for GPS and XM. The sharkfin has 2 plugs the other being for cellular.
33265613328_7622fa07a6_z.jpg

Without the extra cellular antenna the RA3 and RA4 radios will flash an error stating that the vehicle phone needs to be serviced.
46417337664_451eeece67_o.jpg[/url]

Replacing the antenna and leads is more expensive and difficult, so most opt for the dummy antenna seen in the Original Post. Many on here have made their own dummy antennas.
40176117793_8b4e0ab525_z.jpg

The benefit I have gotten out of adding the sharkfin is:

With my 2014 radio
911 works
Yelp works

With my 2015 radio
911 works
Yelp works
Roadside assistance thru Ram works
Registration screen comes up and phone dials and connects but I hung up not knowing what they could do to screw up my radio.

Mpg2 Edit:
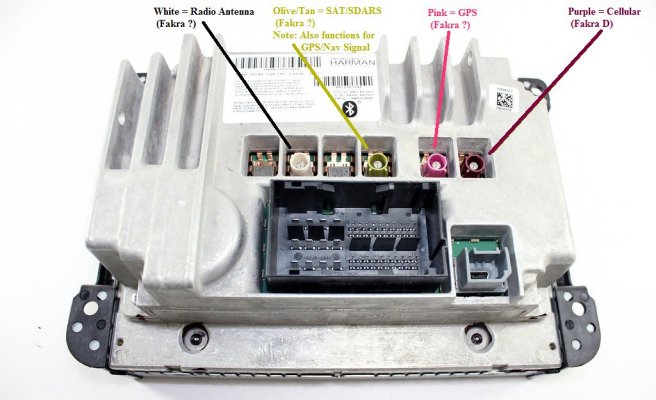
Reference for the 8.4 Radio Connectors
Ram 8.4AN RA4 Back Connectors.jpg
35581323102_73e20cfe2a_b.jpg


Heres an update on my install. 2 colored fakra connectors missing but fixed it with some fakra to smb adapter. So far its working good.

Here's links to some of the adapters if needed: (disassemble the plastic housing off the female end)...

Curry Fakra K (SXM) - eBay

Curry Fakra K wRt Angle (SXM) - Amazon
... $11 on eBay (6" by RfBat, long lead time)

White Fakra B (FM) - eBay
... $13 on eBay (long lead time from China)
... $11 on eBay (not sure on length, 4"-12"?)


Bordeaux 'Prpl' Fakra D w/Rt Angle (Cellular) - Amazon (by EightWood .. N/A)
... $12 on ebay (4"/10cm by RfBat, long lead time)


Universal Fakra Z w/Rt Angle - ebay

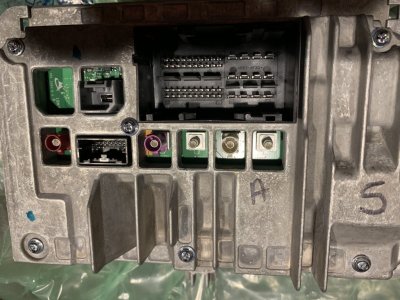
Sergio Perez UAQ Back Connectors.jpeg

Sergio Perez UAQ Back with Fakra Extensions.jpeg
 
Last edited:
OP
OP
Mpgrimm2

Mpgrimm2

Senior Member
Preferred Vendor
Military
Joined
Mar 30, 2014
Posts
6,197
Reaction score
4,339
Location
SC
Ram Year
2022 Ram 1500 (5th Gen)
Engine
5.7L
POST 11:

Indaram's - DIY - OEM 5.0 Radio to 8.4 Radio Upgrade
Cached Pg 6

http://www.ramforum.com/f75/diy_-_oem_5_0_radio_8_4_radio_upgrade-66196/index6.html

Cptwing said:

Not just by size but by type as well. The 52 position radio connector on the 2013 and up actually uses 2 different pin types. To find the correct pins you need the manufacture's part data drawing. In addition the connector drawings will list multiple size pins for the connector by wire size, so to match those up you need the pinout diagram from the techauthority website. The two types of pins used are 2.8mm and .64mm, while these pins are available for different wire size gauges, I have listed only the ones used by Fiat on the 2013+ trucks

Here is the Radio connector
Mouser Electronics - Electronic Components Distributor

For some reason the drawing no longer lists the pin part numbers for the 52 position connector, so here they are.

Here is the data sheet for the radio connector
http://www.mouser.com/ds/2/418/NG_CD..._C1-672647.pdf

Here are the 2.8mm pins
Mouser Electronics - Electronic Components Distributor

Here are the 0.64mm pins
Mouser Electronics - Electronic Components Distributor


Indaram's - DIY - OEM 5.0 Radio to 8.4 Radio Upgrade
Cached Pg 7

http://www.ramforum.com/f75/diy_-_oem_5_0_radio_8_4_radio_upgrade-66196/index7.html

Mpgrimm2 said:

FYI for the other 4 speed fan conversion folks...

Mondo posted this (here or the z) a while back and is a good reference for those of us that have to use the extra Blower Power Harness with the conversion harness.

@cptwing, can you add this to your post 85 link?


Attached Files:

Mondo161 2013-2016 8.4 Blower Mtr & 4Spd ConvHarness Connections - Mpg edits 6-20-16.jpg

Last edited: Jul 6, 2017
 
OP
OP
Mpgrimm2

Mpgrimm2

Senior Member
Preferred Vendor
Military
Joined
Mar 30, 2014
Posts
6,197
Reaction score
4,339
Location
SC
Ram Year
2022 Ram 1500 (5th Gen)
Engine
5.7L
Post 12:

A couple notes on possible crimp tools for those wanting to make their own harness. If anyone else has links/details to affordable ones they used that worked well please let me know and I will update this post...

The link to the crimper cptwing used is/was broken.
It may have been this one by iWiss <--- RECOMMENDED!


From the original backup Cam thread..


The official Amp/TE Connectivity "Pro Crimper III" tool is likely upwards of around $210 at Newark or Mouser.
Manufacturer: TE CONNECTIVITY / AMP
Newark Part No.: 44F8409 (LINK)
Manufacturer Part No 58495-1

Note: A bread bag's Twist Tie with about 3/8" of the coating stripped off, makes a fairly decent pin lock/release tool if you need to pop out pins from the connectors after they have been installed....
46227032635_bf8a7b1683_o.jpg

Ramtech2319 said:

I need to build a harness where did everyone get the connector ends and pins or I did not see them in the post thx in advance

Mouser Electronics, DigiKey Electronics, Newark Electronics, Allied Electronics, Nexus Electronics (NexElec.com) depending on who you can locate in-stock qty and reasonable minimums.
 
Last edited:
OP
OP
Mpgrimm2

Mpgrimm2

Senior Member
Preferred Vendor
Military
Joined
Mar 30, 2014
Posts
6,197
Reaction score
4,339
Location
SC
Ram Year
2022 Ram 1500 (5th Gen)
Engine
5.7L
Post 13:

MPgrimm2 Harness Notes:

For those of you making your own extended harness, here is a bit of details from mine that may help you...

- Use twisted & soldered connections for splices (blobs can be unreliable)
- Use 1/8” heatshrink over splices vs electrical tape
- (optional) Lightly ‘flow’ solder at all pin crimps for durability and to prevent “pullouts”.

- Some other useful accessories if you do a lot of this stuff:
I use a Weller WES51 soldering iron with ET0 tip, helping hands, Solder Tip Cleaner, Kester 60/40 Solder (or similar),

- Here's a kit of wire with (6) 25ft rolls of 22awg wire with 6 different colors
or (10) 25ft rolls of 22awg wire with 10 different colors (10 Colors to match the schematic)

- Here's Braided sleeving: 25 FT 3/8" Black Expandable Wire Cable Sleeving Sheathing Braided Loom Tubing (main harness)
and 5 FT 1/4" Black Expandable Wire Cable Sleeving Sheathing Braided Loom Tubing (bezel segment)

00R/T's Crimping Notes:

00R/T said:

It's hard to explain how I crimp it, but I'll try.

Strip the wire so the exposed wire is just slightly longer than the wire crimp portion of the terminal.

Set the wire in the terminal so the insulation butts up against the wire crimp portion of the terminal.

Use pliers to press the insulation portion of the terminal (the ears) into the insulation just enough so the terminal will stay in position.

Hold the crimper so the open "mouth" end is facing you.

Place the terminal in the crimper with the open part of the terminal (the fins that fold over) facing the bottom of the crimper.

Align the terminal left-to-right so the insulation side is on the wider part of the crimping die and the wire side is on the narrower side.

Slowly close the crimper and make sure the terminal doesn't rotate.

Close the crimper all the way.

Fix the insulation part of the crimp with pliers if it isn't as round as it should be.

EDIT: On your crimper, the open side of the terminal may go up. You want it facing the part of the die that has the line down the center (like the top of a heart).


Mpgrimm2’s - Some soldering basics to start:

Soldering pt 1
Correct solder splice1.jpg


Soldering pt 2
Correct solder splice2.jpg


Soldering pt 3
Correct solder splice3.jpg


Soldering pt 4
Correct solder splice 4.jpg


Questionable Solder Splice
4spd harness Orig Splice.jpg


Crimped & Soldered Pins (Optional - Unless crimps are questionable)
Crimp & solder pins for Durability.jpg


Last edited: Jul 6, 2017
 
Last edited:
OP
OP
Mpgrimm2

Mpgrimm2

Senior Member
Preferred Vendor
Military
Joined
Mar 30, 2014
Posts
6,197
Reaction score
4,339
Location
SC
Ram Year
2022 Ram 1500 (5th Gen)
Engine
5.7L
Post 14:

More Mpgrimm2 Extended Harness "Braided Sleeving" notes:

NOTE: I used braided nylon sleeving and heatshrink which can be a bit more difficult to work with vs split wire loom.

(i.e. I covered harness with 1/2' nylon sleeve/braiding. Finished with 3/4" & 1/2" heatshrink.)


Bezel Breakout 1.jpg


Bezel Breakout 2.jpg


Bezel Breakout 3.jpg


Bezel Breakout 4.jpg


Bezel Breakout 5.jpg


Bezel Breakout 6.jpg


Bezel Breakout 7.jpg


Other End 1:
Braided Jacket Finishing 1.jpg


Other End 2:
Braided Jacket Finishing 2.jpg


Other End 3:
Braided Jacket Finishing 3.jpg


Other End 4:
Braided Jacket Finishing 4.jpg


Other End 5:
Braided Jacket Finishing 5.jpg


Finished Harness w/Sleeving:
Completed Harness.jpg


Last edited: Jul 6, 2017
 
OP
OP
Mpgrimm2

Mpgrimm2

Senior Member
Preferred Vendor
Military
Joined
Mar 30, 2014
Posts
6,197
Reaction score
4,339
Location
SC
Ram Year
2022 Ram 1500 (5th Gen)
Engine
5.7L
Post 15:

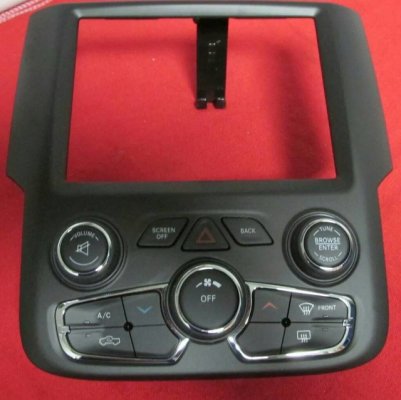
Just a quick note on the bezel ...

There are 2 bezels that will work with the 8.4AN conversion...

- Preferred option 1:
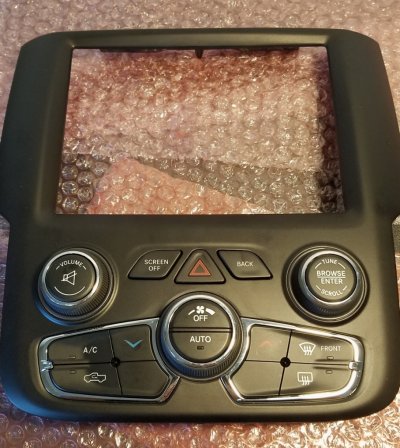
SINGLE ZONE OEM 8.4" (MTC) BEZEL
P/N: 1UJ96DX9AC or 5VD75JXPAA (or AE, AF, etc)

40176284813_c2abcedca2_z.jpg

- Workable option 2:
DUAL ZONE OEM 8.4" (ATC) BEZEL
P/N: 1UJ97DX9AC or 5VD73JXPAC (or AE, AF, etc)

33265874658_a6e2cb5b94_z.jpg

Indaram's - DIY - OEM 5.0 Radio to 8.4 Radio Upgrade
Cptwing said:

Yes the dual auto climate bezels will work, but will function as single zone manual climate control. The ATC bezel has all the same controls/buttons but also has 3 extra buttons that will be non-functional with the basic 8.4 upgrade/HVAC conversion; ie the 2 right side buttons (up/dwn) for the passenger side Temp control (dual zone), and 1 (1/2) button on the center knob for the Auto temperature feature.

Only the driver’s side temp button will function and the auto function will not work. But besides that it will function the same way.


The ATC bezel was verified to work minus the items noted above by Cptwing, Jared4.7, See Here, (and later by Mpgrimm2).

Jan 11, 2016

EDIT:
You can now enable/add Single Zone ATC (still no dual zone!)
- How to Add (ATC) to a Manual Temperature Control Truck

& it's possible to combine both bezels for a Single Zone ATC Bezel, see post 8 of ATC Thread.
d6c588baea590e5f7249a3261dfad272.jpg


EDIT 2:
If you really want to pursue true dual Zone ATC, it's possible but very involved.
Adding dual zone atc to a tradesman.
 
Last edited:
OP
OP
Mpgrimm2

Mpgrimm2

Senior Member
Preferred Vendor
Military
Joined
Mar 30, 2014
Posts
6,197
Reaction score
4,339
Location
SC
Ram Year
2022 Ram 1500 (5th Gen)
Engine
5.7L
Spare post 16

While it's not recommended to install a 13-17 RAx radio in a 2018 or 19 classic it can be done with the correct parts but you 'CURRENTLY' can't get rid of Cellular System needs service error message at startup (unless using a 2018 UAx radio).

Ram 2019 Classic RA2 to RA4 Upgrade.

.
 
Last edited:
OP
OP
Mpgrimm2

Mpgrimm2

Senior Member
Preferred Vendor
Military
Joined
Mar 30, 2014
Posts
6,197
Reaction score
4,339
Location
SC
Ram Year
2022 Ram 1500 (5th Gen)
Engine
5.7L
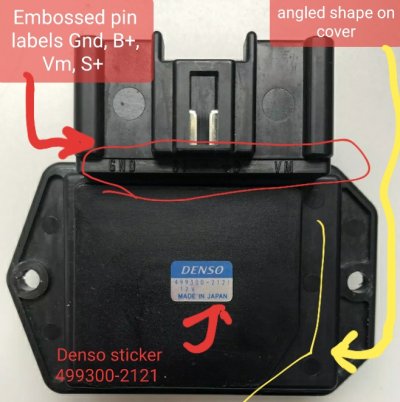
A heads up about using cheap Chinese clone blower motor/fan resistors....

IMO... You're better off getting a used OEM one vs a new clones version.

.just troubleshoot a similar situation and it turned out that a genuine resistor fixed the issue. Here's video of the issue with clone resistor vs OEM resistor

Updated video Link: https://youtu.be/STwZpe4pns4

Vs.

OEM resistor...Updated Video Link: https://youtu.be/2cfE0LAM_Ps


Thanks for posting. The fact that you bought a kit and can't get people to respond back when you have an issue after several days and had to contact me, is well ...


Let's see a picture of the resistor itself ie the face of it... I can tell if it's one of the Chinese clones vs Mopar/denso. I've seen reports from people claiming these work fine and I bet the clone is what you've got.

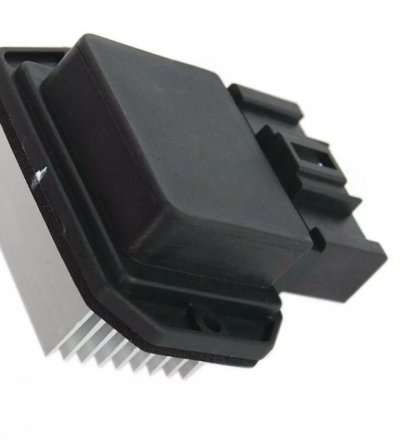
You don't even have to take it out. Here's a picture of a $100 genuine resistor vs $20 clone. (I've also see a clone resistor that looks nearly identical, and has issues. Probably used the original molds)

OEM...
b306ec8b6f5b0804318be94408e546ce.jpg

Clone...
d52ac320084b4e74ab3d4b8c763057a9.jpg

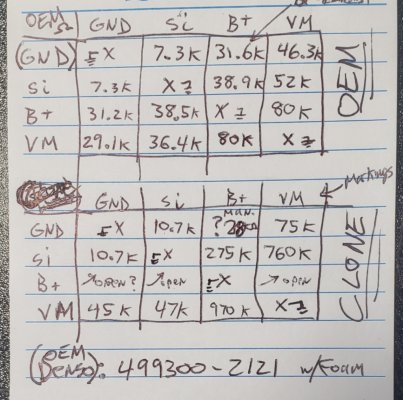
OEM fan resistor values here as a reference...
a0407afbec0e052896b972b15fb53a54.jpg
 
Last edited:
OP
OP
Mpgrimm2

Mpgrimm2

Senior Member
Preferred Vendor
Military
Joined
Mar 30, 2014
Posts
6,197
Reaction score
4,339
Location
SC
Ram Year
2022 Ram 1500 (5th Gen)
Engine
5.7L
Spare post 18
 
OP
OP
Mpgrimm2

Mpgrimm2

Senior Member
Preferred Vendor
Military
Joined
Mar 30, 2014
Posts
6,197
Reaction score
4,339
Location
SC
Ram Year
2022 Ram 1500 (5th Gen)
Engine
5.7L
OP
OP
Mpgrimm2

Mpgrimm2

Senior Member
Preferred Vendor
Military
Joined
Mar 30, 2014
Posts
6,197
Reaction score
4,339
Location
SC
Ram Year
2022 Ram 1500 (5th Gen)
Engine
5.7L
Spare post 20. - That should be enough posts for now if anyone wants to comment/add relevant info. ** I will go back and edit the first 15 posts when I get the chance **

Alright. 3.5hrs digging through cached webpages and I'm burnt out.

- Managed to get most of the Cptwing's Info on the conversion for 4 speed fan folks
(But no pictures)

- Absolutely could not locate a cached page of Indaram's Original post for the 7 Speed fan folks.

1500ram12 said:
http://www.ramforum.com/showthread.php?t=64564

DIY 5.0 to 8.4 Navigation upgrade

That original thread is locked and the relevant posts are missing.


- The 4 speed fan instructions by Cptwing at posts 81, 85, 88, 89, & 90 are lost along with the detailed pictures he posted.
I managed to dig them out from Google's cached web pages archive, but without the pictures.

-Indaram's original post 1 from his consolidated info thread detailing the 7 speed conversion was lost (part numbers, links, etc) and the entirety of his thread are gone.
I was able to go through the cached Google pages for relevant posts, but couldn't locate a cached page for Indaram's post 1.

EDIT: Thanks 1500ram12 for the above post!


Last edited: Jan 9, 2016
 
Top