bigramma0786
Junior Member
Relatively simple job but thought it might help someone out to post. This post is about hiding the 12V line for a phone charger.
Parts/Tools needed:
-Magnetic Charging Phone Mount: https://www.amazon.com/gp/product/B08HNBHSQV
-12V Car Cigarette Lighter Socket Dual QC 3.0 USB Port Fast Charger Power Adapter: https://www.ebay.com/itm/284868507107?var=586611683331
-1/4" Socket screwdriver
-Phillips screwdriver
-T20 Torx Screwdriver
-Heat shrink/gun or electrical tape
-Xacto/Knife (Optional)
-Small flat-head or similar for de-pinning connectors (optional, if you want to use heat-shrink).
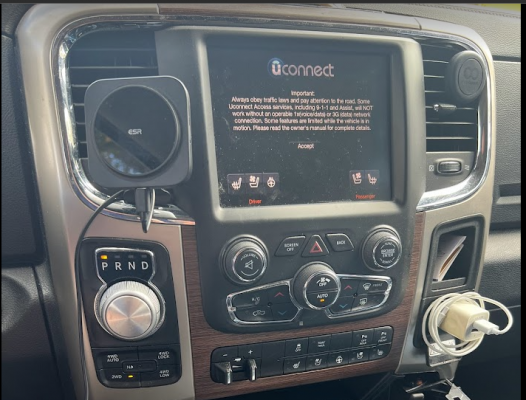
I recently bought a new phone that supports MagSafe mounting/charging (i.e. magnetic mounting and wireless charging) and went to upgrade the vent-mount in my car. Below you can see the old mount on the right vent that I don't use anymore, and I was charging via the 120V with the block and white cable.
The new mount/charger now sits where the old one used to be on the left vent.

The charger plugs into USB and I didn't want to run it to the brick, so I had it run to the 12V charger in the center console below and I hated it.
The charger supports fast charging up and I wanted to tap into the 12V line. I bought this socket that supports up to 36W. The plug I had it in before was a 5V/2A (10W) and I didn't have a problem with it but I figured I'd at least get what I could out of the port and to support future availability. It also wanted this one because it comes with an inline 10A fuse, although I wish it was a blade-fuse, but oh well.
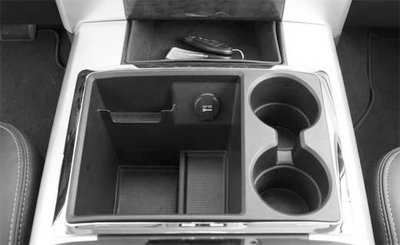
The 12V socket lives in the center console (see image below). To get to the guts, you take off the chrome bezel and all the rubber mats, and there are five socket-head screws under the mats in the deep section/cupholder.
There are also 2 Philips screws in the tray where the keys are:

The light-colored trim then easily lifts off of some clips.
Once you get in you can easily unclip the 12V socket connector and pull everything out.
Cut off the ring terminals and spliced the wires into the 12V line using a military splice:

There is a LOT of room in the center console, sheesh.
Tested the connection, heatshrinked the wires (I had to de-pin the white connecter by pulling out the red retaining tab, fyi),

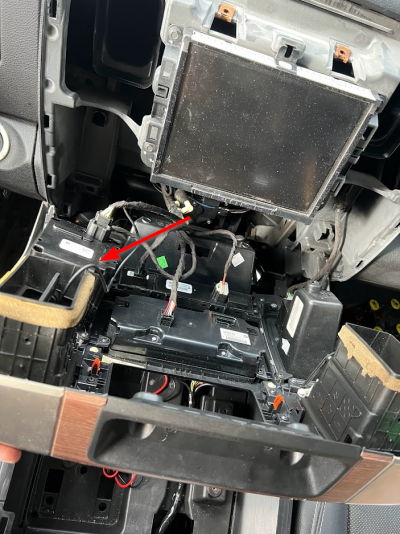
For the wire routing, I wanted to run the line into the vent and down behind the dash bezel. It is surprisingly easy to remove....
Two T20 retaining screws in the top under the mat, and 1 in the little cubby on the right. At this point I'd already removed the two that connect it to the lower trim:


Then you literally just grab the top (right where it says RAM) and give it a good pull forward and the whole thing pulls out from a dozen clips.
Originally I was prepared to drill a hole in the vent somewhere, but it turns out the way the vent mounts to the duct, there is a soft-foam gasket that I could just let the cable route through with absolutely no issue:

There was no noticeable interference when I closed it up.
I threw a rubber band on the usb for good measure since this will be tucked away. The blade terminals were nice as they had retaining tabs and there's an extra USB port there if I need it later.

Closed everything up and (after a good cleaning) got it put back together.

If you had everything with you and knew what to do, this is a 15 minute job.
Cheers!
Parts/Tools needed:
-Magnetic Charging Phone Mount: https://www.amazon.com/gp/product/B08HNBHSQV
-12V Car Cigarette Lighter Socket Dual QC 3.0 USB Port Fast Charger Power Adapter: https://www.ebay.com/itm/284868507107?var=586611683331
-1/4" Socket screwdriver
-Phillips screwdriver
-T20 Torx Screwdriver
-Heat shrink/gun or electrical tape
-Xacto/Knife (Optional)
-Small flat-head or similar for de-pinning connectors (optional, if you want to use heat-shrink).
I recently bought a new phone that supports MagSafe mounting/charging (i.e. magnetic mounting and wireless charging) and went to upgrade the vent-mount in my car. Below you can see the old mount on the right vent that I don't use anymore, and I was charging via the 120V with the block and white cable.
The new mount/charger now sits where the old one used to be on the left vent.

The charger plugs into USB and I didn't want to run it to the brick, so I had it run to the 12V charger in the center console below and I hated it.
The charger supports fast charging up and I wanted to tap into the 12V line. I bought this socket that supports up to 36W. The plug I had it in before was a 5V/2A (10W) and I didn't have a problem with it but I figured I'd at least get what I could out of the port and to support future availability. It also wanted this one because it comes with an inline 10A fuse, although I wish it was a blade-fuse, but oh well.
The 12V socket lives in the center console (see image below). To get to the guts, you take off the chrome bezel and all the rubber mats, and there are five socket-head screws under the mats in the deep section/cupholder.
There are also 2 Philips screws in the tray where the keys are:

The light-colored trim then easily lifts off of some clips.
Once you get in you can easily unclip the 12V socket connector and pull everything out.
Cut off the ring terminals and spliced the wires into the 12V line using a military splice:
There is a LOT of room in the center console, sheesh.
Tested the connection, heatshrinked the wires (I had to de-pin the white connecter by pulling out the red retaining tab, fyi),
For the wire routing, I wanted to run the line into the vent and down behind the dash bezel. It is surprisingly easy to remove....
Two T20 retaining screws in the top under the mat, and 1 in the little cubby on the right. At this point I'd already removed the two that connect it to the lower trim:
Then you literally just grab the top (right where it says RAM) and give it a good pull forward and the whole thing pulls out from a dozen clips.
Originally I was prepared to drill a hole in the vent somewhere, but it turns out the way the vent mounts to the duct, there is a soft-foam gasket that I could just let the cable route through with absolutely no issue:

There was no noticeable interference when I closed it up.
I threw a rubber band on the usb for good measure since this will be tucked away. The blade terminals were nice as they had retaining tabs and there's an extra USB port there if I need it later.
Closed everything up and (after a good cleaning) got it put back together.
If you had everything with you and knew what to do, this is a 15 minute job.
Cheers!

