dan1911
Senior Member
- Joined
- Aug 8, 2016
- Posts
- 398
- Reaction score
- 251
- Location
- Fairbanks, Alaska
- Ram Year
- 2013
- Engine
- Hemi 5.7
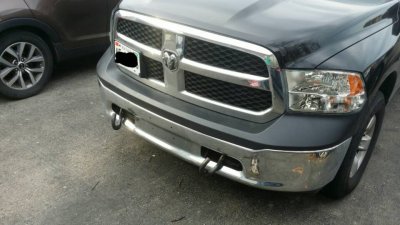
SO there is a ton of info out there for folks who want to add tow hooks to their Sport edition etc. etc.
There is little info on how to do it on the chrome bumper of the 4th gens with dual cutouts, and the directions supplied by the dealer were lacking (and for the wrong model year) so I figured i would snap some pics for a quick DIY. I am only showing the driver side (do one side at a time!) but the process will be the same for both.
This can all be done with a basic set of deep socket wrenches and a torque wrench, and a magnetic light is handy too!
First, here are the beefy Mopar tow hooks from the dealer. Nice and heavy and seem very sturdy. If you purchased 2nd hand, make sure you have the brackets otherwise you are SOL unless you fab something yourself.
 [/URL][/IMG]
Here are the replacement panel cutouts, some people were just fine cutting theirs but for under $9 it was hard to pass up these.
 [/URL][/IMG]
Get under the truck and locate where the panel cutout is.
 [/URL][/IMG]
The dealer initally said some models with the chrome bumper is easier if you remove the bumper. Well we are gonna skip that nonesense and work around it. In the pic above, the two large bolts facing you are the bumper mount bolts that are used to help support the tow hook. That bolt on the left is what we will use to as a work around to removing the bumper.
Ok, now lets get to work.
Take off these bolts, there are two on each side of the panel cutout.
 [/URL][/IMG]
And the other side..
 [/URL][/IMG]
Once you get all 4 bolts removed and the panel is loose, we need to slide it out.
Here is that bolt again. Loosen it and back it off a bit. You will not need to remove it all the way, but it wont hurt if you do inadvertently.
 [/URL][/IMG]
Now slide the cutout panel towards the outside of the vehicle through the opening where my hand is.
 [/URL][/IMG]
I have seen suggestions with people trying to slide toward center but I wasnt able to get it to work, so this was my easy solution. The bolt that was loosened up allows the clearance for the panel to pass under it, and then up and through the bumper brackets. The panel will have to be worked a bit and the angle will be about as vertical as the pic above to get it out.
Good job, you got it.
 [/URL][/IMG]
Now install the new cutout in the reverse order that the old one was taken out. Install the 4 bolts that hold on the cutout panel.
Now its time to remove the bumper bracket nuts. The bumper will not move by just removing these nuts, so no worries if you dont have a second hand to help you.
 [/URL][/IMG]
Work the the tow hook into the cutout and onto the bumper bolts.
 [/URL][/IMG]
Pretty much done. All that is left is to put the bumper bolts back on and the new the bolt through the bottom of the tow hook and into the frame support. The directions say to do the bumper bolts first and then the frame bolt, but I worked them down evenly to make sure the surfaces mated well but im sure any method would be fine. Make sure you torque to specs in the directions and call it a day!
(this was my first posted DIY so be easy lol)
 [/URL][/IMG]
 [/URL][/IMG]
 [/URL][/IMG]
There is little info on how to do it on the chrome bumper of the 4th gens with dual cutouts, and the directions supplied by the dealer were lacking (and for the wrong model year) so I figured i would snap some pics for a quick DIY. I am only showing the driver side (do one side at a time!) but the process will be the same for both.
This can all be done with a basic set of deep socket wrenches and a torque wrench, and a magnetic light is handy too!
First, here are the beefy Mopar tow hooks from the dealer. Nice and heavy and seem very sturdy. If you purchased 2nd hand, make sure you have the brackets otherwise you are SOL unless you fab something yourself.

Here are the replacement panel cutouts, some people were just fine cutting theirs but for under $9 it was hard to pass up these.

Get under the truck and locate where the panel cutout is.

The dealer initally said some models with the chrome bumper is easier if you remove the bumper. Well we are gonna skip that nonesense and work around it. In the pic above, the two large bolts facing you are the bumper mount bolts that are used to help support the tow hook. That bolt on the left is what we will use to as a work around to removing the bumper.
Ok, now lets get to work.
Take off these bolts, there are two on each side of the panel cutout.

And the other side..

Once you get all 4 bolts removed and the panel is loose, we need to slide it out.
Here is that bolt again. Loosen it and back it off a bit. You will not need to remove it all the way, but it wont hurt if you do inadvertently.

Now slide the cutout panel towards the outside of the vehicle through the opening where my hand is.

I have seen suggestions with people trying to slide toward center but I wasnt able to get it to work, so this was my easy solution. The bolt that was loosened up allows the clearance for the panel to pass under it, and then up and through the bumper brackets. The panel will have to be worked a bit and the angle will be about as vertical as the pic above to get it out.
Good job, you got it.

Now install the new cutout in the reverse order that the old one was taken out. Install the 4 bolts that hold on the cutout panel.
Now its time to remove the bumper bracket nuts. The bumper will not move by just removing these nuts, so no worries if you dont have a second hand to help you.

Work the the tow hook into the cutout and onto the bumper bolts.

Pretty much done. All that is left is to put the bumper bolts back on and the new the bolt through the bottom of the tow hook and into the frame support. The directions say to do the bumper bolts first and then the frame bolt, but I worked them down evenly to make sure the surfaces mated well but im sure any method would be fine. Make sure you torque to specs in the directions and call it a day!
(this was my first posted DIY so be easy lol)


