- Joined
- Sep 3, 2012
- Posts
- 1,060
- Reaction score
- 78
- Ram Year
- 2012
- Engine
- hemi 5.7
i posted this how to on another forum, and figured i would post it here as well. It a very good write up hope everyone here enjoys it also.
So yesterday i found out that my blacked out headlights with projectors were on a backorder and it will be 2-3 months before they get here so what it the solutions? ill tell you i actually had the entire weekend off so it was removing the headlights from the truck, baking them, removing the lense and then painting the chromed out parts, does this solve my projector problem? no. but it looks bad ass. so here we go step by step with many many pictures.
Now i did this on a 2012 1500 QC 5.7l st, so that is what these directions are going to be for.
First we need to open the hood and locate the radiator cover shouldnt be to hard as it is right there lol, now they are just push pins that hold it on so you need to lift up on it to pop them and then set the radiator cover asside.

now we need to locate the 2 bolts holding the grille on and remove them, once they are removed there is two clips simply pull strait up on the grille and it will come out, now set it asside somewhere preferrably with the raditor cover so we dont go loosing anything(remember if you dont want to loose bolts always put them back in the whole you found them so they are there when you go to reassemble.)

now once the grille is off and the readiator cover is removed this is what you should have

now we can start to work on removing the headlights, each one is held is by 4 bolts and a white clip.
now for the easy part, remove the to bolts on the front of the assembly.

locate the flap in your wheel well plastic and open it

now remove the 2 bolts one should be right in front of you if it were, and the other kinda of up and arround the corner you can see it from the whole in your wheel well plastic though.

now you should see a white pin slider looking thing simply push it up all the way.
now go back around front and pull the headlight out, remove the 2 bulbls and set it somehwere lense up. and repeat on the other side

we go into the house or shop now, remove the rubber grommets from the back of the assembly and then preheat your oven for 250 f.

place the assembly lense up on a cookie sheet or something of the equivelent and then place it in the oven for 10 minutes.


now pull it out and take a flat head screw driver and start working your way around the lense and the assembly prying it loose from the glue(i did it by prying it loose in the corners and then was able to just pull it apart with a little force . ) while its hot you can also remove as much glue from the lense and housing as possible it will make for a much easier time putting it all back together later.
now remove the chrome pieces from the lense, and take out the yellow plastic piece.

now remove the chrome pieces from the lense, and take out the yellow plastic piece.

once we have done this we need to set the housing and the lense asside somewhere. and then take your chrome pieces and some kind of a scratch pad and scratch the hell out of it.

now we go to a well ventilated room and beging to paint. I used a black caliper paint in a spray can from the local auto store(i bought 2 it was like 15$ and some change) now if you use the same type of paint i have spray on one coat, wait 10 minutes, spray on another and repeat as many time as you feel necisary in an hour,(i put on 6 coats).

now once that one is all painted set it asside somewhere to dry and cure, and place the other assembly in the oven for 15minutes and repeat the rest. this is kinda a crappy picture looks alot better than that in person.

now let everything set for 4-6 hours(this would be a good time to clean the inside of the lense ), once everything is nice and dry take your assembly and put it back in the oven at 250 for 5minutes(just the houseing not the lense or the piece you just painted) we do this to make the plastic workable again. while it is in the oven take the peice you painted snap the yellow plastic back in and then snap it back into the lense very very carefully.
now when your 5 minutes is up take the housing out of the oven, run a bead of hightemp silicone around it and then take you lense assembly and press it in there, use some clamps to hold it together while you silicone sets. now let it sit for another 4-6hours.

and repeat on the other side.

now just for some extra safety i went ahead and taped of the lense and covered it with paper then took some flexseal in a can and sprayed it around the entire assembly where the lense meets the housing, once this is complete let it sit for about a 2 hours or so then peel away the paper and tape.


now we are ready for reaseembly at the truck. simply take your headlight assembly to the truck put the bulbs back in, and bolt everything back together(dont forget to push your white pic back down .)
.)


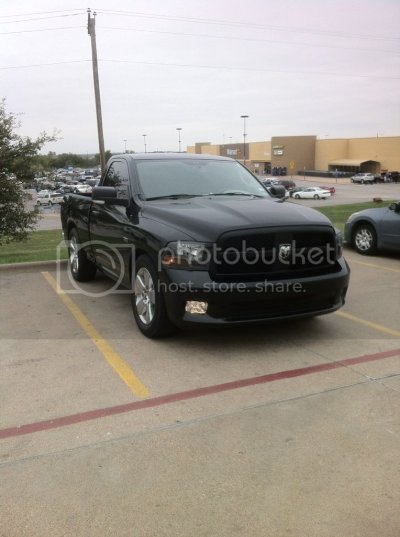
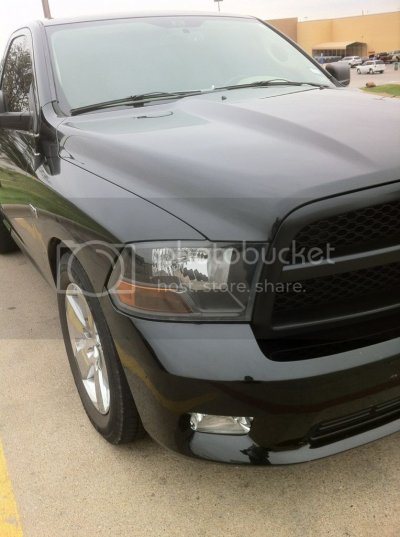
now once everything is back together take some good glass cleaner and clean all your fingerpricts and tape glue off the lights, take a pic and show your buds how bad ass you are
So yesterday i found out that my blacked out headlights with projectors were on a backorder and it will be 2-3 months before they get here so what it the solutions? ill tell you i actually had the entire weekend off so it was removing the headlights from the truck, baking them, removing the lense and then painting the chromed out parts, does this solve my projector problem? no. but it looks bad ass. so here we go step by step with many many pictures.
Now i did this on a 2012 1500 QC 5.7l st, so that is what these directions are going to be for.
First we need to open the hood and locate the radiator cover shouldnt be to hard as it is right there lol, now they are just push pins that hold it on so you need to lift up on it to pop them and then set the radiator cover asside.

now we need to locate the 2 bolts holding the grille on and remove them, once they are removed there is two clips simply pull strait up on the grille and it will come out, now set it asside somewhere preferrably with the raditor cover so we dont go loosing anything(remember if you dont want to loose bolts always put them back in the whole you found them so they are there when you go to reassemble.)

now once the grille is off and the readiator cover is removed this is what you should have

now we can start to work on removing the headlights, each one is held is by 4 bolts and a white clip.
now for the easy part, remove the to bolts on the front of the assembly.

locate the flap in your wheel well plastic and open it

now remove the 2 bolts one should be right in front of you if it were, and the other kinda of up and arround the corner you can see it from the whole in your wheel well plastic though.

now you should see a white pin slider looking thing simply push it up all the way.
now go back around front and pull the headlight out, remove the 2 bulbls and set it somehwere lense up. and repeat on the other side

we go into the house or shop now, remove the rubber grommets from the back of the assembly and then preheat your oven for 250 f.

place the assembly lense up on a cookie sheet or something of the equivelent and then place it in the oven for 10 minutes.


now pull it out and take a flat head screw driver and start working your way around the lense and the assembly prying it loose from the glue(i did it by prying it loose in the corners and then was able to just pull it apart with a little force
now remove the chrome pieces from the lense, and take out the yellow plastic piece.

now remove the chrome pieces from the lense, and take out the yellow plastic piece.

once we have done this we need to set the housing and the lense asside somewhere. and then take your chrome pieces and some kind of a scratch pad and scratch the hell out of it.

now we go to a well ventilated room and beging to paint. I used a black caliper paint in a spray can from the local auto store(i bought 2 it was like 15$ and some change) now if you use the same type of paint i have spray on one coat, wait 10 minutes, spray on another and repeat as many time as you feel necisary in an hour,(i put on 6 coats).

now once that one is all painted set it asside somewhere to dry and cure, and place the other assembly in the oven for 15minutes and repeat the rest. this is kinda a crappy picture looks alot better than that in person.

now let everything set for 4-6 hours(this would be a good time to clean the inside of the lense
now when your 5 minutes is up take the housing out of the oven, run a bead of hightemp silicone around it and then take you lense assembly and press it in there, use some clamps to hold it together while you silicone sets. now let it sit for another 4-6hours.

and repeat on the other side.

now just for some extra safety i went ahead and taped of the lense and covered it with paper then took some flexseal in a can and sprayed it around the entire assembly where the lense meets the housing, once this is complete let it sit for about a 2 hours or so then peel away the paper and tape.


now we are ready for reaseembly at the truck. simply take your headlight assembly to the truck put the bulbs back in, and bolt everything back together(dont forget to push your white pic back down


now once everything is back together take some good glass cleaner and clean all your fingerpricts and tape glue off the lights, take a pic and show your buds how bad ass you are


