circuitguy
Senior Member
- Joined
- Aug 10, 2018
- Posts
- 1,930
- Reaction score
- 1,556
- Location
- Elk Grove, CA
- Ram Year
- 2017 Ram Tradesman Regular Cab
- Engine
- 5.7L HEMI
Great job on the dash swap!
Thank you much!!
Disclaimer: Links on this page pointing to Amazon, eBay and other sites may include affiliate code. If you click them and make a purchase, we may earn a small commission.
Great job on the dash swap!
Very nice write up. I just purchased a 2019 classic Big Horn and looking to do the dash swap.Special thanks for Moparman16 for all the help and confidence in getting me to do this upgrade myself.
Just upgraded my dash on my 2017 Ram Tradesman to a 2018 Ram Sport Leather Dash.
Should be the same for all 2013-2018 Ram and 2019 Ram Classic.
Not a hard job but it does have many steps to complete.
Here is the part number for the new Leather dash, was $485 plus shipping. You could also get one from a wreck yard for a bit less in price.
Mopar # 5MY12DX9AA
Purchased it here, they had the best delivered price online.
https://www.moparwholesaleparts.com/oem-parts/mopar-instrument-panel-5my12dx9aa
Now would also be a good time to add a cabin filter if you don't have one.
Please keep in mind that we are only removing the dash cover not the entire dash structure.
Here is the rundown on how to complete the dash removal and install. Removal time was about 1.5 hours with two people, installation time was about 2.5 hours wit two people.
HOW TO REMOVE AND REPLACE THE DASH COVER ON THE 2013-2018 RAM AND 2019 RAM CLASSIC.
1. DISCONNECT THE POSITIVE BATTERY TERMINAL FROM THE BATTERY USING A 10MIL WRENCH OR SOCKET.
2. PULL AND REMOVE LEFT, RIGHT AND CENTER DASH SPEAKER GRILLS, UNPLUG PHOTO SENSOR.
3. REMOVE TWO 7MIL SCREWS FROM EACH DASH SPEAKER, UNPLUG AND REMOVE SPEAKERS.
4. REMOVE BOLT TWO BOLT COVER AT FRONT OF DASH BELOW WINDSHIELD, REMOVE ONE 10MIL BOLT FROM EACH AND ONE 7MIL SCREW FROM THE LEFT SIDE.
5. REMOVE BOLT COVERS AND TWO 10MIL BOLTS FROM EACH LEFT AND RIGHT “A” PILLER COVERS.
6. PULL AND REMOVE LEFT AND RIGHT DASH END COVER, REMOVE THREE 7MIL SCREWS FROM EACH SIDE.
7. REMOVE TWO 10MIL BOLTS FROM CONSOLE BEZEL POCKET, REMOVE COMPLETE CONSOLE BEZEL.
8. REMOVE TWO 10MIL BOLTS FROM EACH SIDE OF CONSOLE, SLIDE CONSOLE BACK AWAY FROM THE DASH.
9. REMOVE TWO 7MIL SCREWS FROM TOP OF CENTER DASH BEZEL AND ONE T20 TORX SCREW FROM POCKET ABOVE 114V PLUG, UNPLUG ALL AND REMOVE BEZEL.
10. REMOVE FOUR 7MIL SCREWS FROM RADIO, UNPLUG AND REMOVE RADIO.
11. REMOVE TWO 7MIL SCREWS BELOW RADIO.
12. PULL AND REMOVE LOWER GLOVE BOX, REMOVE TWO 7MIL SCREWS FROM GLOVE BOX LATCH, REMOVE LATCH.
13. PULL AND REMOVE UPPER DASH GLOVE BOX POCKET
14. REMOVE FOUR 7MIL SCREWS FROM UPPER GLOVE BOX DOOR, REMOVE DOOR.
15. REMOVE TWO 7MIL SCREWS FROM UPPER GLOVE BOX STRIKER, REMOVE STRIKER.
16. PULL AND REMOVE LEFT AND RIGHT AIR VENT, PULL FROM TOP THEN OUT, UNPLUG HEADLIGHT SWITCH.
17. REMOVE TWO 7MIL SCREWS FROM DRIVES LOWER DASH PANEL, REMOVE PANEL LAY ON FLOOR.
18. REMOVE FIVE 7MIL SCREWS FROM BEHIND LEFT LOWER DASH PANEL.
19. PULL AND REMOVE PLUG BELOW HEADLIGHT SWITCH.
20. REMOVE TWO 7MIL SCREWS FROM EMERGENCY NEUTRAL PULL. PULL IT DOWN AND AWAY TO THE REAR OF THE DASH.
21. REMOVE THREE T20 TORX SCREWS FROM THE BOTTOM OF THE STEERING COLUMN COVER, REMOVE UPPER AND LOWER STEERING COLUMN COVER.
22. UNPLUG AND REMOVE BRAKE LIGHT SWITCH.
23. REMOVE FOUR 14MIL NUTS HOLDING STEERING COLUMN UP, DROP COLUMN SLOWLY AND LAY STEERING WHEEL ON SEAT WITH STEERING WHEEL TILTED UP.
24. REMOVE FOUR T20 TORX SCREWS FROM START BUTTON, UNPLUG AND REMOVE START BUTTON.
25. REMOVE TWO 8MIL BOLTS THAT MOUNT THE PASSENGER AIRBAG TO THE DASH FRAME.
26. PULL DASH UP AND AWAY FROM THE WINDSHIELD ABOUT TWO TO THREE INCHES.
27. LIFT UP RIGHT SIDE OF DASH, UNPLUG PASSENGER AIRBAG.
28. PUT A TOWEL OVER THE STEERING WHEEL TO PROTECT FROM DAMAGE WHILE REMOVING THE DASH.
29. WITH TWO PEOPLE CAREFULLY PULL THE DASH UP AND AWAY FROM THE WINDSHIELD, YOU WILL NEED TO TILT IT UP A BIT TO CLEAR THE CENTER AIR VENT DUCTING.
30. WITH TWO PEOPLE CAREFULLY REMOVE THE DASH AND TAKE IT OUT ON THE PASSENGER SIDE, CAREFUL NOT TO SCRATCH THE STEERING WHEEL OR THE CORNERS OF THE DASH ON THE RAW METAL ON THE “A” PILLARS.
31. DASH SHOULD NOW BE OUT OF THE TRUCK.
32. TRANSFER ALL CLIPS FROM THE OLD DASH TO THE NEW ONE.
33. TRANSFER PASSENGER SIDE AIRBAG FROM THE OLD DASH TO THE NEW ONE.
34. BEFORE INSTALLING THE NEW DASH MAKE SURE TO POSITION ALL THE WIRES FOR THE DASH SPEAKERS, PHOTO SENSOR, AIRBAG, GAUGE CLUSTER ECT SO YOU CAN GET ACCESS TO THESE WIRES ONCE THE NEW DASH IS IN PLACE. ALSO KEEP THAT TOWEL OVER THE STEERING WHEEL SO NOT TO DAMAGE IT DURING INSTALL.
35. INSTALL NEW DASH IN REVERSE ORDER AS REMOVED.
36. RECONNECT POSITIVE BATTERY TERMINAL THEN START THE TRUCK AND TEST ALL ELECTRICAL INCLUDING BRAKE LIGHTS TO MAKE SURE YOU HAVE ALL ELECTRICAL COMPONENTS ARE PLUGGED IN CORRECTLY.
CONGRATS! YOU JUST SAVED $700 IN LABOR DOING THIS INSTALL YOURSELF!
More pics on the next post.
View attachment 181129
View attachment 181130
View attachment 181131
View attachment 181132
View attachment 181133
Very nice write up. I just purchased a 2019 classic Big Horn and looking to do the dash swap.
Very nice write up. I just purchased a 2019 classic Big Horn and looking to do the dash swap.
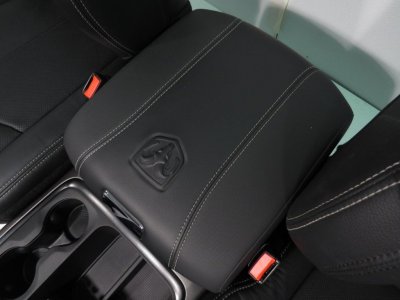
That console lid really completes the look! Does it have the red and white contrasting stitching or just the white?
I like that version of the console lid much better.
Sent from my iPhone using Tapatalk
That console lid really completes the look! Does it have the red and white contrasting stitching or just the white?
This one has just white stitching to match the factory leather interior stitching. There is also white/red and white/blue available though many don't know about these.
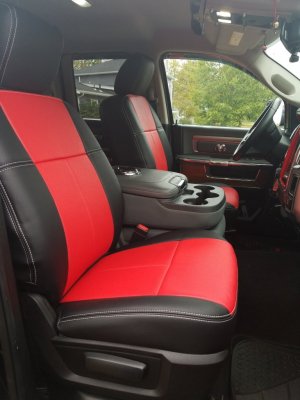
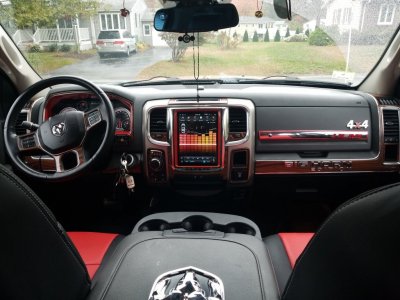
Circuitguy, what was the part number for the console lid you used? I have found a white/red stitching one on eBay for $250ish but I prefer the white only stitching.
Sent from my iPhone using Tapatalk
Great job!! definitely a lot of time and effort. I have a 2014 Ram Bighorn with few amenity's, and i'm not a rich man, always wanted a Laramie or Limited and knew I really couldn't afford it, so I thought I could make my own style of RAM inside and out, so I did this over the last 5 years. Believe it or not it cost less to do all this than it would have if I had bought the Limited, or the .laramieView attachment 186692 View attachment 186693 View attachment 186694
Thank you sir! I have a 2019 Ram Classic with the UAQ so when I finish up my interior upgrade this will definitely be on the list.BLACK LEATHER CONSOLE LID 6RD67XDBAF
Keep in mind that this is for the 2018 Ram and 2019 Ram Classic with the UAQ and UAS radios.
View attachment 186695
BLACK LEATHER CONSOLE LID 6RD67XDBAF
Keep in mind that this is for the 2018 Ram and 2019 Ram Classic with the UAQ and UAS radios.
Were there any wiring issues going with the 2018/2019 Classic UAS/UAQ lid? I currently have the adapter harness for the 2018 usb hub in my 2015 lid.
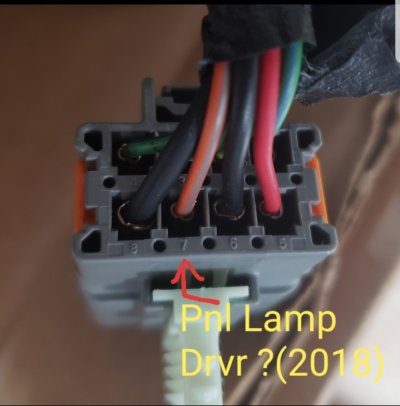
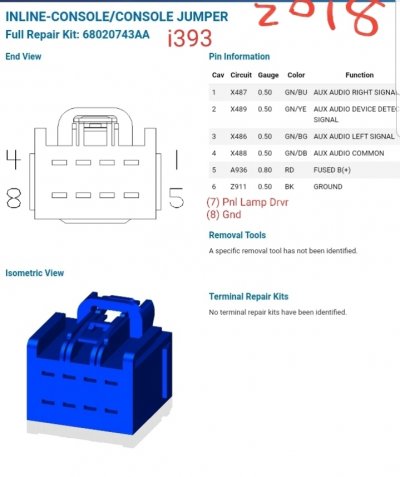
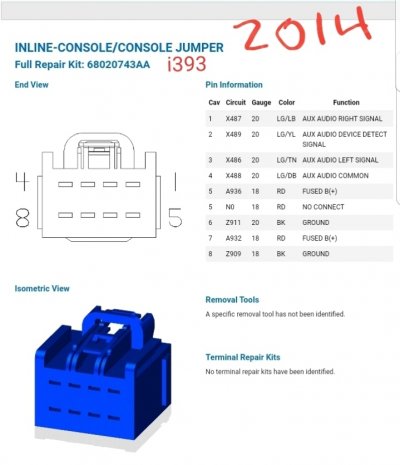
All just plugs in like factory no adapter needed but the back lighting on the hub stays on with the truck turned off. I left mine alone for now but this could drain the battery if left for off for some time. One of the wires at theback of the console lid needs to be cut and re-ran to a lighting source just have not had time to do this yet.
Ok, thanks. Do you happen to know which wire to cut?
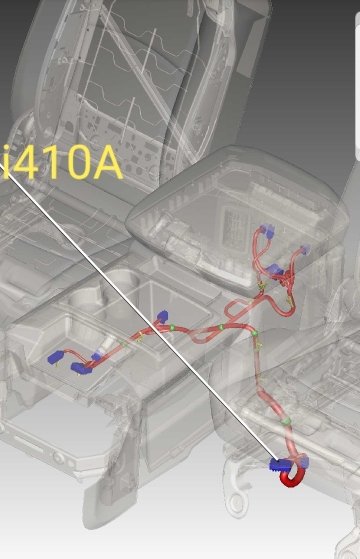
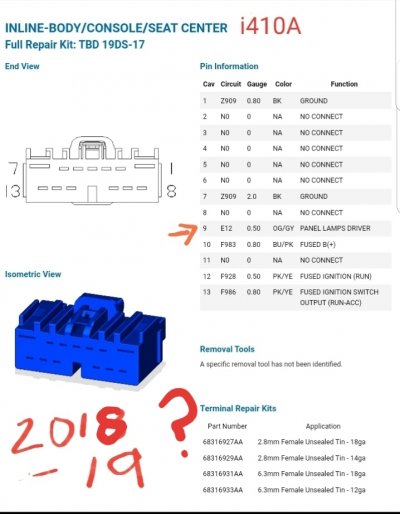
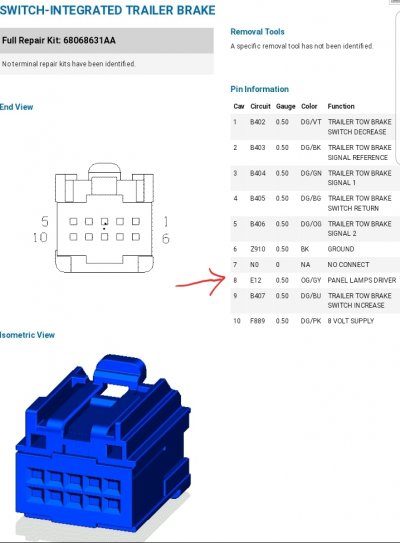
Looks like the center console connector I410A pin 9 is listed as All Aariants, circuit E12, Panel Lamps Driver, OR/GY 20 gauge. I haven't traced it out to see where it goes on the console end but it's a start.Not yet but thats easy to find out.
All just plugs in like factory no adapter needed but the back lighting on the hub stays on with the truck turned off. I left mine alone for now but this could drain the battery if left for off for some time. One of the wires at theback of the console lid needs to be cut and re-ran to a lighting source just have not had time to do this yet.
Ok, thanks. Do you happen to know which wire to cut?
