My build thread for swapping out dash to Laramie dash.

Disclaimer: Links on this page pointing to Amazon, eBay and other sites may include affiliate code. If you click them and make a purchase, we may earn a small commission.

Socalramfan

Senior Member
Supporting Member
TOTM Winner
Joined
Feb 12, 2017
Posts
4,271
Reaction score
5,113
Location
Huntington Beach
Ram Year
2011 Big Horn
Engine
4.7
The following is a build thread created to help others who might venture down this road.

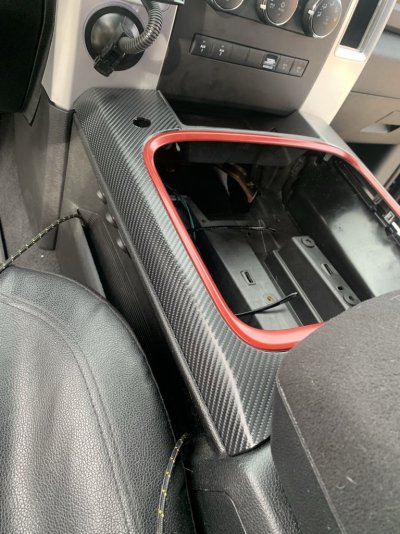
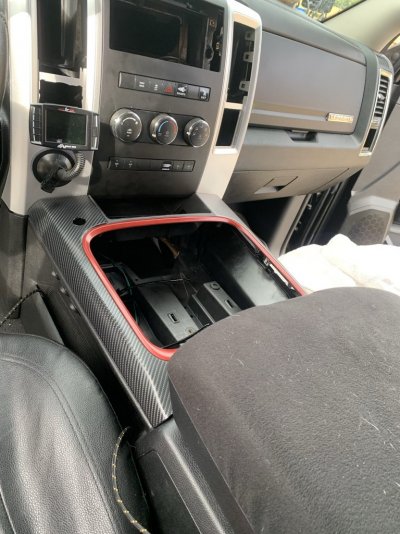
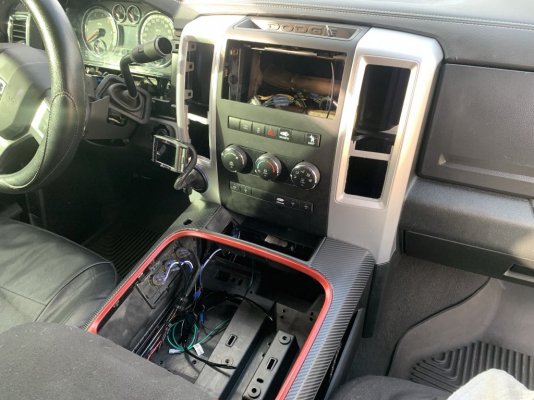
As mentioned under ‘ what have you done to your Ram this week’, I started posting a few pics of a Leather Laramie Dash I scored from a 2017 Ram 2500 recently, along with the door cards.

Purpose: I wanted to go all black on the interior. Could have painted the various parts currently in place (diesel grey), but when the opportunity to came to get the full dash… I jumped on it.

Tools needed are very minimal.

I had to remove the dash from the 2500, so I that allowed me a great learning experience. I began to check out You tube University and gathered whatever info I could. There are a few good videos out there to get you going.

I take no responsibility if you screw it up. This is MY account of how I did it on my Ram.
 
OP
OP
Socalramfan

Socalramfan

Senior Member
Supporting Member
TOTM Winner
Joined
Feb 12, 2017
Posts
4,271
Reaction score
5,113
Location
Huntington Beach
Ram Year
2011 Big Horn
Engine
4.7
Today I literally cleaned all components from the 2500 donor dash. Not difficult, but time consuming.

I want all parts ready and prepped for when I pull out my dash and reinstall the new one.

51AFA3FE-6F68-430C-9DDC-8F0AF75C37A0.jpegBD1F0A54-5D69-4F03-BFDF-78C04224F647.jpegA510F775-02D0-435C-A330-F4CCA57479AD.jpegA510F775-02D0-435C-A330-F4CCA57479AD.jpeg3A724046-F171-4D19-8652-39AC567666DC.jpeg
 
OP
OP
Socalramfan

Socalramfan

Senior Member
Supporting Member
TOTM Winner
Joined
Feb 12, 2017
Posts
4,271
Reaction score
5,113
Location
Huntington Beach
Ram Year
2011 Big Horn
Engine
4.7
Spent the day removing all the other Gazillion screws from the dash assembly, as well as the remaining major parts.

7A828CC1-B5BF-49E6-9D8D-078F1E9566BD.jpeg

Goal was to get the dash itself removed, so that tomorrow I can get and clean a few years of dusty etc, and re-organize some of the wiring.

CCCCE86C-992A-4F75-83EF-ACFEE89BCDEA.jpeg

mission accomplished

4425D392-3780-41B4-B87B-9E84519AED03.jpeg

Yes…. I’ll be placing it up for sale :waytogo:
 
Last edited:
OP
OP
Socalramfan

Socalramfan

Senior Member
Supporting Member
TOTM Winner
Joined
Feb 12, 2017
Posts
4,271
Reaction score
5,113
Location
Huntington Beach
Ram Year
2011 Big Horn
Engine
4.7
Day 3 …….. Broke out the Metrovac, a few rags and got to cleaning the dust and dirt accumulated since 2011 Behind the dash and in the ducting etc.

First time the interior of the ducts actually got whipped down I’m sure On the inside. And to think, I’ve got the air filter mod. Can’t imagine all the crap I’d be inhaling without it.

5D392FB3-5D60-49B4-818C-144E764CBDCA.jpeg

3E697ECC-1D27-4129-8144-9918D975E36D.jpeg

A9C45B2D-108D-4B65-AF77-CC1571789E64.jpeg

Yuk!!!

24C32549-CB01-41D5-A9CE-D919D6187C77.jpeg
 
OP
OP
Socalramfan

Socalramfan

Senior Member
Supporting Member
TOTM Winner
Joined
Feb 12, 2017
Posts
4,271
Reaction score
5,113
Location
Huntington Beach
Ram Year
2011 Big Horn
Engine
4.7
Day 3 Part 2…..

Decided to cleanup all previous wiring, get things better organized wiring wise etc.

Got out the soldering gun, heat shrink tube, and a lot of zip ties. Also Will label all wiring so in the future anyone working on it will be able to determine right away which wire runs what.

Will post pics tomorrow when that part gets completed.

Originally was shooting for installing the dash today, but my OCD took over :waytogo: :gr_grin:
 
OP
OP
Socalramfan

Socalramfan

Senior Member
Supporting Member
TOTM Winner
Joined
Feb 12, 2017
Posts
4,271
Reaction score
5,113
Location
Huntington Beach
Ram Year
2011 Big Horn
Engine
4.7
Day 4…..

Finished up the electrical clean up. Routed several previous add-ons which seemed to be cleaner as well as accessible for future needs.

Goal was to get the dash in today. Success :favorites37:

Had a friend give me a hand as I wanted to be ultra careful not to scrape or scratch anything.

As a note…. Reconnect the Airbag connectors First. You won’t be able to reach them afterwards to do so.

I’ll be reassembling the rest in a few coming days when I get a chance. Gotta go to work some time :waytogo:

E5EB5061-08CC-4F18-B693-D20218551FF4.jpeg

A7D111F4-A576-48B4-A0D7-87CFB2B84BA8.jpeg

9F8D6666-0A18-4221-B6AC-2CFB1F63049C.jpeg
 
OP
OP
Socalramfan

Socalramfan

Senior Member
Supporting Member
TOTM Winner
Joined
Feb 12, 2017
Posts
4,271
Reaction score
5,113
Location
Huntington Beach
Ram Year
2011 Big Horn
Engine
4.7
Day 5,6……

Had a chance today to fasten up a few items.

Started on the passenger side, and worked towards the left. Taking my time to make sure those Gazillion screws all get replaced. Certainly don’t want any ‘squeak or rattle‘ issues down the road o_O

Making a list as I go for items that will need to be adjusted or modified to fit seamlessly.

In addition, I’m giving serious consideration to wrapping the center trim panel and console trim panel in Carbon Fiber.

Think it’s coming along pretty good :waytogo:

5E8E0100-5AE6-43A8-96F5-A9811B7245B1.jpeg

Possible Wrap candidates ….

C94EA48E-8815-4ED5-AE8F-F995D70E3C17.jpeg

16482C48-77A8-4902-98AE-53E8AB3344F8.jpeg
 
OP
OP
Socalramfan

Socalramfan

Senior Member
Supporting Member
TOTM Winner
Joined
Feb 12, 2017
Posts
4,271
Reaction score
5,113
Location
Huntington Beach
Ram Year
2011 Big Horn
Engine
4.7
Here’s a list of items to get a bit more attention as the dash swap isn’t a 100% swap, without a few adjustments etc.

1. Trailer brake Control housing & trim panel

2. Instrument cluster trim bezel

3. Ignition switch surround

4. Radio mounting point

I’ll attach pics with each when I get a chance soon. :waytogo:
 

PaleFlyer

Senior Member
Joined
Jan 1, 2022
Posts
454
Reaction score
259
Location
Charlotte NC
Ram Year
2018
Engine
Hemi 5.7
You're not upgrading to an 8.4 Uconnect while you have everything apart???
 
OP
OP
Socalramfan

Socalramfan

Senior Member
Supporting Member
TOTM Winner
Joined
Feb 12, 2017
Posts
4,271
Reaction score
5,113
Location
Huntington Beach
Ram Year
2011 Big Horn
Engine
4.7
No, wasn’t on the list.

Would really need to do a lot more research to see what would need to be changed / modified to do so. Not sure that I’d even be able to do so with a 2011.

After this mod, will have a serious bill from Core 4x4 planned :favorites37:
 
OP
OP
Socalramfan

Socalramfan

Senior Member
Supporting Member
TOTM Winner
Joined
Feb 12, 2017
Posts
4,271
Reaction score
5,113
Location
Huntington Beach
Ram Year
2011 Big Horn
Engine
4.7
Day 7…….

Ironing out the little details on various parts. Today addressed the Brake Control and bezel.

On a 2011 it is located on the lower left side just above the Parking Brake release lever. On a 2017, it’s intergraded in the center dash controls.

The opening is there for it to be installed, but needs to be modified via a dermal tool, to fit flush and also a mounting screw to be relocated. I’ll have to make adjustments to incorporate the bezel I have, and do so SLOWLY. Too much trimming….. and it’ll look like crap.

Think it was pretty successful :waytogo:

BF212CC2-9EB2-4248-A2EC-5EE9437B66E2.jpeg60DA5853-2299-4941-BB1A-E74DE77F5457.jpeg

Brake controller with bezel positioned prior to adjustments. Not flush.

667078B4-227C-4D4E-AAAA-8FE76DD6FFC7.jpeg


With some Dremel work, and mounting hole relocated…

20948F01-3ED8-451B-B54E-F21EB1885456.jpeg

Blind screw base plate installed……
39E140FA-604F-4F49-8A7D-6BE5DB8851A8.jpeg

Finish product, equal spacing all the way around and flush
644C72DC-AC59-43DF-A948-57DAEC6D7FA6.jpeg

81A63356-89FC-4997-A1B4-840029166F42.jpeg
 
Last edited:
OP
OP
Socalramfan

Socalramfan

Senior Member
Supporting Member
TOTM Winner
Joined
Feb 12, 2017
Posts
4,271
Reaction score
5,113
Location
Huntington Beach
Ram Year
2011 Big Horn
Engine
4.7
Day 8….

Played around with the Carbon Fiber wrap for the center bezel and console bezel.

Various pics showing the process. Paticence is the key to good results here. There was a bit of a learning curve with the various curves ( no pun), but fortunately the wrap used was very forgiving.

Still have the left center bezel to do, as well as iron out and little imperfections etc.

Will finish it up tomorrow…. Trick or Treaters‘ started to arrive. :33:

FDB32087-E070-4610-A1D8-AA79FF2EE9B8.jpeg

67FC2FD7-F504-4AA3-B764-36A76BD2C9F4.jpeg

AA0CCB25-A269-4C5D-BC4D-EF966AC63265.jpeg

9FAF280A-16BB-46DF-BF1E-527229E48168.jpeg

E7CF429C-F1F7-4E26-9053-B587FD932B96.jpeg


E0193EEA-D1CC-4949-9387-BE0724E12D7B.jpeg

7B94396D-4FB1-48F6-A1A5-B07A8C5FB5A0.jpeg

0E755335-4AF8-40CD-90D7-FA593E433B74.jpeg

30D9FE83-7BE2-4C14-BA02-D43683E262B7.jpeg

250ADA4A-6AFE-4E4B-B40E-DC1514ED7C5D.jpeg

B774EE0B-7BD3-4A34-A2AC-F4E6F66AA4A3.jpeg

8145F411-60A1-49B6-B432-B01D8DE094A9.jpeg
 

Attachments

  • 902048AE-606A-4A3C-B903-C588E9F45AA6.jpeg
    902048AE-606A-4A3C-B903-C588E9F45AA6.jpeg
    191.5 KB · Views: 7
  • 773E711F-270E-47EE-BDE8-58753028F4EA.jpeg
    773E711F-270E-47EE-BDE8-58753028F4EA.jpeg
    180.4 KB · Views: 6
  • FFD586E1-BA4E-4F92-8E74-2BE2B0D4B955.jpeg
    FFD586E1-BA4E-4F92-8E74-2BE2B0D4B955.jpeg
    164.8 KB · Views: 7
Last edited:
OP
OP
Socalramfan

Socalramfan

Senior Member
Supporting Member
TOTM Winner
Joined
Feb 12, 2017
Posts
4,271
Reaction score
5,113
Location
Huntington Beach
Ram Year
2011 Big Horn
Engine
4.7
Day 9…..

Finished with the wrap, installed the air vents and did a test fit of everything hooked up.

A few minor adjustment and tweaking, but I gotta say I’m liking it. Might even wrap the trim on the other vents. Really changed the look and feel from previously.

Still up:

1. Trim instrument bezel and attach,

2. Adjust and align radio with center bezel. Needs slight upward adjustment to be flush.

3. Adjust mount for CB

At a later date, I’ll run wire and connect all the extra courtesy lighting I gained from the Laramie swap.

For now, I’m pretty pleased with the results. Definitely well worth it :waytogo:

93240C60-3F27-4A64-A46A-9867FB5C6168.jpeg

BB69D401-8B37-4724-998C-82289A001DF7.jpeg

5735D8C7-3D04-4A07-8B13-8FCC4BDF4792.jpeg

38EC2F96-E6B1-45F0-A64A-96ECFD034DF8.jpeg

A609988B-5BBB-40BA-A68B-BEC3DA790315.jpeg

C0BD9803-729F-4611-9213-01261D0E123C.jpeg

754B9DC3-37AB-47D9-97C1-6C7B143689A4.jpeg
 
Top