Power issue to head unit, need assistance (FInal Update - Success!)

Disclaimer: Links on this page pointing to Amazon, eBay and other sites may include affiliate code. If you click them and make a purchase, we may earn a small commission.

OP
OP
O

osprey92

Senior Member
Joined
May 1, 2017
Posts
143
Reaction score
53
Ram Year
2017
Engine
Hemi 5.7
OK. This is so friggin frustrating. The Axxess LC-CHRC-01 harmess is not wired correctly. The constant 12v pins to the ACC and the ACC wire on the Axess harness still get no ACC power. Than God I tested it before wiring everything up (live and learn). I've read a few threads up and I am not convinced there is not a way to do this. When on the battery, the ACC and 12v+ are connected and the radio powers up. Is there a obvious place to tap into ACC somewhere? Folks have installed the AToyo successfully. This really cannot be an impossible task, can it?
 

chrisbh17

Senior Member
Joined
Oct 12, 2017
Posts
6,691
Reaction score
7,475
Ram Year
2017
Engine
Hemi 5.7
You are using the interface along with the harness, correct?

And following the initialization instructions?
 
OP
OP
O

osprey92

Senior Member
Joined
May 1, 2017
Posts
143
Reaction score
53
Ram Year
2017
Engine
Hemi 5.7
You are using the interface along with the harness, correct?

And following the initialization instructions?
I have the interface but it is not getting power off the Axxess harness (either harnesses). Even tapped directly with a multimeter, I cannot find power out of the Axxess harness on the red or any available wire, even those leading into the interface pin. I do have constant power. I believe I need to solve the ACC issue first, which is the Axxess harness has no connectivity to the ACC wire on the main harness. But I'm open to suggestions if I am misthinking the issue.
 

chrisbh17

Senior Member
Joined
Oct 12, 2017
Posts
6,691
Reaction score
7,475
Ram Year
2017
Engine
Hemi 5.7
I think part of the purpose of the interface is to mimick accessory power.

So the *output* of the interface would have an accessory-only power along with a constant power.

The *input* to the interface will only have a constant power.
 

Jimmy07

Senior Member
Joined
Feb 23, 2017
Posts
3,254
Reaction score
2,915
Ram Year
2017
Engine
6.4 Hemi
I think part of the purpose of the interface is to mimick accessory power.

So the *output* of the interface would have an accessory-only power along with a constant power.

The *input* to the interface will only have a constant power.
Correct. It needs to be wired up to the radio, then initialized with the key on then off then to accessory
 
OP
OP
O

osprey92

Senior Member
Joined
May 1, 2017
Posts
143
Reaction score
53
Ram Year
2017
Engine
Hemi 5.7
Thanks for the input. Yes, that was the case. Tested and powered up with the chime and interface installed. Wiring up to test speakers, etc. Will post an update later.
 
OP
OP
O

osprey92

Senior Member
Joined
May 1, 2017
Posts
143
Reaction score
53
Ram Year
2017
Engine
Hemi 5.7
A quick up date on progress. Remaining harness was wired and tested. Everything working as it should. I need to complete the install tomorrow, then move on to the front speaker upgrade (rear done). From very brief run through of the Android head unit I am loving it.
Completing the install got bogged down in dealing with the bezel facia. The radio is slightly larger (2mm) thank a standard 2Din and has a volume knob on the drivers side. I was able to use a Dremel and a sanding cylinder and give the knob enough room to move freely. There is a USB/SD card cover that is impacted by the bezel - need to think of a way that can give me a few mm to open close the cover. Probably more Demel work tomorrow.
Installed the support rails for a test run and the machine screws project from the side and will not allow the radio to slide into the dash. Off the the hardware store tomorrow to find something that has a flat head.
Other than those issues, real close to finishing up. I'll provide a write up/lessons learned and post a few pics. My gratitude for all that contributed and helped me get this far. Cars were simpler last time I did this!
 
OP
OP
O

osprey92

Senior Member
Joined
May 1, 2017
Posts
143
Reaction score
53
Ram Year
2017
Engine
Hemi 5.7
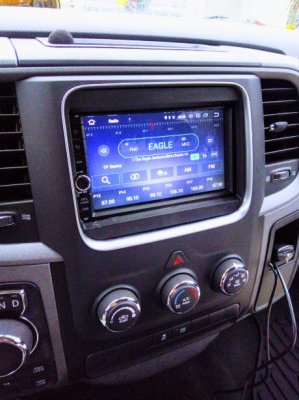
So the head unit is in and I am really satisfied. It was rainy all day so I could not install the new speakers, but just changing out the head unit is like a whole audio replacement. My only complaints about the unit is the download speed off wifi is very, very slow, the rear view camera is blank (may have connected the wrong cable) and I cannot get Spotify to load. Below is the gear I used to get this working on a 2017 Tradesman Crew with UConnect 3.0, no amplifier:

AMuse Audio branded Head Unit, 2DIN Android 8.0, Octacore, 4GB/32GB, 7" HD screen, (UPC 688209588989)
Metra Axxess LC-CHRC-01 (main harness)
Metra Axxess ASWC-1 Interface/Steering Wheel Control
American International Mounting Kit CDK656
40-EU55 Antenna Adapter
2 - inline fuse holders
2 - 2A fuses

Miscellaneous:
Butt Connectors
Crimper/wire stripper
Hacksaw
Dremel
1TB SD Card
Velcro mounting strips
4 - 5x80 flat head machine screws
4 - fiber washers

All in the cost was around $330.

radio.JPG

Major issues faced in installation was the incorrect harness matching on the Metra website. I initially purchased the AX-ADXSVI-CH3 harness, tested the radio, and had no ACC power. When the radio tested good, I purchased another harness thinking the first was defective. Again, no ACC power. After calling Metra, the correct harness was purchased and worked. This caused several months delay and frustration, partly because of the incorrect harnesses, but also not understanding that the factory harness does not deliver ACC power to the head unit. The only way to accomplish this is with the correct harness and the interface which mimics ACC power to the unit via the interface and the 12V+ ground. If it wasn't for this forum and support, I probably would have paid someone to install the unit.

Minor issues were a few. (1) The radio is labeled a 2DIN radio but exceeds the global 2DIN size by 2mm horizontally. This causes the mounting frame to flex around the radio when the rails are added. The fiber washers helped press the rails to the sides. And without the flat head machine screws, the radio would not clear the dash frame. (2) The radio has a volume knob and a SD card slot covered by a tabbed cap. The dremel was used to clear a space for the knob to move freely and access to the SD card slot.

The radio came with a GPS antenna, mic, and double USB dongle. I used Velcro applied to a space directly under the dash and the GPS antenna to secure it there. I have excellent GPS satellite reception. For the mic I drilled a hole in the cubby on top of the dash and installed the mic. I have not tested it. The USB cable was routed thru a hole drilled in the dash right panel cubby. Note: you loose the USB connectivity in the center console. You can connect a micro-USB tail or a USB/Apple tail to the USB cables and charge phones.

Connecting the LC-CHRC-01 harness to the radio harness was not difficult but took matching each wire by function (not by color). The Chinese harness manufactures seem to throw whatever colored wire on hand into the pins and they rarely match a standard function/color scheme. You have to pay attention to the radio wire diagram. I added the inline fuses to the ACC and antenna power lines replacing the fuses that can wired with the harness (snap/twist, easier to replace if needed).

So far I have tested the GPS with Google Maps (excellent) and equalizer (really impressed). Adding a 1TB SD card allows Android 8 to see this as internal storage, providing more than enough room to add maps and music files. Overall, I think for the $ outlayed I have exactly what I envisioned planning to upgrade the UConnect 3.0.
 
Last edited:

Quyonmob

Senior Member
Joined
Dec 29, 2018
Posts
778
Reaction score
853
Location
Canada
Ram Year
2017
Engine
3.6
Doing the same Install today. The blue wire on the 40-eu55, where did you connect it on the LRC-CHRC-01? There is a blue/white/500L and a blue/white labelled “not in use”.

Or is it done in the dash?
 

Quyonmob

Senior Member
Joined
Dec 29, 2018
Posts
778
Reaction score
853
Location
Canada
Ram Year
2017
Engine
3.6
Or can I use the blue white REM wire (usually amp turn on signal) from the head unit harness?
 
OP
OP
O

osprey92

Senior Member
Joined
May 1, 2017
Posts
143
Reaction score
53
Ram Year
2017
Engine
Hemi 5.7
I used the wire labled antenna power and connected a 2A fuse between the harness wire and the antenna power wire.

Correction: I used the wire off the radio harness labled for antenna power and connected a 2A fuse between the harness wire and antenna power wire.
 
Last edited:

Quyonmob

Senior Member
Joined
Dec 29, 2018
Posts
778
Reaction score
853
Location
Canada
Ram Year
2017
Engine
3.6
I used the wire labled antenna power and connected a 2A fuse between the harness wire and the antenna power wire.

Weird. My LRC-CHRC-01 has no antenna power wire. Just 2 amp turn on wires, one labelled 500L. :sad72:
 

Quyonmob

Senior Member
Joined
Dec 29, 2018
Posts
778
Reaction score
853
Location
Canada
Ram Year
2017
Engine
3.6
I contacted Axxess, instant reply, awesome customer support. Powered antenna should run off the head unit’s amp signal wire.
 

Quyonmob

Senior Member
Joined
Dec 29, 2018
Posts
778
Reaction score
853
Location
Canada
Ram Year
2017
Engine
3.6
I contacted Axxess, instant reply, awesome customer support. Powered antenna should run off the head unit’s amp signal wire.
After a few months, looks like the amp signal wire is insufficient power for the powered antenna. The signal reception is awful.
 

jkendall4

Junior Member
Joined
Feb 12, 2018
Posts
28
Reaction score
3
Location
Kentucky
Ram Year
2013
Engine
V6
So the head unit is in and I am really satisfied. It was rainy all day so I could not install the new speakers, but just changing out the head unit is like a whole audio replacement. My only complaints about the unit is the download speed off wifi is very, very slow, the rear view camera is blank (may have connected the wrong cable) and I cannot get Spotify to load. Below is the gear I used to get this working on a 2017 Tradesman Crew with UConnect 3.0, no amplifier:

AMuse Audio branded Head Unit, 2DIN Android 8.0, Octacore, 4GB/32GB, 7" HD screen, (UPC 688209588989)
Metra Axxess LC-CHRC-01 (main harness)
Metra Axxess ASWC-1 Interface/Steering Wheel Control
American International Mounting Kit CDK656
40-EU55 Antenna Adapter
2 - inline fuse holders
2 - 2A fuses

Miscellaneous:
Butt Connectors
Crimper/wire stripper
Hacksaw
Dremel
1TB SD Card
Velcro mounting strips
4 - 5x80 flat head machine screws
4 - fiber washers

All in the cost was around $330.

View attachment 149256

Major issues faced in installation was the incorrect harness matching on the Metra website. I initially purchased the AX-ADXSVI-CH3 harness, tested the radio, and had no ACC power. When the radio tested good, I purchased another harness thinking the first was defective. Again, no ACC power. After calling Metra, the correct harness was purchased and worked. This caused several months delay and frustration, partly because of the incorrect harnesses, but also not understanding that the factory harness does not deliver ACC power to the head unit. The only way to accomplish this is with the correct harness and the interface which mimics ACC power to the unit via the interface and the 12V+ ground. If it wasn't for this forum and support, I probably would have paid someone to install the unit.

Minor issues were a few. (1) The radio is labeled a 2DIN radio but exceeds the global 2DIN size by 2mm horizontally. This causes the mounting frame to flex around the radio when the rails are added. The fiber washers helped press the rails to the sides. And without the flat head machine screws, the radio would not clear the dash frame. (2) The radio has a volume knob and a SD card slot covered by a tabbed cap. The dremel was used to clear a space for the knob to move freely and access to the SD card slot.

The radio came with a GPS antenna, mic, and double USB dongle. I used Velcro applied to a space directly under the dash and the GPS antenna to secure it there. I have excellent GPS satellite reception. For the mic I drilled a hole in the cubby on top of the dash and installed the mic. I have not tested it. The USB cable was routed thru a hole drilled in the dash right panel cubby. Note: you loose the USB connectivity in the center console. You can connect a micro-USB tail or a USB/Apple tail to the USB cables and charge phones.

Connecting the LC-CHRC-01 harness to the radio harness was not difficult but took matching each wire by function (not by color). The Chinese harness manufactures seem to throw whatever colored wire on hand into the pins and they rarely match a standard function/color scheme. You have to pay attention to the radio wire diagram. I added the inline fuses to the ACC and antenna power lines replacing the fuses that can wired with the harness (snap/twist, easier to replace if needed).

So far I have tested the GPS with Google Maps (excellent) and equalizer (really impressed). Adding a 1TB SD card allows Android 8 to see this as internal storage, providing more than enough room to add maps and music files. Overall, I think for the $ outlayed I have exactly what I envisioned planning to upgrade the UConnect 3.0.

So what harness ended up working? I think I’m having the same problem
 
Top