MK82
Member
- Joined
- Jul 6, 2021
- Posts
- 57
- Reaction score
- 55
- Location
- Houston, Texas
- Ram Year
- 2007
- Engine
- 5.9 HO Cummins
Morning folks!
Happy New Year!
So yesterday I decided to try and fix my driver and passenger seat belts. They wouldn't retract anymore, we're twisted In 2 places, and I got tired of them flopping all over the place. Beyond that its a safety concern for my family. I originally ordered new ones at the exorbant price dodge sells them for and after watching the YouTube I figured hell with it let me see if I can fix it myself and I'll return these new ones. Also thought well if I screw something up I have good replacements lol
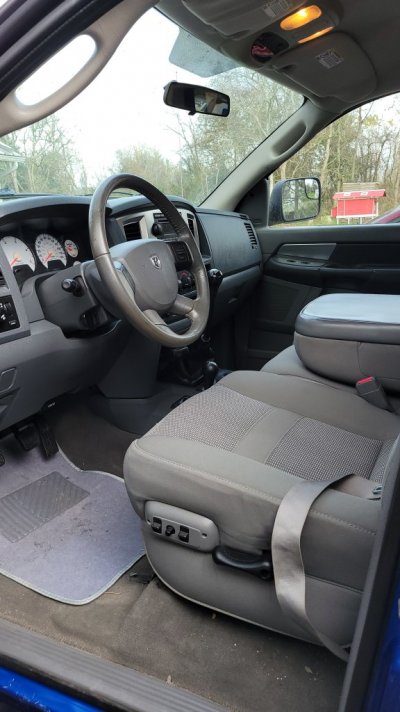
So here goes.... move your front seats as far forward as possible and move the back rest to its forward most position...
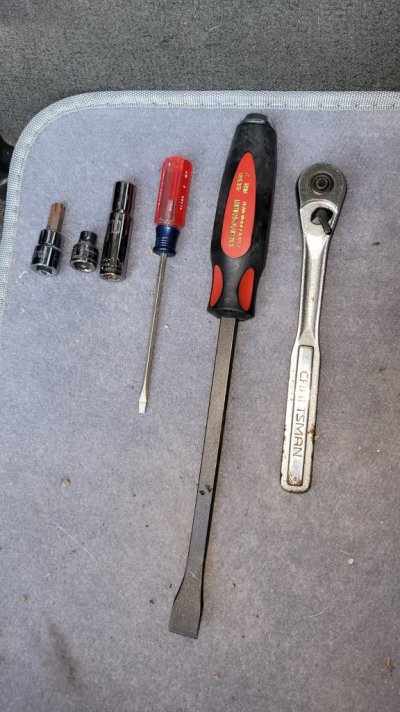
Tools: 8mm socket, 10mm socket, #50 torx socket, small flat head screwdriver, a trim tool or pry bar (if needed), and a small punch. I put some blue loctite on all the #50 torx bolts too as they had it on there from the factory. You'll need a can of dry lube, I used the liquid wrench brand but it's the only one I could find locally and it's safe for plastics (Yes I forgot the punch and dry lube in the picture)
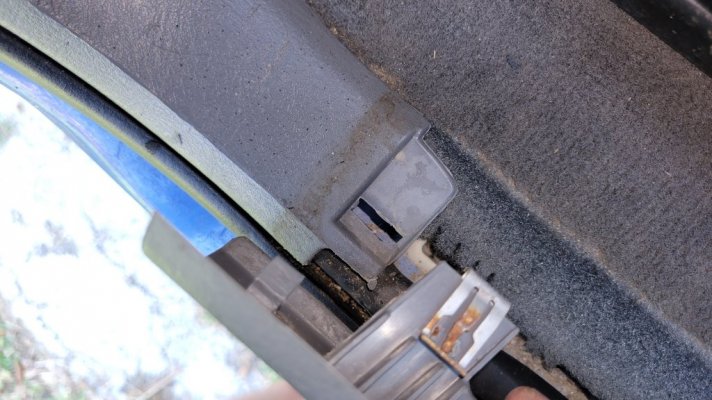
So start by popping up the rocker trim, it's three clips front and 2 clips in back, the front has a tab that hooks into the B pillar bottom trim. I used a little prybar as I don't have any trim tools and my trim was really snug in there.

Once you have those popped up move on to the grab handles in the back. I used my small flat head to pop off the bolt covers. Inside there is a 10mm bolt you'll have to remove. Once I had them removed I left the bolts in the holes and just closed the caps so I wouldn't
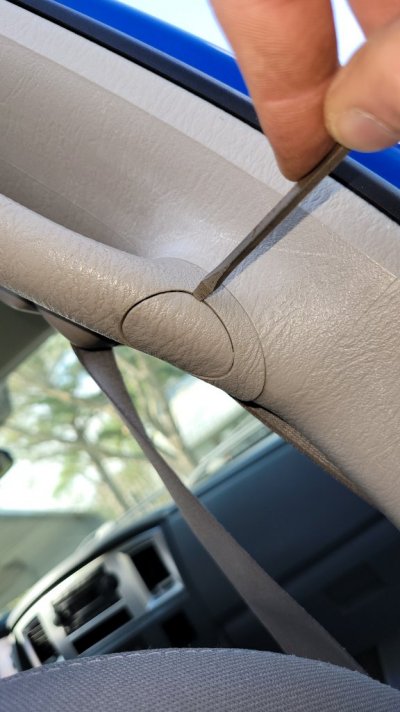

Next I popped off the cover from the seat belt swivel deal (technical term) as there is a #50 torx bolt there you'll have to remove. It pops off pretty easy bit it's mildly flimsy so be careful.
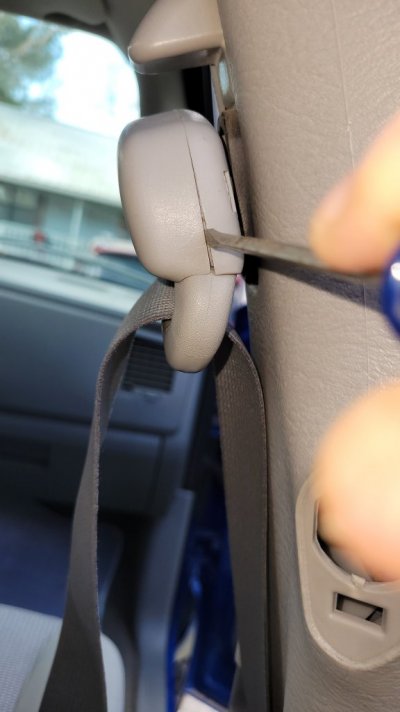
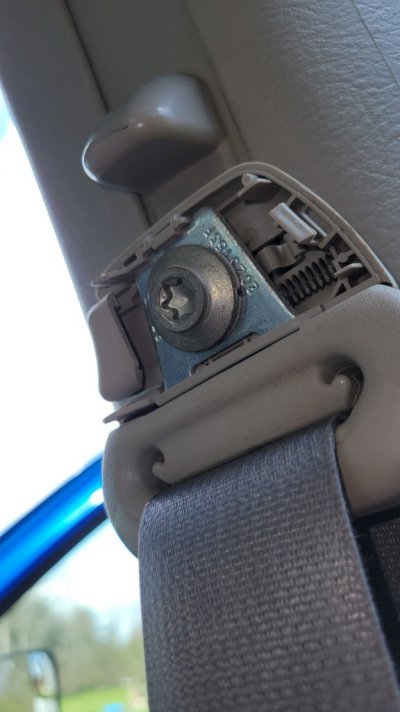
Once you have that removed and the swivel thingie removed, you can pull the upper B pillar trim away. This trim fits into a groove in the door weather stripping so you need to pop that out to get it to move. Now that that is pulled away. The lower trim is also in the door weather stripping. There are 2 clips on either side of the seat belt slit. Mine were pretty snug so it took a little force. Now take the seat belt out of the little slit and The lower B pillar trim just pops out and set it aside. Becareful not to break the trim.

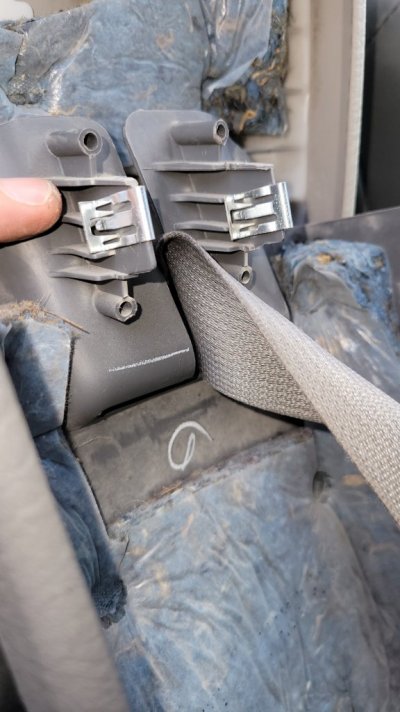
Now we're down to the meat and taters of it. There is another guide for the seat belt on the B pillar, take the small flathead and press the clips in and it basically falls out. At the bottom you'll find the retractor. It's held in by a 8mm bolt on top and a #50 torx on the bottom.
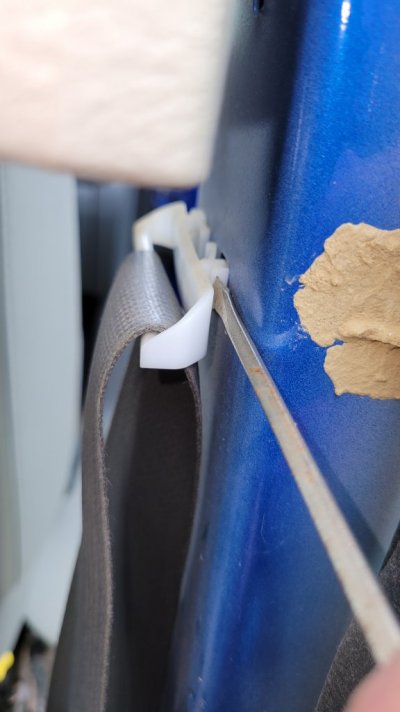
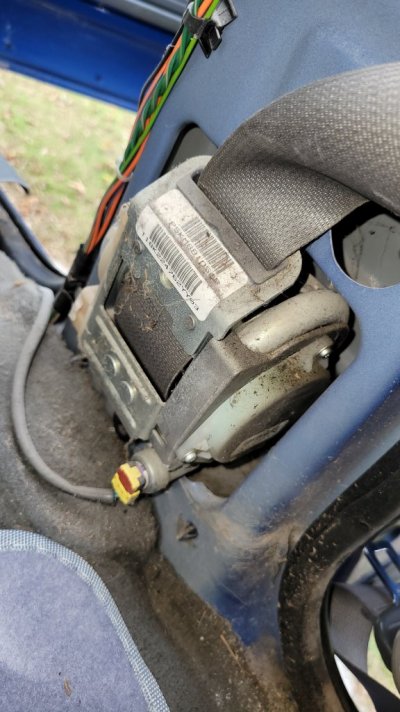


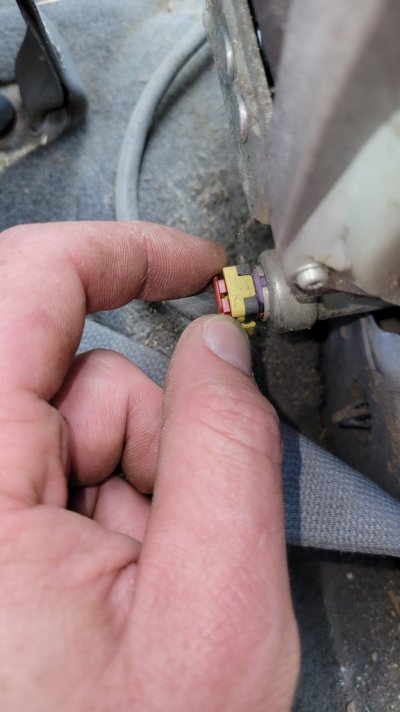
There is also an electrical connector on it. Pop out the little red tab on the connector and it comes off pretty easy.
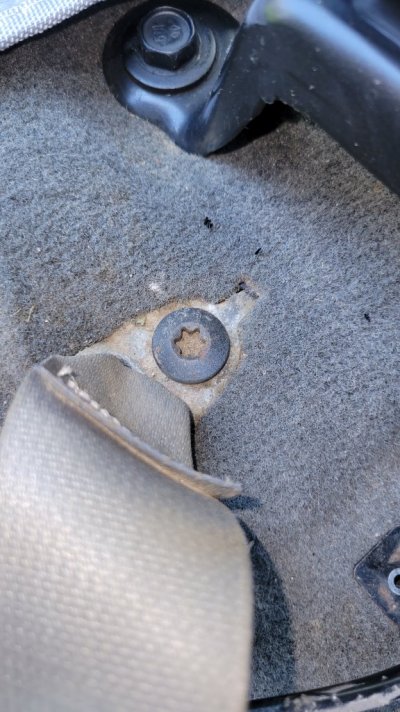
There is a #50 torx on the floor board at the rear of the front seat frame holding in the other side of the seat belt remove this as well and everything just pops out.
Now the delicate work begins....
Now that you have the retractor out you need to hold it up right like it was in the truck and pull the seat belt out all the way. This will take some time cause if the little check ball thingie (which we'll get to in a minute) isn't just in the right spot with the wind out of the south and Jupiter aligned perfectly with Pluto on a 37.64° axis... it will lock up and you have to let some or all of it back in and start over. Once you have it all the way out I used my small flathead to lock it in place with the groves in the spool and the spring tension. If you have a binder clip or vice grips just hold the seat belt that way. If your belts are twisted now is the time to untwist them, mine were twisted in 2 places on both sides... not sure how the PO accomplished that lol.
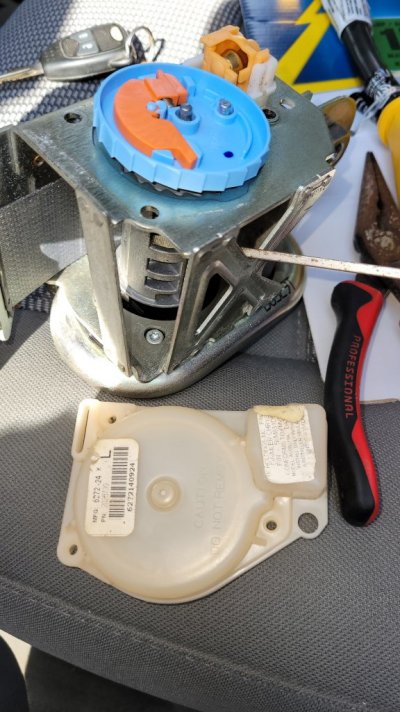
(For the step below)
****IMPORTANT**** DO NOT LOOSE THES PINS!!!! You'll need them to put the cover back on.
Now, the plastic cover that has a little box at the bottom, that's the side you need. There are 3 plastic pins holding it in place. You'll need a punch about the size of these pins. Working from the inside of the retractor, carefully push these pins out. It's at an angle and there is no good way to get to the bottom pin (well any of them really). If you try to drive (atleast the bottom one) out from the outside you will shear it off. (Ask me how I know lol)
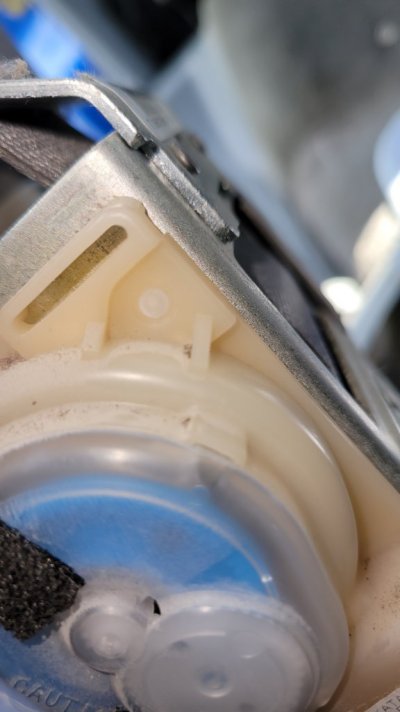
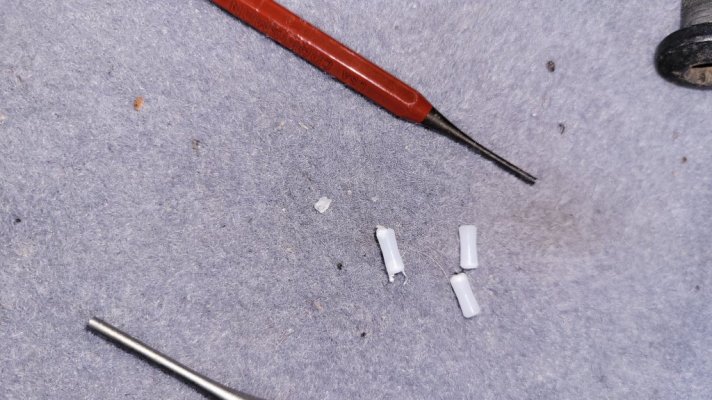
Once you get the cover off, keep this side up as the gears will come off and I don't know if they are clocked in there or if they just ride on the little release pin. Either way... in that little box at the bottom you'll see a check ball looking thing. I blew it out to make sure there wasnt any dust or dirt in there. Take your dry lube and give it a good coating, I sprayed each side of the spool too where it contacts the housing.
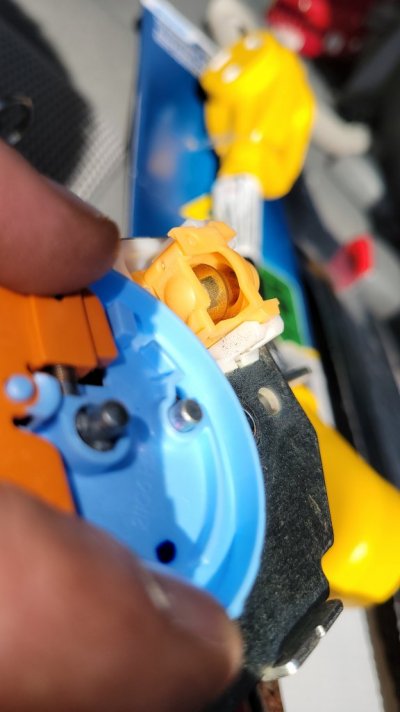
Once you have everything lubed up put the cover back on and push the plastic pins back in from the outside. I used a pair of needle nose pliers to push them back in flush. Now you could reinstall from here and see how things do... but I read in a few places that seatbelts can build up a layer of "funk" we'll call it and that will cause them to retract poorly as well. Beyond that I already have them out of the truck so why not clean them.
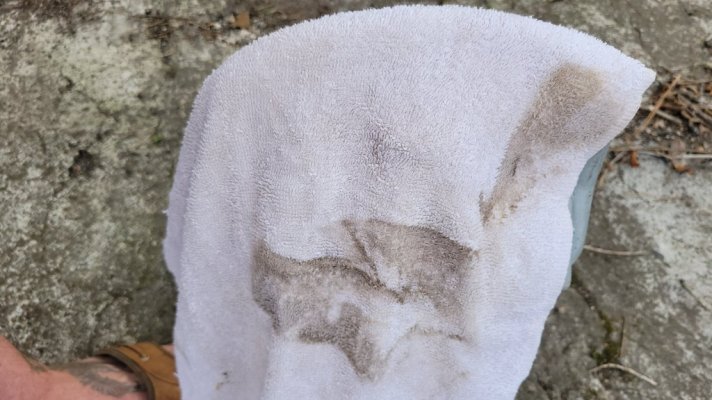
I put a good bit of dawn in a 5gal bucket and filled it with water enough to cover both belts. Placed them in there and let them soak for an hour. I'm sure you can use simple green or purple power or what have you and they might do a better job, but dawn is what I have and I know it won't hurt the poly webbing of the belts. I Also made a little tool to help get the the belts clean out of 3/4 pvc. (Got the idea from a guy on YouTube, credit where credit is due, I don't remember his channel) Just cut a slit in it big enough for the belt. After I let it soak I put the belt in the slit, held the pipe at the cut end and ran it down the belt. Pic is after the 2nd or third time doing it and you can see the funk coming off... blah. You run it down several times till it's clean, I think it took 6 or 7 passes before there was nothing else coming out. Then I toweled off the belts and still got a bunch of funk off... now set them I'm the sun to dry, if you let them real back up wet you'll get mold... and we don't want that lol. They looked much better when I was done, not perfectly clean but much better. I didn't have time to scrub or let them soak longer.
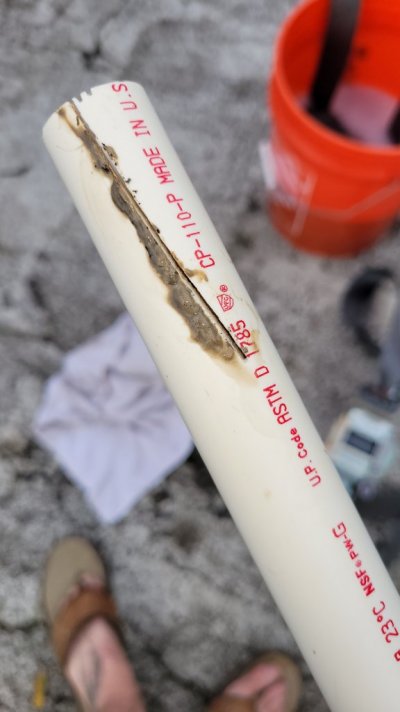
Once dry reinstall in the reverse of removal. EXCEPT, put the anchor bolt on the floor in last. Also make sure when the B pillar trim goes back together make sure you have both pieces back in the groove in the weather stripping.

I hope this helps yall if yall are having any issues. my belts retract as they should now and are a lot more comfortable to wear. I don't need the new belts which saves me about $800 bucks. Yes I could have gotten used ones cheaper but who's to say I wouldn't have had the same issues. My family rides in this rig with me and while I don't use my seat belt all the time, they do, and I wanted to make sure their safety was priority. If yall have any questions please let me know I'll be happy to answer anything I can. I hope all the images load *fingers crossed*
Matt
Happy New Year!
So yesterday I decided to try and fix my driver and passenger seat belts. They wouldn't retract anymore, we're twisted In 2 places, and I got tired of them flopping all over the place. Beyond that its a safety concern for my family. I originally ordered new ones at the exorbant price dodge sells them for and after watching the YouTube I figured hell with it let me see if I can fix it myself and I'll return these new ones. Also thought well if I screw something up I have good replacements lol

So here goes.... move your front seats as far forward as possible and move the back rest to its forward most position...
Tools: 8mm socket, 10mm socket, #50 torx socket, small flat head screwdriver, a trim tool or pry bar (if needed), and a small punch. I put some blue loctite on all the #50 torx bolts too as they had it on there from the factory. You'll need a can of dry lube, I used the liquid wrench brand but it's the only one I could find locally and it's safe for plastics (Yes I forgot the punch and dry lube in the picture)

So start by popping up the rocker trim, it's three clips front and 2 clips in back, the front has a tab that hooks into the B pillar bottom trim. I used a little prybar as I don't have any trim tools and my trim was really snug in there.


Once you have those popped up move on to the grab handles in the back. I used my small flat head to pop off the bolt covers. Inside there is a 10mm bolt you'll have to remove. Once I had them removed I left the bolts in the holes and just closed the caps so I wouldn't


Next I popped off the cover from the seat belt swivel deal (technical term) as there is a #50 torx bolt there you'll have to remove. It pops off pretty easy bit it's mildly flimsy so be careful.


Once you have that removed and the swivel thingie removed, you can pull the upper B pillar trim away. This trim fits into a groove in the door weather stripping so you need to pop that out to get it to move. Now that that is pulled away. The lower trim is also in the door weather stripping. There are 2 clips on either side of the seat belt slit. Mine were pretty snug so it took a little force. Now take the seat belt out of the little slit and The lower B pillar trim just pops out and set it aside. Becareful not to break the trim.


Now we're down to the meat and taters of it. There is another guide for the seat belt on the B pillar, take the small flathead and press the clips in and it basically falls out. At the bottom you'll find the retractor. It's held in by a 8mm bolt on top and a #50 torx on the bottom.


There is also an electrical connector on it. Pop out the little red tab on the connector and it comes off pretty easy.

There is a #50 torx on the floor board at the rear of the front seat frame holding in the other side of the seat belt remove this as well and everything just pops out.

Now the delicate work begins....
Now that you have the retractor out you need to hold it up right like it was in the truck and pull the seat belt out all the way. This will take some time cause if the little check ball thingie (which we'll get to in a minute) isn't just in the right spot with the wind out of the south and Jupiter aligned perfectly with Pluto on a 37.64° axis... it will lock up and you have to let some or all of it back in and start over. Once you have it all the way out I used my small flathead to lock it in place with the groves in the spool and the spring tension. If you have a binder clip or vice grips just hold the seat belt that way. If your belts are twisted now is the time to untwist them, mine were twisted in 2 places on both sides... not sure how the PO accomplished that lol.

(For the step below)
****IMPORTANT**** DO NOT LOOSE THES PINS!!!! You'll need them to put the cover back on.
Now, the plastic cover that has a little box at the bottom, that's the side you need. There are 3 plastic pins holding it in place. You'll need a punch about the size of these pins. Working from the inside of the retractor, carefully push these pins out. It's at an angle and there is no good way to get to the bottom pin (well any of them really). If you try to drive (atleast the bottom one) out from the outside you will shear it off. (Ask me how I know lol)


Once you get the cover off, keep this side up as the gears will come off and I don't know if they are clocked in there or if they just ride on the little release pin. Either way... in that little box at the bottom you'll see a check ball looking thing. I blew it out to make sure there wasnt any dust or dirt in there. Take your dry lube and give it a good coating, I sprayed each side of the spool too where it contacts the housing.

Once you have everything lubed up put the cover back on and push the plastic pins back in from the outside. I used a pair of needle nose pliers to push them back in flush. Now you could reinstall from here and see how things do... but I read in a few places that seatbelts can build up a layer of "funk" we'll call it and that will cause them to retract poorly as well. Beyond that I already have them out of the truck so why not clean them.
I put a good bit of dawn in a 5gal bucket and filled it with water enough to cover both belts. Placed them in there and let them soak for an hour. I'm sure you can use simple green or purple power or what have you and they might do a better job, but dawn is what I have and I know it won't hurt the poly webbing of the belts. I Also made a little tool to help get the the belts clean out of 3/4 pvc. (Got the idea from a guy on YouTube, credit where credit is due, I don't remember his channel) Just cut a slit in it big enough for the belt. After I let it soak I put the belt in the slit, held the pipe at the cut end and ran it down the belt. Pic is after the 2nd or third time doing it and you can see the funk coming off... blah. You run it down several times till it's clean, I think it took 6 or 7 passes before there was nothing else coming out. Then I toweled off the belts and still got a bunch of funk off... now set them I'm the sun to dry, if you let them real back up wet you'll get mold... and we don't want that lol. They looked much better when I was done, not perfectly clean but much better. I didn't have time to scrub or let them soak longer.


Once dry reinstall in the reverse of removal. EXCEPT, put the anchor bolt on the floor in last. Also make sure when the B pillar trim goes back together make sure you have both pieces back in the groove in the weather stripping.

I hope this helps yall if yall are having any issues. my belts retract as they should now and are a lot more comfortable to wear. I don't need the new belts which saves me about $800 bucks. Yes I could have gotten used ones cheaper but who's to say I wouldn't have had the same issues. My family rides in this rig with me and while I don't use my seat belt all the time, they do, and I wanted to make sure their safety was priority. If yall have any questions please let me know I'll be happy to answer anything I can. I hope all the images load *fingers crossed*
Matt
Last edited:

