"Tesla Style" 10.4 Android Radio Information

Disclaimer: Links on this page pointing to Amazon, eBay and other sites may include affiliate code. If you click them and make a purchase, we may earn a small commission.

SitKneelBend

Senior Member
Joined
Jan 8, 2015
Posts
9,063
Reaction score
4,745
Location
St. Louis
Ram Year
2014
Engine
3.6 Pentastar
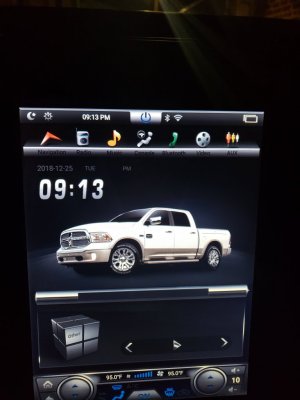
So I do I change the white truck on the screen to something else
From 4PDA (lots of instructions on this site, you just need to use Google translate)...

"Make a PNG image of 740 * 313 pixels and name it as ZXWLOGO.png .
Usually it should be a photograph of the vehicle that you want to put on the screen with a transparent background.
Place the image in the internal SD card (/ sdcard in the file manager), and the image will be displayed on the screen upon reboot. "

Source: https://4pda.ru/forum/index.php?showtopic=877711

Sent from my HTC U11 using Tapatalk
 

jon martin

Junior Member
Joined
Dec 24, 2018
Posts
17
Reaction score
8
Location
Maryland
Ram Year
2015
Engine
Hemi 5.7
I did that and it change the boot up picture but I was talking about this one

20181225_211310.jpg
 

SitKneelBend

Senior Member
Joined
Jan 8, 2015
Posts
9,063
Reaction score
4,745
Location
St. Louis
Ram Year
2014
Engine
3.6 Pentastar
I did that and it change the boot up picture but I was talking about this one

View attachment 150133
No, you did a similar process and used boot logo changer APK file to apply it as the boot image.

The instructions I gave will let you use any picture you want to replace the white truck on that screen. The picture file just has to be named ZXWLOGO.png and be placed in the root of the radio's internal storage.

Sent from my HTC U11 using Tapatalk
 

jon martin

Junior Member
Joined
Dec 24, 2018
Posts
17
Reaction score
8
Location
Maryland
Ram Year
2015
Engine
Hemi 5.7
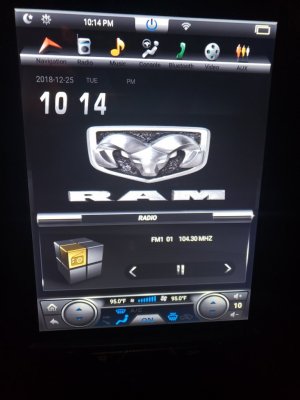
I got it thanks. Also my temperament on the unit only will show celcius, I change it to Fahrenheit in the System setting but still stays on celcius.

20181225_221458.jpg
 

SitKneelBend

Senior Member
Joined
Jan 8, 2015
Posts
9,063
Reaction score
4,745
Location
St. Louis
Ram Year
2014
Engine
3.6 Pentastar
I got it thanks. Also my temperament on the unit only will show celcius, I change it to Fahrenheit in the System setting but still stays on celcius.

View attachment 150136
There are two locations to change from celcius to Fahrenheit, one is in the console menu for the truck specific settings, the other in the radio settings. Make sure it's changed in both places. If I'm not mistaken though, on mine one of the settings will be the opposite of what you want it to be to display properly.

In addition, you can use a free online cropping tool to format your picture that replaced the truck to have a better aspect ratio. You want the width to be 740 pixels and the height to be 313 pixels (it doesn't need to be exact and can be adjusted to your liking).

Sent from my HTC U11 using Tapatalk
 

jon martin

Junior Member
Joined
Dec 24, 2018
Posts
17
Reaction score
8
Location
Maryland
Ram Year
2015
Engine
Hemi 5.7
There are two locations to change from celcius to Fahrenheit, one is in the console menu for the truck specific settings, the other in the radio settings. Make sure it's changed in both places. If I'm not mistaken though, on mine one of the settings will be the opposite of what you want it to be to display properly.

In addition, you can use a free online cropping tool to format your picture that replaced the truck to have a better aspect ratio. You want the width to be 740 pixels and the height to be 313 pixels (it doesn't need to be exact and can be adjusted to your liking).

Sent from my HTC U11 using Tapatalk

Thanks. Still messing around with all the setting. Have you had any problems with the door showing open when closed, it doesn't do it all the time. Anyway to turn that off
 

SitKneelBend

Senior Member
Joined
Jan 8, 2015
Posts
9,063
Reaction score
4,745
Location
St. Louis
Ram Year
2014
Engine
3.6 Pentastar
Thanks. Still messing around with all the setting. Have you had any problems with the door showing open when closed, it doesn't do it all the time. Anyway to turn that off
I haven't but I use a different launcher then the stock one, so I don't see that stuff anymore on the radio.

I use Car Launcher Pro. It's great and very customizable.

Sent from my HTC U11 using Tapatalk
 

SitKneelBend

Senior Member
Joined
Jan 8, 2015
Posts
9,063
Reaction score
4,745
Location
St. Louis
Ram Year
2014
Engine
3.6 Pentastar
What do you have to do to run a different launcher
Just install it from the Google Play Store and when you're comfortable with the new launcher over the stock one, select that you want to use the new one "always" when prompted at launch.

It's a good idea to install a separate launcher on these radio's even if you don't use it. It can act as a back door to aid trouble shooting if something goes wrong.

Sent from my HTC U11 using Tapatalk
 
OP
OP
mdifilippo

mdifilippo

Senior Member
Joined
Mar 12, 2017
Posts
571
Reaction score
348
Location
NJ
Ram Year
2017
Engine
5.7 hemi
GOt my 7.1 upgrade board. Hoping to have some time this week to pull out the unit, solder on the BT, Wifi, and GPS modules and get it reinstalled. I'll post up in here a walk through and my results.
 
OP
OP
mdifilippo

mdifilippo

Senior Member
Joined
Mar 12, 2017
Posts
571
Reaction score
348
Location
NJ
Ram Year
2017
Engine
5.7 hemi
Just install it from the Google Play Store and when you're comfortable with the new launcher over the stock one, select that you want to use the new one "always" when prompted at launch.

It's a good idea to install a separate launcher on these radio's even if you don't use it. It can act as a back door to aid trouble shooting if something goes wrong.

Sent from my HTC U11 using Tapatalk

I've been using Car Launcher Pro since I installed my unit, funny issue though when I would set it as the default launcher it would force its self into Landscape mode, had to take it off default and deal with the stupid dialog each time selecting "this time only" I'll have to go through and see if once I install the new board if it is any better. I reached out to Car Launcher Pro and at the time they didn't have the option to force auto-rotation off or to force it into portrait mode.
 

SitKneelBend

Senior Member
Joined
Jan 8, 2015
Posts
9,063
Reaction score
4,745
Location
St. Louis
Ram Year
2014
Engine
3.6 Pentastar
I've been using Car Launcher Pro since I installed my unit, funny issue though when I would set it as the default launcher it would force its self into Landscape mode, had to take it off default and deal with the stupid dialog each time selecting "this time only" I'll have to go through and see if once I install the new board if it is any better. I reached out to Car Launcher Pro and at the time they didn't have the option to force auto-rotation off or to force it into portrait mode.
I think I had that issue too but it was firmware related. I believe I was using Phoenix Androids April/May firmware when I had that issue.

Sent from my HTC U11 using Tapatalk
 

SitKneelBend

Senior Member
Joined
Jan 8, 2015
Posts
9,063
Reaction score
4,745
Location
St. Louis
Ram Year
2014
Engine
3.6 Pentastar
GOt my 7.1 upgrade board. Hoping to have some time this week to pull out the unit, solder on the BT, Wifi, and GPS modules and get it reinstalled. I'll post up in here a walk through and my results.
Still waiting here... looking forward to your write-up! It's nice not being first (sometimes)...

Sent from my HTC U11 using Tapatalk
 
OP
OP
mdifilippo

mdifilippo

Senior Member
Joined
Mar 12, 2017
Posts
571
Reaction score
348
Location
NJ
Ram Year
2017
Engine
5.7 hemi
Yes, this one cut to fit allows you to wear polarized sunglasses again and still see the screen...

Mr Shield For Amazon Fire HD 10... https://www.amazon.com/dp/B015IKUNL2?ref=yo_pop_ma_swf

Sent from my HTC U11 using Tapatalk
Did you find that it help cut down glare? Or more of a just protection? Hoping to pull the radio out in a bit and get started on it. Going to do it out of the vehicle so I can connect to my house WIFI and check things out and take care of some app updates.
 

SitKneelBend

Senior Member
Joined
Jan 8, 2015
Posts
9,063
Reaction score
4,745
Location
St. Louis
Ram Year
2014
Engine
3.6 Pentastar
Did you find that it help cut down glare? Or more of a just protection? Hoping to pull the radio out in a bit and get started on it. Going to do it out of the vehicle so I can connect to my house WIFI and check things out and take care of some app updates.
Yes, that was my original reason for purchasing it. The glare from the the passenger seat was greatly reduced and being able to wear polarized sunglasses again was a nice bonus...

Sent from my HTC U11 using Tapatalk
 
Last edited:
OP
OP
mdifilippo

mdifilippo

Senior Member
Joined
Mar 12, 2017
Posts
571
Reaction score
348
Location
NJ
Ram Year
2017
Engine
5.7 hemi
Issue Troubleshooting: Contacted Phoenix Android Radios and they suggested checking the solder points. I de-soldered all and confirmed the board is not the issue. With no antennas it powers up and stays on no issue. Went ahead and connected the wifi same deal, all good! Connecting either the bluetooth and or the GPS though cause the issue. Ill update as I continue to discover things. So after thinking the issue was something shorting, then having a short moment of success I believe the issue came down to power.

The reason I bench tested my radio (which I also did when I first set it up originally with no issue) is to get all the apps loaded up and configured before sucking down my hotspot's data usage and to do it from the comfort of my house vs my truck.

Moving to a 14Volt power adapter did get me better results but still resulted in the unit shutting its self down and getting stuck in a boot loop. Installed in the truck and the issue has gone away.

I am working with Phoenix however to get my A/C controls back. My truck has auto a/c and the Dodge Ram Hi that worked with the original core board is not working now. I'll update once I get a response and hopefully a fix.

A/C Fix: Protocol WAS "BNR with AC" changing it to changvuatong with bagu fixed the a/c control
-------------------------------------------------


Well, went ahead and did the swap, was really easily actually. However now I am stuck in a boot loop. After install was able to boot up and access everything, I started to get all my settings back (you will be starting with a brand new unit essentially, no settings, no apps). And now it is stuck in a loop. Goes from boot menu to black screen to boot menu. No amount of power downs, reset buttons seems to get it back. Putting back in the old board seems to bring the unit back to life as does leaving it unpowered for a few minutes. Then if it boots, stays on about 2 minutes and then continues it's boot cycle. Maybe an overheating issue? The new board has a WAY BETTER heatsink and it is hardly warm to the touch after the cycling. So I'll be reaching out to Phoenix Radio and seeing if I can get any answers as to what is going on. I'll go ahead and do the writeup with photos as I'm the install is pretty straightforward and I can't see how it is causing the cycling issue.
 
Last edited:
OP
OP
mdifilippo

mdifilippo

Senior Member
Joined
Mar 12, 2017
Posts
571
Reaction score
348
Location
NJ
Ram Year
2017
Engine
5.7 hemi
Install Walkthrough for Phoenix Android Radios : 2G RAM 32 G ROM CORE BOARD FOR SELECTED ANDROID 7.1 FAST BOOT VERTICAL SCREEN HEAD UNITS

When you turn it back on after installing the new board you are starting with a fresh unit. You'll need to go through all your settings and reload apps.

Phoenix Android Radios offers 2 options; one is to ship the old unit back to them and have them install, the second option is to purchase the new unit, do the swap yourself and then send back the old unit for a partial credit refund. Phoenix Android Radios has mentioned they will not guarantee how this core board works with OTHER units, only their own.

I am not paid, sponsored, or have any relation to Phoenix Android Radios. I paid full price for the board and am assuming full responsibility for all actions and consequences, you should do the same if you proceed.

Tools Needed:
Variable Wattage Soldering Iron
Solder
#2 Philip Screw Driver
#1 Philip Screw Driver
(Optional) Solder Sucker
(Optional) 12 Volt power supply
(Optional) tweezers

Step 1: Remove the unit from your vehicle. Just as you installed it, be sure to take note of which connections are going to what if you have any RCA cables attached.
IMG_20181228_163711.jpg

I opted to remove the unit from the bezel to make getting at it easier, you do not NEED to do this however I suggest it.

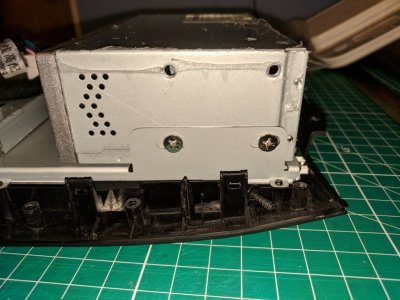
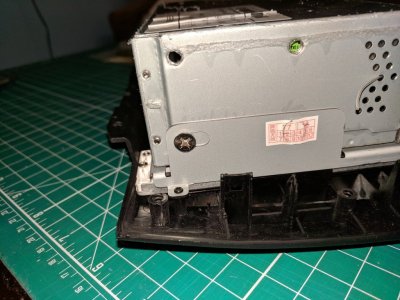
Step 2: You'll need to open up the main compartment (the big hump) on the back of the unit, there are 2 screws on each side (1 will likely be covered by a sticker) go ahead and undo all 4 with the #2 philip screw driver.
IMG_20181228_164212.jpg IMG_20181228_164205.jpg

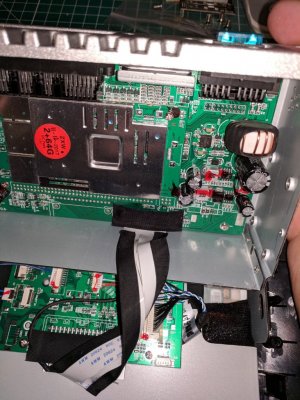
BE CAREFUL! At this point there is a ribbon cable connecting the main board in this box to the rest of the unit. Again, you can leave it in place and carefully work with the little bit of slack you have but I opted (and suggest) you disconnect the ribbon cable.

Step 3: Locate the ribbon cable on the "Main board", the connector will likely be covered by a piece of black fabric tape. Remove the tape, and using tweezer or a small flat head screw driver flip the brown lock up so you can carefully remove the ribbon cable.
IMG_20181228_164334.jpg (ribbon cable is on the bottom in this photo)

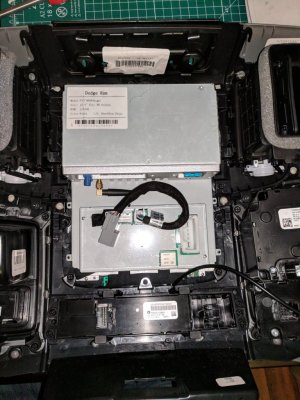
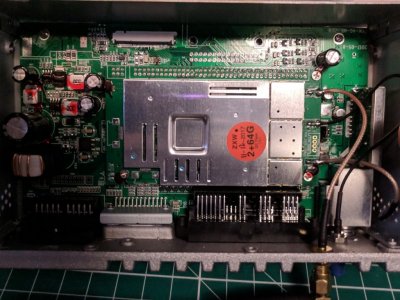
Now we can see the "main board" and the "core board" the core board is what we will be replacing. The "core board" is the smaller board with a metal casing over it. It uses a row of double headers to connect and 3 screws that hold it down. There may also be some red "glue" that is holding the board to the surrounding capacitors, if so carefully cut the glue free.

IMG_20181228_164554_1.jpg
 
Last edited:
Top