1SilverBullet2
Senior Member
- Joined
- Jan 27, 2015
- Posts
- 1,567
- Reaction score
- 612
- Location
- North Dakota
- Ram Year
- 2014 Big Horn 8 speed
- Engine
- 5.7 Hemi
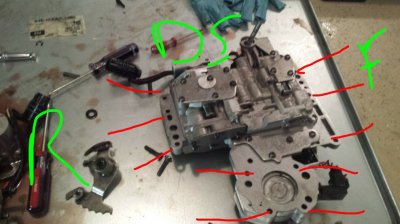
This is a DYI for removal of the valvebody in a 46re for a shift kit install. I didnt have my phone on my at all times and doing the work by myself I only have two hands haha. I got some pics when I could though.
Tools needed: 1/2" socket (deep well or a shallow and extension), ratchet or impact, 7/16" socket, Torx 25 socket, pry bar, 90* degree o-ring pick, flat head screw driver, 1/2" wrench, 7/16" and 3/8" wrench, lots of shop rags lol, drain pan, bolts tray if you want, and brake cleaner.
WARNING- Id pressure wash off your trans before doing this so you have a clean area to work in.
First step: is either jack up your pickup and put it on stand or have a lifted pickup to do that for you. Chalk the wheels, engage the parking brake, and put the trans into neutral.
Second step: is using the 1/2" socket begin removing bolts in one corner of the pan, Ive always opted for the left hand corner towards the back. Remove the bolts from there and have your drain pan ready. Work your way around the pan and watch for fluid to begin pouring from that corner. I usually take out 4 to 6 bolts and if the pan hasn't begun to drop I take my screw driver and lightly pry it down to break the gasket seal. After the seal is broken leave atleast 3 bolts in the pan oppposite the corner you began. Once the pan is done draining, support the pan and remove the remaining bolts. Drain the rest of the oil into the pan. The vavlebody is be dripping the whole time unless you opt to put the pan back up for awhile and let everything drain down more. Also remove the trans filter using the torx 25 socket, there'll be two bolts holding that up and a lot of fluid will pour out of that too.
Third step: removing the manual levers on the lever shaft. Theyre located on the left side on top of the pan. I used wrenches since I couldnt get a socket onto them, but the bolts lever is a 1/2" and the upper is 3/8 or 7/16". Remove the bolts and pull the levers off. The bottom lever may be stuck a little so use the pry bar and just rock the lever back and forth until the lever pops off.

Fourth step: remove the two sensor connectors from the left side right by the manual levers you just removed.
Fifth step: Remove the bolts holding up the valvebody. There's 10 bolts total holding it up. Leave one bolt in but just a few threads in so there's something supporting the body.

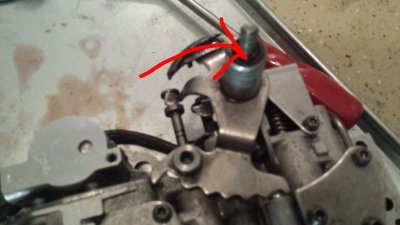
Sixth step: Wiggle the valvebody and it will be drop down. There's a parking lever connected to a sprag in the trans and connected to a rooster lever on top of the valvebody. There's an e clip holding the lever to the valvebody. I used a 90* degree o-ring pick to pull the e clip off, it was easier than a screw driver. Hold up the valvebody too while doing this so it doesn't fall. After that e clip is removed the valvebody usually will just drop down. Watch out for the accumulator piston and springs. They'll fall out so catch them.

That's removing the valvebody in a nut shell. I'll get the install later when I isntall the valvbody again.
Tools needed: 1/2" socket (deep well or a shallow and extension), ratchet or impact, 7/16" socket, Torx 25 socket, pry bar, 90* degree o-ring pick, flat head screw driver, 1/2" wrench, 7/16" and 3/8" wrench, lots of shop rags lol, drain pan, bolts tray if you want, and brake cleaner.
WARNING- Id pressure wash off your trans before doing this so you have a clean area to work in.
First step: is either jack up your pickup and put it on stand or have a lifted pickup to do that for you. Chalk the wheels, engage the parking brake, and put the trans into neutral.
Second step: is using the 1/2" socket begin removing bolts in one corner of the pan, Ive always opted for the left hand corner towards the back. Remove the bolts from there and have your drain pan ready. Work your way around the pan and watch for fluid to begin pouring from that corner. I usually take out 4 to 6 bolts and if the pan hasn't begun to drop I take my screw driver and lightly pry it down to break the gasket seal. After the seal is broken leave atleast 3 bolts in the pan oppposite the corner you began. Once the pan is done draining, support the pan and remove the remaining bolts. Drain the rest of the oil into the pan. The vavlebody is be dripping the whole time unless you opt to put the pan back up for awhile and let everything drain down more. Also remove the trans filter using the torx 25 socket, there'll be two bolts holding that up and a lot of fluid will pour out of that too.
Third step: removing the manual levers on the lever shaft. Theyre located on the left side on top of the pan. I used wrenches since I couldnt get a socket onto them, but the bolts lever is a 1/2" and the upper is 3/8 or 7/16". Remove the bolts and pull the levers off. The bottom lever may be stuck a little so use the pry bar and just rock the lever back and forth until the lever pops off.

Fourth step: remove the two sensor connectors from the left side right by the manual levers you just removed.
Fifth step: Remove the bolts holding up the valvebody. There's 10 bolts total holding it up. Leave one bolt in but just a few threads in so there's something supporting the body.

Sixth step: Wiggle the valvebody and it will be drop down. There's a parking lever connected to a sprag in the trans and connected to a rooster lever on top of the valvebody. There's an e clip holding the lever to the valvebody. I used a 90* degree o-ring pick to pull the e clip off, it was easier than a screw driver. Hold up the valvebody too while doing this so it doesn't fall. After that e clip is removed the valvebody usually will just drop down. Watch out for the accumulator piston and springs. They'll fall out so catch them.

That's removing the valvebody in a nut shell. I'll get the install later when I isntall the valvbody again.
Last edited:


