The Assassin
Senior Member
- Joined
- Jul 8, 2010
- Posts
- 7,725
- Reaction score
- 58
- Location
- B-more careful, Murderland
- Ram Year
- 2006
- Engine
- 4.7
This DIY found via the internet:
Use Mopar DOT 3 brake fluid, or an equivalent meeting SAE J1703-F and DOT 3 standards to fill and bleed the system. ***PLEASE NOTE*** 06+ require DOT 4 brake fluid! You can add DOT 4 to DOT 3 fluid , but if you add DOT 3 to DOT 4 it degrades the fluid. Bleeding can be performed manually with vacuum equipment or with pressure equipment If vacuum or pressure bleeding equipment is used, it is important that the manufactures instructions be followed for proper results.
Vacuum bleeding does not require that the front brake metering valve be held open. However, if pressure equipment is used, it will be necessary to hold the front brake metering valve open in order to bleed the front brakes. The valve can be held open with a tension clip tool or by hand. It will also be necessary that a suitable size pressure tank hose adapter be available for use on the master cylinder reservoir caps.
Recommended bleeding sequence for ABS brake system components is:
master cylinder
rear antilock valve
combination valve
front antilock valve
left rear wheel
right rear wheel
right front wheel
left front wheel
Observe following precautions while bleeding the brake system:

Bleed only one valve, or wheel brake unit at a time. Use a bleed hose on each wheel cylinder and caliper bleed screw.
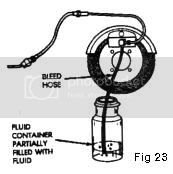
Attach one end of the bleed hose to the bleed screw and insert the opposite end of the hose in glass container partially filled with brake fluid (Fig. 23). A glass container makes it easier to see air bubbles as they exit the bleed hose.
Be sure the end of the bleed hose remains immersed in fluid. This is necessary to prevent air from being drawn bank into the cylinder or caliper and brake line.
ABS MANUAL BRAKE BLEEDING PROCEDURE
(l) If master cylinder has been overhauled or a now cylinder will be installed, bleed cylinder on a bench before installation. This shortens time needed to bleed system and ensures proper cylinder operation. Refer to procedure in Master Cylinder Service section.
(2) If master cylinder was not serviced, wipe cylinder reservoir and filler caps clean with shop towels. Use Mopar brake cleaner if reservoir and caps are extremely dirty. Then remove reservoir fill caps and fill reservoir with Mopar, or equivalent DOT 3 brake fluid.
(3) Open all caliper and wheel cylinder bleed screws. Close bleed screws when fluid starts flowing from each bleed screw. Then top off master cylinder reservoir again.
(4) Bleed master cylinder first. Have helper operate brake pedal while bleeding each master cylinder outlet line.
CAUTION: Do not allow the master cylinder to run out of fluid when bleeding the brakes. An empty cylinder will allow additional air to be drawn into the system. Check the cylinder fluid level frequently and add fluid as needed.
(5) Bleed rear brake antilock valve next and combination valve afterward. Bleed each valve at brake line fittings one at a time. Surround line fittings with shop towels to catch fluid bled from valve.
(6) There are two bleed procedures for the front antilock valve. If a new front valve is being installed, bleed the valve as described in step (7). However, if the original valve is still in the vehicle, bleed the valve as described in step (8).
(7) If a new front antilock valve and motor assembly is being installed, bleed new valve as follows:
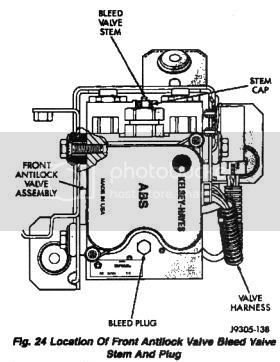
(a) Loosen bleed plug on new front valve about 1/4 to one full turn (Fig 24). Plug must be open to fully bleed upper and lower sections of front antilock valve.
(b) Remove cap from bleed valve stem (Fig 24)
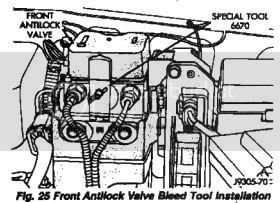
(c) Install Valve Depressor Tool 6670 on bleed valve stem (Figs 24 and 25). To install tool, slide notched side of tool onto boss that surrounds bleed valve stem (Fig 25). Stem must be held inward (in open position) to fully bleed upper section of new valve assembly.
(d) Tighten thumbscrew on bleed tool 6670 just enough to push valve stem inward about 0.51-0.76mm (0.020-0030 in.).
(e) Apply brake pedal. Pedal will fall off significantly when bleed plug is properly open and bleed valve stem is correctly unseated (pressed inward) by tool.
(f) Stroke brake pedal rapidly 5-10 times. This action will fill upper and lower sections of valve rapidly.
(g) Bleed new valve assembly at each brake line fitting one at a time. Remember to close valve bleed plug before each brake pedal stroke. Continue bleeding until fluid flowing from fittings is clear and free of bubbles.
(h) remove depressor tool from valve stem and install cap on stem. Then tighten bleed plug to 7-9 Nm 60-84 in.-lbs) torque.
(8) If original front antilock valve assembly is still in place, bleed plug and bleed valve do not have to be open during bleeding operations. Just bleed the valve assembly at each brakeline fitting one at a time.
(9) Bleed wheel brake units one at a time in the recommended sequence as follows:
(a) Bleed first wheel brake unit as follows. Start at left rear wheel.
(b) Open caliper or wheel cylinder bleed fitting 1/2 to 3/4 turn.
(c) Have helper press and hold brake pedal to floor.
(d) Tighten bleed fitting and have helper release brake pedal.
(e) Continue bleeding operation until fluid fluid flowing into bleed fluid container is clear and free of bubbles.
(10) Check and top off master cylinder reservoir fluid level. Then verify proper brake operation before moving vehicle.
PRESSURE VACUUM BRAKE BLEEDING
(1) If vacuum bleeding equipment is used, no special precautions are required. However, if pressure bleeding equipment will be used, metering valve stem in combination valve must be either pressed inward or held outward slightly in order to bleed front brakes. Stem can be held open with clip or by hand.
(2) Fill pressure bleed tank if necessary.
(3) Purge air from bleed tank and lines before proceeding.
(4) Clean master cylinder reservoir and filler caps thoroughly.
(5) Connect vacuum equipment to cylinder and/or wheel units as described in manufacturers instructions.
(6) Remove master cylinder filler caps and install pressure hose adapter in place of caps. A suitable adapter will usually be available from the tank manufacturer.
(7) Connect bleed tank pressure hose to adapter.
(8) Bleed master cylinder first, rear antilock valve second, combination valve third, and front antilock valve fourth. Then proceed to wheel brake bleeding in the following steps. A special procedure is required to bleed a new front antilock valve. Refer to the procedure described in the manual bleeding section.
(9) Bleed rear wheel brake units as described in manual bleeding procedure.
(10) Bleed front wheel brake units as described in manual bleeding procedure. Use clip tool or have helper hold metering valve stem open by pressing valve stem slightly inward. Amount of valve stem movement needed to hold valve open is quite modest. Do not use excessive force.
(11) Remove pressure bleeding equipment and top off master cylinder reservoir. Verify firm brake pedal before moving vehicle. Repeat bleeding procedure if system warning lights come on, remain on, or if pedal is still spongy.


Use Mopar DOT 3 brake fluid, or an equivalent meeting SAE J1703-F and DOT 3 standards to fill and bleed the system. ***PLEASE NOTE*** 06+ require DOT 4 brake fluid! You can add DOT 4 to DOT 3 fluid , but if you add DOT 3 to DOT 4 it degrades the fluid. Bleeding can be performed manually with vacuum equipment or with pressure equipment If vacuum or pressure bleeding equipment is used, it is important that the manufactures instructions be followed for proper results.
Vacuum bleeding does not require that the front brake metering valve be held open. However, if pressure equipment is used, it will be necessary to hold the front brake metering valve open in order to bleed the front brakes. The valve can be held open with a tension clip tool or by hand. It will also be necessary that a suitable size pressure tank hose adapter be available for use on the master cylinder reservoir caps.
Recommended bleeding sequence for ABS brake system components is:
master cylinder
rear antilock valve
combination valve
front antilock valve
left rear wheel
right rear wheel
right front wheel
left front wheel
Observe following precautions while bleeding the brake system:

Bleed only one valve, or wheel brake unit at a time. Use a bleed hose on each wheel cylinder and caliper bleed screw.
Attach one end of the bleed hose to the bleed screw and insert the opposite end of the hose in glass container partially filled with brake fluid (Fig. 23). A glass container makes it easier to see air bubbles as they exit the bleed hose.
Be sure the end of the bleed hose remains immersed in fluid. This is necessary to prevent air from being drawn bank into the cylinder or caliper and brake line.
ABS MANUAL BRAKE BLEEDING PROCEDURE
(l) If master cylinder has been overhauled or a now cylinder will be installed, bleed cylinder on a bench before installation. This shortens time needed to bleed system and ensures proper cylinder operation. Refer to procedure in Master Cylinder Service section.
(2) If master cylinder was not serviced, wipe cylinder reservoir and filler caps clean with shop towels. Use Mopar brake cleaner if reservoir and caps are extremely dirty. Then remove reservoir fill caps and fill reservoir with Mopar, or equivalent DOT 3 brake fluid.
(3) Open all caliper and wheel cylinder bleed screws. Close bleed screws when fluid starts flowing from each bleed screw. Then top off master cylinder reservoir again.
(4) Bleed master cylinder first. Have helper operate brake pedal while bleeding each master cylinder outlet line.
CAUTION: Do not allow the master cylinder to run out of fluid when bleeding the brakes. An empty cylinder will allow additional air to be drawn into the system. Check the cylinder fluid level frequently and add fluid as needed.
(5) Bleed rear brake antilock valve next and combination valve afterward. Bleed each valve at brake line fittings one at a time. Surround line fittings with shop towels to catch fluid bled from valve.
(6) There are two bleed procedures for the front antilock valve. If a new front valve is being installed, bleed the valve as described in step (7). However, if the original valve is still in the vehicle, bleed the valve as described in step (8).
(7) If a new front antilock valve and motor assembly is being installed, bleed new valve as follows:
(a) Loosen bleed plug on new front valve about 1/4 to one full turn (Fig 24). Plug must be open to fully bleed upper and lower sections of front antilock valve.
(b) Remove cap from bleed valve stem (Fig 24)
(c) Install Valve Depressor Tool 6670 on bleed valve stem (Figs 24 and 25). To install tool, slide notched side of tool onto boss that surrounds bleed valve stem (Fig 25). Stem must be held inward (in open position) to fully bleed upper section of new valve assembly.
(d) Tighten thumbscrew on bleed tool 6670 just enough to push valve stem inward about 0.51-0.76mm (0.020-0030 in.).
(e) Apply brake pedal. Pedal will fall off significantly when bleed plug is properly open and bleed valve stem is correctly unseated (pressed inward) by tool.
(f) Stroke brake pedal rapidly 5-10 times. This action will fill upper and lower sections of valve rapidly.
(g) Bleed new valve assembly at each brake line fitting one at a time. Remember to close valve bleed plug before each brake pedal stroke. Continue bleeding until fluid flowing from fittings is clear and free of bubbles.
(h) remove depressor tool from valve stem and install cap on stem. Then tighten bleed plug to 7-9 Nm 60-84 in.-lbs) torque.
(8) If original front antilock valve assembly is still in place, bleed plug and bleed valve do not have to be open during bleeding operations. Just bleed the valve assembly at each brakeline fitting one at a time.
(9) Bleed wheel brake units one at a time in the recommended sequence as follows:
(a) Bleed first wheel brake unit as follows. Start at left rear wheel.
(b) Open caliper or wheel cylinder bleed fitting 1/2 to 3/4 turn.
(c) Have helper press and hold brake pedal to floor.
(d) Tighten bleed fitting and have helper release brake pedal.
(e) Continue bleeding operation until fluid fluid flowing into bleed fluid container is clear and free of bubbles.
(10) Check and top off master cylinder reservoir fluid level. Then verify proper brake operation before moving vehicle.
PRESSURE VACUUM BRAKE BLEEDING
(1) If vacuum bleeding equipment is used, no special precautions are required. However, if pressure bleeding equipment will be used, metering valve stem in combination valve must be either pressed inward or held outward slightly in order to bleed front brakes. Stem can be held open with clip or by hand.
(2) Fill pressure bleed tank if necessary.
(3) Purge air from bleed tank and lines before proceeding.
(4) Clean master cylinder reservoir and filler caps thoroughly.
(5) Connect vacuum equipment to cylinder and/or wheel units as described in manufacturers instructions.
(6) Remove master cylinder filler caps and install pressure hose adapter in place of caps. A suitable adapter will usually be available from the tank manufacturer.
(7) Connect bleed tank pressure hose to adapter.
(8) Bleed master cylinder first, rear antilock valve second, combination valve third, and front antilock valve fourth. Then proceed to wheel brake bleeding in the following steps. A special procedure is required to bleed a new front antilock valve. Refer to the procedure described in the manual bleeding section.
(9) Bleed rear wheel brake units as described in manual bleeding procedure.
(10) Bleed front wheel brake units as described in manual bleeding procedure. Use clip tool or have helper hold metering valve stem open by pressing valve stem slightly inward. Amount of valve stem movement needed to hold valve open is quite modest. Do not use excessive force.
(11) Remove pressure bleeding equipment and top off master cylinder reservoir. Verify firm brake pedal before moving vehicle. Repeat bleeding procedure if system warning lights come on, remain on, or if pedal is still spongy.


Last edited:


