Life as my Ram 2500 MC 6.4L V8 HEMI

Disclaimer: Links on this page pointing to Amazon, eBay and other sites may include affiliate code. If you click them and make a purchase, we may earn a small commission.

OP
OP
Mr.Asmith9

Mr.Asmith9

Senior Member
Joined
Feb 8, 2014
Posts
485
Reaction score
145
Location
Fairbanks, AK
Ram Year
2015 Ram 2500 Mega Cab
Engine
6.4L V8 Hemi
HIDs, Putco G2 Dayliners, and Custom Second Fuse Box

Special thanks to Jeremy over at the RetroShop for an outstanding product and still the best customer service I have yet to experience from anyone, and also to sbarron for the idea, parts list, and basic Q/A for the secondary fusebox.

I started this install on the 13th but it took me a few days to finish. Mostly because I was in no rush, but also because I needed to pick up some parts, like extra screws, and the store was closed ect.

Quick Parts list for those who are interested.
Retroshop's HID's for Ram 2015
Putco G2 Dayliners
http://www.amazon.com/gp/product/B00HE0NIQ2?psc=1&redirect=true&ref_=oh_aui_detailpage_o00_s00Fuse Block
Weather Proof Box

The HID's and Dayliners have similar instructions so they are slightly intermixed in this post. If your following this as a how to guide for yourself it should be easy to differentiate the two.


First I opened the hood and removed the plastic cover by removing 4? puhs pin inserts then exposing the radiator
20150713_155029.jpg


I then removed the grill by taking out four screws on the top, pulling gently at the bottom of the grill after the screws where removed to release the plastic tabs then carefully lift it up and out.
20150713_155742.jpg


Before I removed the headlight housings I went ahead and attached the Putco Dayliners to the headlight housing. To do this I washed them with a soft sponge and dawn soap, then used the supplied alcohol wipe to get any leftover residue off. NOTE: The adhesive on these is amazing, and yet terrifying. once it touches, it STAYS so be extra carefull not to even brush up against the light housing while your lining them up or you'll end up regretting it, Trust me I know from experience :Frustrated:
20150713_160032.jpg
20150713_162720.jpg

To remove the headlights there are two bolts per side, one on top and one on bottom of the light housing that must be removed and a plastic tab/lever that must be flipped behind it. To flip the tab you use the access port inside the fender-well, use a flash lite to locate the plastic piece and push it up. Then carefully remove the light
20150713_163922.jpg


The back of the light is sealed with 5 screws, carefully remove them and set aside. replace stock lights with HIDS.
20150713_171520.jpg


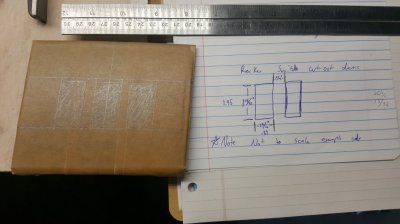
Then use a 7/8" holesaw on the light covers to run your wires.
20150713_192411.jpg

You will actually need to use the holesaw pilot to add a small notch into the cutouts to allow one of the connectors through see pictures.
1436845879049.jpg
1436845789686.jpg


Then place the grommets and set aside, that was the easy part. The rust is much more fun!
1436845907949.jpg


Heres the Fun part :suicide: Running the relays and setting up the resistors and ballasts.
20150713_173420.jpg


Find a place to attach the relays. I placed them on the front of my fuse box and then ran the wires to the general designated area. (In the picture you'll notice some velcro on top of my fuse box, I'll come back to that later)
20150713_223658.jpg
The following image, and all Credits go to Retroshop, as it is a diagram off their webpage. I have linked this diagram for reference only as its not 100% accurate to the harness I had received.
2013Ram.png


After the wires are ran you'll have to mount the resistors, I had chosen to mount them on the top of my finder well where it turns into the hood. I would recommend using stainless steel screws, and not zinc or any other 'coated' material as they tend to rust. (Another lesson from experience on my Ecodiesel where I installed these resistors in this exact same location. I'd also recommend painting the stainless steel screws to match the color of your body or there abouts. For example I have a black truck so I painted them black. I did this to help blend them into the truck. See pictures below. (On my old Ecodiesel the screws where eye sores anytime you opened the hood, or looked at the hood seam from a sharp angles, by painting them you create a clean image.)
20150714_145420.jpg
20150714_110427.jpg
20150714_111542.jpg
20150714_111626.jpg
(Painted vs unpainted)
20150714_112138.jpg
20150714_145427.jpg

NOTE: Be sure not to block any holes while mounting the resistors, they are used to adjust the angle of your headlights!
 
Last edited:
OP
OP
Mr.Asmith9

Mr.Asmith9

Senior Member
Joined
Feb 8, 2014
Posts
485
Reaction score
145
Location
Fairbanks, AK
Ram Year
2015 Ram 2500 Mega Cab
Engine
6.4L V8 Hemi
After the resistors are mounted you need to find a place to mount the ballasts. On the passenger side I screwed them into the plastic side wall shown in the picture.
20150714_145445.jpg

On the driver side there was no where readily avalible to mount the ballasts so I ended up removing the drive side front tire well, and mounting the ballasts to the backside of the frame.
20150714_200541.jpg
20150714_200802.jpg

Now with everything to installed all I had to do was wire up the Dayliners, after cutting the wire to length, and stripping it I had to use a voltmeter to determine the correct wire to tap into. The instructions that came with the Dayliners stated blue with white stripe, but they were wrong. It ended up being a white wire with a redish/orangeish stripe on the passanger side, and on the drive side white with a gray stripe. Both wires where in the same position just different colors, I thought this to be odd but the Voltmeter tells no lies, and the ended up working just fine.
20150714_172704.jpg
20150714_172659.jpg

Before you put everything back together or move onto any other steps I'd suggest testing your HIDs, by either attaching the positive lead, or by holding it to the battery while some one turns the lights on, trust me, you'll save your self a lot of heart ache by testing them before you put everything back together. If they work slap it all together and call it a day. If they don't check all connections, then double check them... and then recheck them because you where blind the first two times.

For me, I plan on installing a handful of other aftermarket components that will require being plugged up directly to the battery. On my last two vehicles the battery terminal was full of wires and it just looked like garbage, so I took a page out of sbarrons book like I mentioned at the beginning of this post and wired up a second fuse box.

First I mounted the Blue Seas Systems Fuse block to the inside of the Weather Proof Box with 4 stainless steel machine screws. Then I washed the bottom of the weather proof box and the top of the vehicles fuse box with water and dawn dish soap, hand dried, and wiped down with rubbing alcohol to remove any renaming residue. Afterwords I attached the velcro to the bottom of the weather proof box, and carefully set it just where I wanted on the vehicles fuse box. I then took a heavy bracket and set it ontop of the weather proof box to apply pressure to the velcro while the adhesive cured. A few hours later I removed the weight and pulled the box off. (You don't need to wait a few hours, I just did this step before I started taking my truck apart so it could cure while I worked.)

Afterwords, I took my 8ga wire and found a grommet that wouldn't take the wire without lube, drilled two holes in the front right of the weather proof box, and installed those two grommets, Then I repeated this process with the 16ga wire and smaller grommets. After all the holes where drilled I used a touch of dawn soap on the wire and forced them through the small holes.

I crimped the wires to terminal connectors? and used heat shrink on them for added protection. Seeing as the wires where so tight getting in I knew I wouldn't be able to pull them out of the box again without cutting the connectors off. So on all the side leads for accessories I have a quick connect terminal full of dielectric grease just encase I need to remove my secondary fuse box for whatever reason later on all I'll have to do is remove the positive and negative connections for the battery and disconnect the relay leads and away it goes.

I also used wire loom for all exposed wires, and wrapped that loom in electrical tape to match the stock appearance. The exception being the positive leads as the 16ga wire swam in the 1/4" wire loom. So I used some wire cover that I took off the Relay when I removed the Fuse portion of its cable.

Now any relay I wire up, or any accessory that needs direct battery power will have its fuse located in a specific location next to other fused for easy identification. And hell, it looks a lot better then having tons of lead wires every where.
20150715_002007.jpg
20150715_002016.jpg
20150715_002040.jpg
20150715_003705.jpg
20150715_003738.jpg


And with that I had finished this install!
20150715_030835.jpg

I'm currently working out some kinks with my HID lows, My EVIC is telling me I have a headlight out (the resistors are supposed to prevent that) but everything is working normaly. I just have to double check my connections...:roflsquared:

I'd also like to note I had to break this up into two posts as when I hit Preview it said 'The following errors occurred with your submission:
The text that you have entered is too long (14469 characters). Please shorten it to 10000 characters long.'
 
OP
OP
Mr.Asmith9

Mr.Asmith9

Senior Member
Joined
Feb 8, 2014
Posts
485
Reaction score
145
Location
Fairbanks, AK
Ram Year
2015 Ram 2500 Mega Cab
Engine
6.4L V8 Hemi
Love that rear bumper!

I do too, I'm very happy, no COULDNT BE HAPPIER with that bumper! It looks good, its 1/4" thick steel, has those awesome side steps which I end up using WAY more than I have any right to haha. Probably just because they are there. I'm having it spray lined at the end of this month, and it's matching front bumper!
 
OP
OP
Mr.Asmith9

Mr.Asmith9

Senior Member
Joined
Feb 8, 2014
Posts
485
Reaction score
145
Location
Fairbanks, AK
Ram Year
2015 Ram 2500 Mega Cab
Engine
6.4L V8 Hemi
Okay guys, tomorrow I drop my truck off for a **** ton of spray liner. Picks to come next week, last night I took off my stock Front Bumper in preparation for tomorrow. And right now I'm over at our local exhaust place getting a muffler delete, I'm leaving the resonators on. It's about 115 and if I don't like it a cheap fix. But here are some pics to hold you over.
d1a355612099e323f39ab95c12eb192a.jpg
d86fa761adb59e5e1b540e75b77d403a.jpg
55a419ec964910d35cf13886543f5554.jpg


Sent from my Galaxy S6 Active with horrible auto correct ... Using Tapatalk
 
OP
OP
Mr.Asmith9

Mr.Asmith9

Senior Member
Joined
Feb 8, 2014
Posts
485
Reaction score
145
Location
Fairbanks, AK
Ram Year
2015 Ram 2500 Mega Cab
Engine
6.4L V8 Hemi
The exhaust is perfect! It's loud on startup but not so much that it'll annoy my naboors and sound great when you get up on it. I'll say with confidence that it killed my gas mileage... Now I have a HEMI foot...

Dropped of the truck this morning at Auto Trim for all the liner. I'll get it back sometime next week and will upload a ton of pics. I can't wait!


Sent from my Galaxy S6 Active with horrible auto correct ... Using Tapatalk
 

cincygoat

Junior Member
Joined
May 24, 2015
Posts
22
Reaction score
1
Ram Year
2010
Engine
Hemi 5.7
beautiful truck man love the blacked out look
 
OP
OP
Mr.Asmith9

Mr.Asmith9

Senior Member
Joined
Feb 8, 2014
Posts
485
Reaction score
145
Location
Fairbanks, AK
Ram Year
2015 Ram 2500 Mega Cab
Engine
6.4L V8 Hemi
Been super busy with the move and what not but here's a pic of my truck with all the spray liner! Next is fog lights!

dd98dfadf3c3330e1a44738b7da8281b.jpg

424b30478c984b33b5f980d3e4b06316.jpg

da77444d074b64363534a6d677c6b3e6.jpg

ae4344ed85ded7a1e3f880d0a36acc9c.jpg

a16f0a9d4a6ad0d1106ed9b7beda829d.jpg

8972f498dc51878087bd4aa0c79a64f3.jpg

b5386197842d343d1188bb92f26a3d92.jpg


Sent from my Galaxy S6 Active with horrible auto correct ... Using Tapatalk
 

hemi1282

Senior Member
Joined
Jul 3, 2012
Posts
752
Reaction score
300
Location
Arkansas
Ram Year
2016 Ram Tradesman
Engine
Hemi 6.4
Very nice truck man I'm really digging all the liner u got done looks good

Do u have any videos of what your truck sounds like
 
OP
OP
Mr.Asmith9

Mr.Asmith9

Senior Member
Joined
Feb 8, 2014
Posts
485
Reaction score
145
Location
Fairbanks, AK
Ram Year
2015 Ram 2500 Mega Cab
Engine
6.4L V8 Hemi
Do u have any videos of what your truck sounds like

I wish I could get a good one! They always turn out sounding like crap! =/


Sent from my Galaxy S6 Active with horrible auto correct ... Using Tapatalk
 
OP
OP
Mr.Asmith9

Mr.Asmith9

Senior Member
Joined
Feb 8, 2014
Posts
485
Reaction score
145
Location
Fairbanks, AK
Ram Year
2015 Ram 2500 Mega Cab
Engine
6.4L V8 Hemi
I haven't posted in awhile, I've been pretty busy as of late. Getting ready for winter, moving, work, little escapades. You know how life is. I haven't done anything major since my last long post but I'm in the midst of one now. So here is a little teaser for now.


Sent from my Galaxy S6 Active with horrible auto correct ... Using Tapatalk
 

Attachments

  • uploadfromtaptalk1441326425771.jpg
    uploadfromtaptalk1441326425771.jpg
    96.1 KB · Views: 108
OP
OP
Mr.Asmith9

Mr.Asmith9

Senior Member
Joined
Feb 8, 2014
Posts
485
Reaction score
145
Location
Fairbanks, AK
Ram Year
2015 Ram 2500 Mega Cab
Engine
6.4L V8 Hemi
Finally got around to installing my fog lights, I've been procrastinating for almost a month but with my shoulder surgery coming up and winter almost upon us I bit the bullet and got to work. This is less instructional then my previous posts as I had a buddy help me and when that happens I don't take as many pictures and write notes and stuff. In fact most these pictures where taken after it was completely installed. So here we go.

Rigid X LED 4" square lights
1 Pair of D2 Driving
1 Pair of D2 Hyperspot

Rocker Switches x 3 (only two seen below, 3rd is on the way.)

Access Panel Part # per local dealership. )I acquired this just encase I botched the cutouts.)
1WA33DX9AB

First I had to find where I wanted to put the switches, I'd of liked to cut out a spot for them under the dash but I was to afraid I'd screw up and then have an ugly ******** in my dash... So I decided to put my switches on a removable panel as I can replace those with ease. Various users here on RamForum made suggestions but I settled with the Access Panel below your headlight controls.

I first removed the panel and made a crude cardboard copy to not only check the measurements for the rocker switch cutouts, but to see how I felt about there location.
20150822_134530.jpg

After deciding I liked the feel, I covered the access panel in tape, and measured out the cutouts. While I was doing this I decided that I'd go ahead and add a 3rd switch just encase I wanted to wire something else up later.
20150902_180027.jpg
20150902_180058.jpg

Then came cutting them out. I used my dremel tool with a mini saw blade. I made a few mistakes, but luckily the rocker switches cover them.
20150902_193721.jpg
20150902_194058.jpg

In order to get the switches to fit I had to file the sides of the cutouts as I accidentally cut them at an angle.
20150902_194242.jpg
20150902_194312.jpg

Wiring was easy but time consuming as I had to run a whole bunch of taps and share lines and blah blah blah. So here is the important parts. These are DPDT Rockers, With On / Off / On. I'm using them in conjunction with a relay to get my desired results of "auto" "off" "on."

I wanted the LED's to dim with the dash lights, however they run independently of the switch operation which I didn't release when I purchased them, meaning If I tap both the LEDs into the dash lights they'll constantly be on. Not what I wanted, So I decided to tap the RED led (which illuminated the words) to the dash lights as I didn't mind them being on when the switch wasn't turned on. But I Didn't want the top Green LED (the one that lights up the symbol) to be on all the time, only when I was using whatever it was wired to. So after much thought I figured out how to make this work.

As these switches are on/off/on DPDT I had plenty of room to make them work. Here is a diagram for a # reference on how I wired these.
Untitled.jpg

#s 9 & 10 are for the Red LED, so I tapped 10 into the dimmer switch, and bridged it over to the second rocker switch, and will bridge it again when my 3rd rocker comes in.

To get the Green LED to work only when the switch is being used I had to revers what #s 1-6 did. What I mean by this is #s 2 & 5 became outgoing, and #s 1, 3, 4 and 6 became ingoing. Luckily these switches didn't have diodes so I could do this(diodes only allow electricity to flow one way)

In order to get you to understand how I wired the Green LED to be depending on the switch position requires you to understand how I wired the rest of the switch so...

I wanted the switch to work as follows. Down 'auto' (comes on with brights) Middle 'off' (Receives no power what so ever) Up 'on' (On regardless of headlights). In order to do that I purchased a typically relay to use with this system, I was able to get this to work by wiring the remote wire for the relay to #2, *ignition power to #1 and a remote wire from my brights to #3.
*I wanted ignition power so that you could only have it in the manual on position if the vehicle was in acc or run but was unable to find a tap under the dash, so instead its actually a constant power so I can turn on lights regardless of the keys.

Now with that in mind back to the Green LED. I actually bridged #8 with #2. In so doing any time the lights are on, the Green LED will turn on. Originally I only wanted the Green LED to be on when I turned the switch to the 'on' position but I actually prefer this more.

I also had to run a ground wire for the LEDS.


20150905_024240.jpg

20150908_140613.jpg

I ran the Relay's remote, and the wire tapped into my brights through this grommet, then on the engine side used wire loop and electrical tape. I fished it through with a wire hanger.
20150908_140704.jpg
20150908_141059.jpg

For the Relay I ran the power through my Fuse Block like I did for my HIDS
20150908_141112.jpg
20150908_141132.jpg


Switches in Action
20150905_024530.jpg
20150908_140317.jpg
20150905_024539.jpg
20150908_140457.jpg

You may be wondering why I wanted I wanted a manual ON for these switches. I wanted it more for the reverse lights then for my moose lights, but as I was going to wire it for the reverse lights I went ahead and decided to do it for both. More often then not the average person would wire an override off switch. However specifically for the reverse lights I wanted to be able to turn them on without having to start my truck, pop it into reverse and put the E-Brake on while I hooked up my trailer or what have you. I also wanted the ability to turn them on while driving forward to tell that SOB riding my ass to back up.
 

tipnitty

Senior Member
Joined
Feb 21, 2014
Posts
969
Reaction score
732
Location
Oklahoma
Ram Year
2014
Engine
Hemi 5.7
I love that fuse box and will get one for later down the line. Love the truck man.
 

derekp

Senior Member
Joined
Mar 10, 2015
Posts
2,131
Reaction score
1,789
Location
Buda, Tx
Ram Year
2007
Engine
1990 5.9 Cummins
Same reason I have my reverse leds on a separate switch. Lol truck looks badass.
 

joeygster

Senior Member
Joined
Sep 21, 2015
Posts
1,834
Reaction score
1,224
Location
Ancaster, Ontario
Ram Year
2016 Ram 1500 Sport Crew Bright White
Engine
Hemi 5.7
Great truck.

How are you liking the N-Fab N-Durasteps. They look awesome. How are they holding up wear & tear wise?
 
OP
OP
Mr.Asmith9

Mr.Asmith9

Senior Member
Joined
Feb 8, 2014
Posts
485
Reaction score
145
Location
Fairbanks, AK
Ram Year
2015 Ram 2500 Mega Cab
Engine
6.4L V8 Hemi
How are you liking the N-Fab N-Durasteps. They look awesome. How are they holding up wear & tear wise?

I really like them actually! They flex a little when you step on them but that's to be expected as they are only attached with 3 bolts per side.

When I first put them on I was annoyed with how noisy they where. Every time my tires through a rock at it they reverberate the sound pretty bad inside the cab. Probably because the shape? The powder coat seemed to be durable except for the fronts where the rocks hit it.


I had them spray lined after about 2-3 weeks of originally installing them. The rocks no longer "ting" off them and the spray liner is definitely more durable then the paint.

Here are my complaints, they stick out pretty far on each side, and hang pretty low. It also takes some time to get use to the exact spot you have to place your foot. Otherwise there really great.

From me to you via Tapatalk.

d6d71f7091bd6f890da6e4631dda56a8.jpg
 
Last edited:
OP
OP
Mr.Asmith9

Mr.Asmith9

Senior Member
Joined
Feb 8, 2014
Posts
485
Reaction score
145
Location
Fairbanks, AK
Ram Year
2015 Ram 2500 Mega Cab
Engine
6.4L V8 Hemi
Hey Guys, So Its been awhile... A long while really since I've done anything to my truck but I've got projects coming up this week! First, a little life update.

Back in September (2015) I got shoulder surgery. There was some benign tumors around my rotator, I also had a few bone spurs and they ended up relocating my bicep tendon while they where at it... Yay... So It's been a long recovery process. It's been 8 months and I'm still trying to get my strength back. Quite frustrating to be honest. But It hurts less... :happy107:

Anyway, I just bought a house and if your reading this, then you have my permission to be jealous. The house is build ontop of a 1700 Sq ft garage. 3 10x10 doors and the 3rd door even has a lift bay!!! Yeah... Good times coming up = )

So with that in mind. I'm now motivated to finish an old project I never got around to doing and that's installing my reverse lights in my bumper. You may recall I have the switch installed, I just forgot to run the wires while I was in there and then had my surgery so I haven't been very motivated.

I've also got 2 new projects.

First is installing a B&W Goose Neck Hitch, and the Second is installing some Air Lift airbags with a wireless on board air compressor.

Now that I've got a shop basically I'll be finding more stuff to do. I'm thinking about getting a 2" lift and some bigger tires but I'm not sure as I do haul and tow a few things so I don't want to reduce the capabilities of my truck for a few extra inches of ground clearance. Time will tell ;)

Anyway, stay tuned for updates and thanks for following!
 
Top