I went on such a rant in that previous post, I wanted to leave it isolated from our mission.
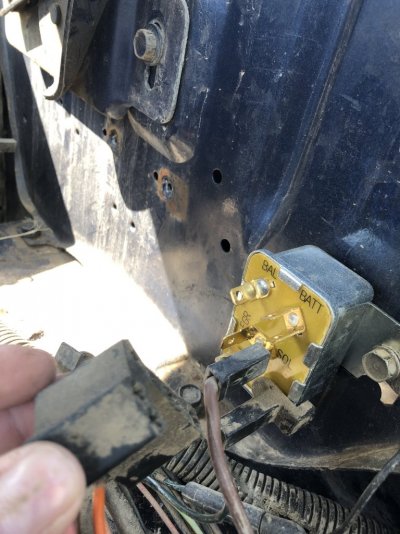
I refer you back to the schematic drawing, there should be 3 wires minimum on the starter solenoid relay.
1) The small gauge ignition switch wire connected to the S or Sol terminal.
2) A large wire connected directly to 12 volts from the battery
3) A second large wire connected to the starter.
Please confirm you have these 3 connections and that you don't see anything bridging or shorting them together.
Leave the ignition wire disconnected from the S terminal and protected from shorting against the chassis.
I wonder if the previous owner rewired this area. That black plug looks a bit irregular and I don't see two distinctly large wires for the battery and starter connections.
If you can post the make and model of the starter solenoid, we can discuss the specific connections and where they should be connected.
I tried to find the starter solenoid in your pic using both text and image search, I had no luck.
We should be 100% certain of all of the connections on the solenoid before proceeding. I've included the next steps to pursue once we're done with the solenoid connections.
If a visual inspection of the large wire from the solenoid to the starter is not productive, move to the next step below.
Identify and remove the large wire that connects from the solenoid to the starter. Insulate this wire from shorting to the chassis. You might as well try the battery test again because it's quick and easy. If it still cranks, leave the large wire feeding the starter disconnected from the solenoid and well-insulated. See the next step.
With the battery disconnected, connect an ohm meter using alligator clips, between the large wire feeding the starter and chassis ground. Adjust the ohm meter scale setting so that you have a large deflection of the meter (for an analog meter) or a larger number for a digital meter.
Prop the meter in a position that you can manipulate or wiggle the large wire while being careful to not move the connected alligator clip. More often than not, this is a two-handed task where one hand prevents the alligator clip or that end of the wire from moving while the other hand works on moving the rest of the wire.
When you find a particular area that causes a significant change in the resistance, this may help you to isolate a smaller area of the large wire for visual scrutiny.
I know you're at work or traveling for work. Respond whenever you're next available.
.


")