
5th gen passenger side intermediate shaft kit, same parts?

Disclaimer: Links on this page pointing to Amazon, eBay and other sites may include affiliate code. If you click them and make a purchase, we may earn a small commission.

Guyfromthenorth

Senior Member
Joined
Jan 2, 2019
Posts
109
Reaction score
108
Location
Ontario
Ram Year
2019
Engine
Hemi 5.7
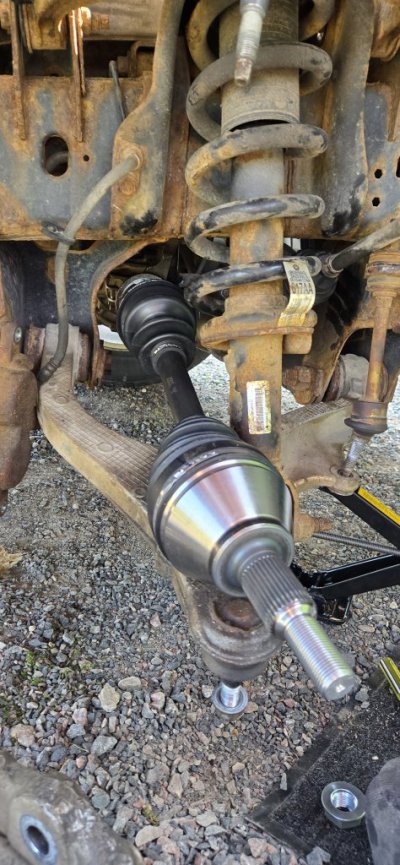
I've been ordering parts to fix a friends 2016 4th gen ram's seized intermediate shaft\CV joint (passenger side) and I crawled under mine today and noticed my CV to intermediate on the passenger side is loose and worn down from corrosion. The 4th gen I'm fixing is SEIZED on and...a pain. Mine at least is wobbly. Both need the intermediate pulled and replaced.

Looking at youtube videos, and the parts kits I'm seeing on amazon (visually seeing, I don't see part numbers) are the 4th and 5th gen intermediate parts for the passenger side the same? Amazon's vehicle selector tells me the 4th gen kit won't fit my 5th gen, but they look IDENTICAL to me.

Since the dealer, as far as I know, doesn't have a part number for the passenger intermediate shaft and parts, I'm having issues figuring out if the 4th and 5ths are the same. I suppose I could try and find out what part number differential is in the front end for each and if the same axle I don't see why the guts would be different?

EDIT: On a youtube video I saw a guy do a 2019, but he mentioned it being CLASSIC, and he showed this Doorman part number: https://www.dormanproducts.com/p--630-446.aspx

On that page doorman does show 2x 2019's listed, classic and just Ram. 2019 was the year they went "new body" but didn't CALL it anything different, and added the CLASSIC option, no offense classic guys as this is more of a shot as RAM but damn if finding parts isn't harder now that there are "two rams" in that year, even though I'm betting 99% of the drivetrain and underhood parts are the same, it's just interior and body that is different...I think....
 
Last edited:
OP
OP
Guyfromthenorth

Guyfromthenorth

Senior Member
Joined
Jan 2, 2019
Posts
109
Reaction score
108
Location
Ontario
Ram Year
2019
Engine
Hemi 5.7
I swear sometimes I look and I look for info and find nothing, then I post here and the answer shows up randomly. Sorry for the redundant thread but hey maybe it'll help someone else. Two things I learned just now:

Typing in "2019 ram 1500 front right axle intermediate shaft kit" into amazon WILL find a 2019 compatible one now, it's 227$.
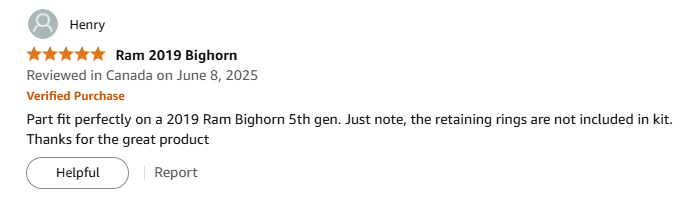
Typing in "2018 ram 1500 front right axle intermediate shaft kit" into amazon WILL find one that doesn't "say" 2019 compatible in it even though it looks EXACTLY the same, and it only costs 127$. I dug through the reviews and found good ol Henry helping me out:
1749765435214.png
 
OP
OP
Guyfromthenorth

Guyfromthenorth

Senior Member
Joined
Jan 2, 2019
Posts
109
Reaction score
108
Location
Ontario
Ram Year
2019
Engine
Hemi 5.7
Follow-up to my install, so this thread has some added value...

I had 2 Rams that needed intermediate shafts replaced. A 2016 4th gen and a 2019 5th gen "new body style".

2016 4th Gen
Passenger side CV axle on a co-workers 4th gen split a boot and puked grease everywhere. I offered to swap it out for them and once it was all apart no amount of hammering could separate the CV bell from the intermediate stub on the axle tube. I debated on getting larger and larger hammers (and the air hammer) but realized 2 things. Firstly rust tests to do 1 of 2 things, turns stuff into a soda cracker, or welds stuff permanently together. Knowing the soda cracker effect wasn't at play here I worried that bigger and bigger forces would just risk damaging the aluminum axle tube housing. Additionally if the CV was so rusted onto the shaft that hammers weren't working that meant there's a nearly 100% chance the splines are ruined anyways.

So I ordered an intermediate shaft kit from Amazon for 127$ (CAD $) shipped. It came with EVERYTHING needed to do both sides of the truck, included twice as many seals as needed, and even had rubber boots meant to cover the CV\stub shaft joint to prevent this kind of corrosion down the road. The one thing the kit does NOT come with are new snap rings, so don't damage the originals.

Notes on the install:

Electrical Connector
-Classic engineer move to feel the need to attach a mystical puzzle cube to the electrical connector for the 4wd shift motor. It'll probably be dirty and greasy. Feel around the top of the plug and clean off whatever you can until you can see the red tab. It has to slide backwards toward the wires for reference, which then exposes a push down tab, press and hold that down while wiggling the plug back and it should come out easy enough. This is done entirely by feel or with the help on a phone set on selfie camera to see up above it because of course these locks are ontop of the plug where you can't see.

Two Bolts that connect to the motor mount
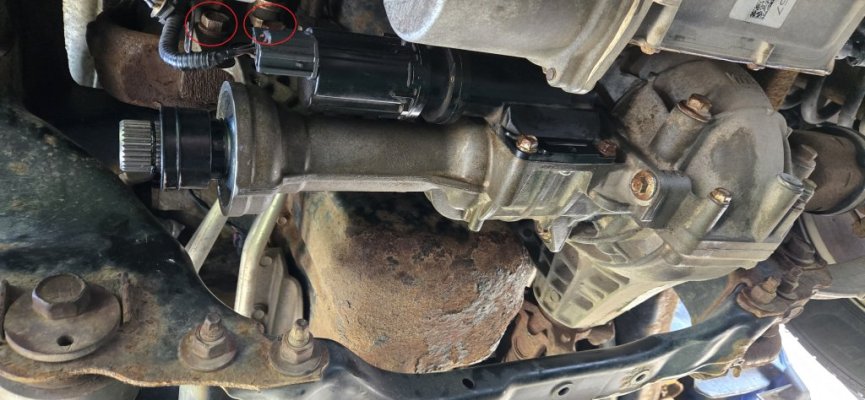
-Get good penetrating oil for the 2 bolts that hold the axle tube to the motor mount (circled in red in attached photo, note the phot is from AFTER replacing the shaft). These bolts eat the weather and get rusty, they also are threaded through inch thick plate steel that's part of the motor mount, and are hard to access if you strip them or snap them off. The bottom of the bolt shank is exposed so you can scrape them with a wire brush and oil them. I'd recommend a ratcheting wrench to work them out as a ratchet barely fits, and definitely doesn't fit as the bolt works it's way out and you run into the steering box. I took an hour to do both of these bolts believe it or not. Soaked in PB, carefully got them to turn, turned until I could feel them tightening (threads probably galling), stopped, sprayed PB in, tightened them back in, sprayed again, loosened further until the tightness was felt again, oiled, tighten, oil, loosen, etc etc.

20250616_160053.jpg


Axle tube housing bolts on the diff
-Before removing these bolts I highly recommend you sweep\vacuum\clean any mud, rust, dust, dead racoons, etc from this whole area. After the axle tube is removed the differential will be open to the environment and diffs don't have a filter in their systems. Yes the plug magnet will catch metal, but won't catch sand as it cycles through everything millions of times.

-There's 4 bolts total (12mm) that hold the tube to the diff. The majority of us will be removing them for the first time since the diff was assembled. Make sure the bolt heads are clean and that your socket is directly ontop of them without being crooked. They take quite a bit of force to crack off the original torque. The two on the bottom are easy enough to get to. The two are the top are terrible. I couldn't get my hand in there let alone a wrench or ratchet. I ended up getting a 36" and 48" extension and going in from the wheel well. You'll want a flashlight so you can see your target. This is where it's especially important you don't slip on the socket or twist it at an angle. Stripping one of these will automatically mean you're pulling the diff out I'm willing to bet unless your really lucky and get a stripped bolt extractor back there and on it properly. The top most bolt for me was a huge pain. My cordless impact wouldn't even break it loose. When adding on a bigger ratchet by hand I felt the extension bar twisting I was putting so much force on it, luckily nothing snapped or stripped and it did give way after a while. Remember once these are removed there's nothing holding the tube on except the factory RTV. You should be able to see squeeze out from initial assembly of the RTV, and that'll show you where to start slowly prying. Remember it's aluminum so you'll want to be careful.

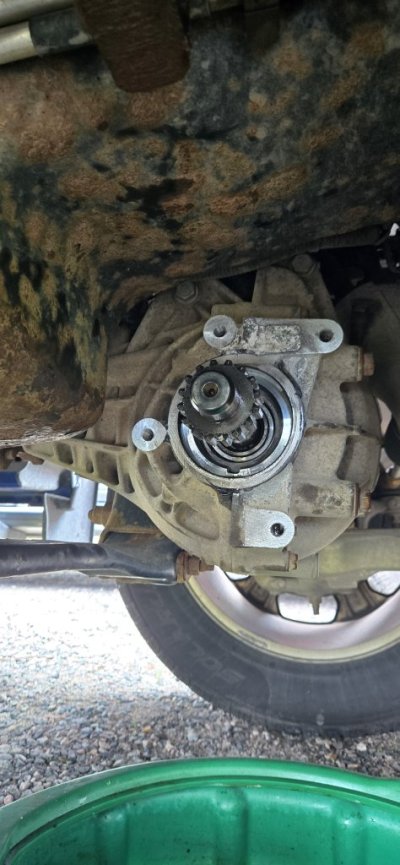
-Once I broke the RTV seal it came off easy enough. Pull the diff outward in the direction of the wheel well as there is a geared shaft that is sticking out from the diff into the tube so pulling straight down could damage that. I didn't have a lift so the truck was jacked up on the passenger side by the frame which meant it was already leaning at a good angle so most of the gear oil was pooled on the drivers side. I'd say maybe an oz came out when it separated.
20250616_135259.jpg

(contd)
 
OP
OP
Guyfromthenorth

Guyfromthenorth

Senior Member
Joined
Jan 2, 2019
Posts
109
Reaction score
108
Location
Ontario
Ram Year
2019
Engine
Hemi 5.7
Removing the 4wd motor
-Easy to remove, 12mm if I remember correctly. Undo the 4 bolts and it'll pop off. The surface is a "reusable" gasket (plastic housing) so try not to damage it. The ring that locks the two shafts together while in 4wd can easily slide to the side and be removed through the window the motor left behind. Be careful not to drop this ring, if you chip the teeth it may not be reuseable.

Removing the seized CV bell
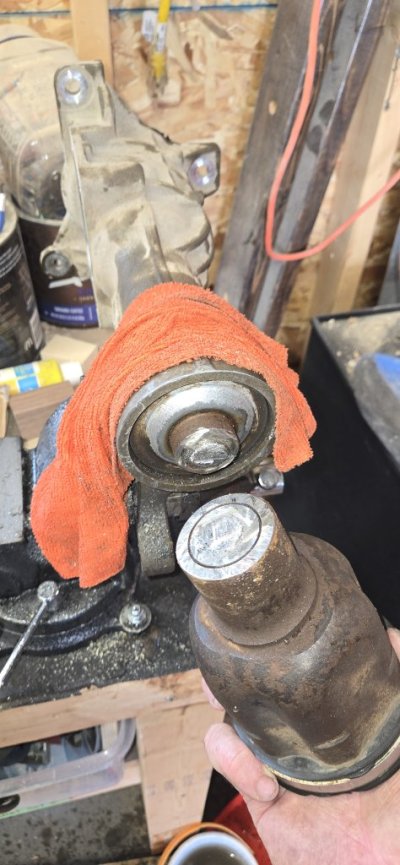
-As you can see this CV was rust welded on. I put the unit it a bench vise, carefully clamping on the section of aluminum the 2 bolts pass through to the motor mount, and got a bucket of water and a rag. Using an angle grinder with a cut off wheel I carefully cut around the shaft stub just below the CV socket. Every 5-10 sec of cutting I used the water and rag to cool the shaft and housing. I didn't want enough heat to build up to distort the aluminum housing. I got probably 50% of the way through the shaft before the grinders head was against the CV bell and couldn't cut any more, I finished the middle part off with a sawzall.
20250616_135401.jpg


20250616_141632.jpg


Removing the guts
-Get some good snap ring pliers. I used a set of HF style ones that have fixed jaws, not the kind of pliers with reversible\changeable jaws, those are always sloppy and work like junk. The main snap ring holding the shaft in came out easy enough, a light tap with a mallet got the shaft out after that. I put a rag inside the tube so when I tapped the shaft it wouldn't fall into the cavity and damage the aluminum. Then remove the retainer ring that holds the capture ball bearing onto the old shaft.
*DON'T FORGET TO KEEP THE SNAP RINGS FOR REUSE.*
Once it was out you can choose to replace the needle bearing and seal at the end of the tube if they look like they need it, or if you want to do it regardless since you're already there. The seals are fragile, so find something the same diameter to tap it into place and oil the surfaces. Also take a measurement of the dept the original seal is set to, there is no "stopper" line the seal presses against, you have to get it right.

20250616_142128.jpg


(contd)
 
OP
OP
Guyfromthenorth

Guyfromthenorth

Senior Member
Joined
Jan 2, 2019
Posts
109
Reaction score
108
Location
Ontario
Ram Year
2019
Engine
Hemi 5.7
Assembling the new shaft
-I put the shaft in the freezer the night before, and I warmed the capture ball bearing up (not in an oven, dashboard on a sunny day will be good, or a hair dryer, you don't want to COOK the bearing). I even added some gear oil to the shaft to assist with fitting the bearing on. I spent ALOT of time carefully ensuring the bearing went down straight onto the shaft so the race didn't get distorted, I only used non-pointy objects and a hammer to tap it down (socket extension for example). I couldn't get it more than halfway and then I was at the point of feeling like I would damage it. As this was at a co-workers house I didn't have my hydraulic press here to make this easy. I went to a machine shop I know and they pressed it on without charging me a penny. If you are doing this job you may get luckier than me, but I'd at least consider if not buying a bearing press at least find a tube or something the same size as the INNER race of the bearing so you can bang the bearing on before it cools. Don't forget to add the snap ring you saved from earlier.

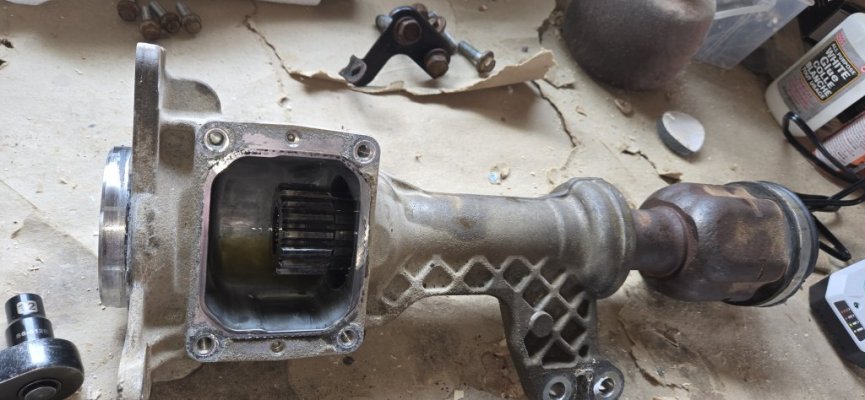
-The kit has NO INSTRUCTIONS. So this part could be easily overlooked. On the shaft end that faces the differential there is an open cup, it is where the next bearing needs to go (see photo below). Do not forget this as the shaft inside the diff rests here. I used a rubber mallet and got it 99% of the way in easy enough, I finished the last millimeter with a socket the same size as the bearing.

20250616_153637.png
-Before putting the new shaft into the axle tube take both the shaft and housing out back and hose them down with brake cleaner. You want every metal fragment, sand grain, and dust cleaned out before this gets sealed back up. After that coat the seal, needle bearings, and shaft itself with some gear oil to help re-assembly. Carefully feed the shaft through the housing and through the seal, I turned the shaft slightly as it went through the seal so it didn't snag anything. I took the mallet and placed the wooden handle down into the house against the shaft and one light knock with a hammer onto the mallet head and the shaft\bearing slide easily into place. Now install the second snap ring we saved from earlier.

-Slide in the engagement collar for the 4wd motor, make sure to add a bit of oil to it so there's no binding. I added a THIN line of RTV to the shift motor base before bolting it down, figured it couldn't hurt.

-Grab one of the new metal dust shields (they look like giant washers) and put it over the exterior shaft, use a socket extension and mallet to knock it down to the base of the shaft, spin the shaft and look for a visual wobble will tell you if it's down flat evenly or not. Now grab some wheel bearing or other high quality, high pressure, water repellent grease and coat the exterior stub shaft that mates to the CV. Get the LONGER of the two rubber boots and push it down over the shaft to the metal dust shield and then pack some more grease into the boot. It doesn't need to be completely full, but not dry. Open the tiny bag of rings and take one of the black circlips and install it onto the shaft in the groove centered on it.

20250616_153555.jpg

Final Prep
-Take some gear oil (maybe an oz or so) and pour it into the axle tube with it slanted towards the send with the seal so oil works its way to the needle bearing at the end and slowly turn the shaft. This will just make sure there's an initial amount of lube on it so the thing isn't spun dry.

-Put some RTV around the mating surfaces of both the axle tube and the diff itself. Don't get any inside the workings of the diff. It probably won't hurt the gears but it could plug up a passageway that oil is meant to be flung through.

(contd)
 
Last edited:
OP
OP
Guyfromthenorth

Guyfromthenorth

Senior Member
Joined
Jan 2, 2019
Posts
109
Reaction score
108
Location
Ontario
Ram Year
2019
Engine
Hemi 5.7
LAST ONE (sorry for the posts, I didn't want to type a whole novel and have the site go 404).

Re-Installation
-Carefully slide the axle tube back over the shaft that is protruding from the diff, it should slide in easily and if you're thinking of tapping it with a hammer something probably isn't right. Once it's in position and the mating surfaces are touching try the 12 o'clock bolt into the diff so the unit can 'hang" from it. It's alot safer to hang from that bolt than to throw a bolt in the bottom and have the weight of it pry against a lower bolt. I was able to squeeze my fingers up there and blindly get the bolt in 4-5 turns. Once it's not going to fall now take ALL the bolts, including the 2 that go into the engine mount and get them all started on their threads. You don't want to tighten any of them fully until all 6 bolts you removed earlier have found proper threading.

-Tighten the axle housing bolts first. Then tighten the 2 motor mount ones. Reconnect the electrical connector and slide the red lock back into it's position.


After that it's just a matter of mating the new CV onto the new shaft. Add more grease to the new CV's female splined connection and push it onto the shaft until it clears the circlip and seats all the way into the rubber boot. If the CV doesn't want to get on try moving the circlip a bit by hand, or line up the CV as straight as you can and tap the end of it (without damaging the threads or the CV itself, no sled hammers). If the boot bubbles out a bit once the CV slides on fully, carefully squeeze out any trapped air or excess grease.

20250616_162625.jpg

20250616_162628.jpg


Finally, either drain and refill the diff if it's due anyways, or just top up with the same amount that leaked out. Remember to be on level ground if you're using the "fill til a steady stream comes out the fill hole" method the FSM states.

I'll check spelling and stuff later, but hopefully this helps some people out there. There's lots of youtube videos on this but I didn't find many that answered all the questions\issues I ran into along the way.
 

Wild one

Senior Member
Joined
Jan 17, 2016
Posts
23,882
Reaction score
54,976
Ram Year
14 Sport
Engine
5.7

 
OP
OP
Guyfromthenorth

Guyfromthenorth

Senior Member
Joined
Jan 2, 2019
Posts
109
Reaction score
108
Location
Ontario
Ram Year
2019
Engine
Hemi 5.7
Just to add to your excellent thread.These guys are based east of you in Nova Scotia.

I watched the same two videos, great info and I've saved them for future reference as I have about 4 friends with Rams and expect to be doing a few of these lol. I appreciated the NS video because he showed how...hammer happy...you can be with some of the parts, knowing the threshold for what is "rough" and what is "acceptable" is definitely an art for drive-train specialists lol.
 
OP
OP
Guyfromthenorth

Guyfromthenorth

Senior Member
Joined
Jan 2, 2019
Posts
109
Reaction score
108
Location
Ontario
Ram Year
2019
Engine
Hemi 5.7
Quick update, finished the 2019 today. Bullet notes:

-Driveway working with previous experience doing one before, the whole job took 4.5hrs without any breaks. Doesn't mean it'll be what anyone else takes, but that's my current average.
-This CV wasn't rust seized on, but the rust had eaten away at the splines to the CV could easily move by hand (I can't upload a video here unfortunately)
-Even though it was "moving" it took ALOT of hammer and prybar to get it to slide off the intermediate thanks to that little locking ring, some PB helped.
-Upon inspection the CV shaft end splines were more damaged\eroded than the intermediate, but there was no way the original intermediate was in spec so I changed it anyway.
-A bearing press made the bearing fitment easy.
-The bolts came out on the 2019 easier, but still took some work, the electrical connector was a pain and the red clip jumped out into the yard and I had to go find it.

Here's the biggest difference I found. On the 2016 I couldn't for the life of me figure out how to get the CV shaft out of the wheel hub with the lower balljoint still attached, it didn't matter how I contorted it, just wasn't going. So I pounded off the lower balljoint and slid the knuckle off that way. Maybe there is a way to do it, but I couldn't get it.

On the 2019 here's what I did after jacking it up, pulling the tire, breaking loose the axle nut:
1)Remov the brakes entirely. During this step also follow the wheel sensor wire from the hub to the frame and disconnect it everywhere you can. On the 2016 the plastic clips were easily opened, on the 2019 they used more of a zip-tie style clip and couldn't be opened. Luckily I had a door trim fork for popping out the plastic clips and used it to free things up from the frame. I could NOT get the connector undone on top of the frame rail. The red lock clip refused all my attempts to slide it back then finally starting breaking so I stopped and left it.
2)Disconnect the sway bar end link at the control arm (depending on the how off level your spot is this may be easier done before the truck is jacked up).
3)Loosen off the upper balljoint nut.
4)Disconnect the tie rod end from the knuckle.
5)Pound the upper knuckle until it pops free of the balljoint.

Now with the knuckle free to turn by hand, and the top leaned all the way "out" away from the frame, I twisted the knuckle towards the back, like you're making an extreme right turn. At that point the CV was easily about to slip out of the hub.

To re-install it I took the new CV, put it in towards the engine but from behind the knuckle, slid it passed the new intermediate shaft until the axle nut end of the CV cleared the knuckle. Then lifted the sway bar link up, moved the CV shaft passed that link and so the axle nut end went forward of the knuckle by passing behind it. Then turned the knuckled how it was when I removed the shaft originally and slid the splined end into the hub. At that point you should be able to move the knuckle to the similar "outward, and turned far to the right" move from earlier and then the female end of the CV was able to slide easily onto the intermediate shaft. It took some fiddling but the grease helped the female end clear the locking clip on the intermediate, but it's obvious once it does get on and lock in. I did that with just hand pressure pulling on the end of the CV that mates to the intermediate until it found it's way.

Probably some spelling I flubbed here, but I'll go through these notes later. Not really a step by step guide here, but some good info to help give someone an idea of what you're getting into at least.
 

Jacob Maguire

Senior Member
Joined
Dec 18, 2019
Posts
158
Reaction score
180
Location
Pine Beach NJ
Ram Year
2015
Engine
Hemi5.7
Thank you for the detailed write up. I'm in the middle of this on a '15 Laramie at 190K in Jersey. Fully rust sealed CV to intermediate shaft. Ordering rebuild kit now as days of beating have yielded zero progress.
 

CaptMaritime

Junior Member
Joined
Mar 10, 2024
Posts
3
Reaction score
0
Location
Virginia
Ram Year
2018
Engine
EcoDiesel 3.0
Assembling the new shaft
-I put the shaft in the freezer the night before, and I warmed the capture ball bearing up (not in an oven, dashboard on a sunny day will be good, or a hair dryer, you don't want to COOK the bearing). I even added some gear oil to the shaft to assist with fitting the bearing on. I spent ALOT of time carefully ensuring the bearing went down straight onto the shaft so the race didn't get distorted, I only used non-pointy objects and a hammer to tap it down (socket extension for example). I couldn't get it more than halfway and then I was at the point of feeling like I would damage it. As this was at a co-workers house I didn't have my hydraulic press here to make this easy. I went to a machine shop I know and they pressed it on without charging me a penny. If you are doing this job you may get luckier than me, but I'd at least consider if not buying a bearing press at least find a tube or something the same size as the INNER race of the bearing so you can bang the bearing on before it cools. Don't forget to add the snap ring you saved from earlier.

-The kit has NO INSTRUCTIONS. So this part could be easily overlooked. On the shaft end that faces the differential there is an open cup, it is where the next bearing needs to go (see photo below). Do not forget this as the shaft inside the diff rests here. I used a rubber mallet and got it 99% of the way in easy enough, I finished the last millimeter with a socket the same size as the bearing.

View attachment 568161
-Before putting the new shaft into the axle tube take both the shaft and housing out back and hose them down with brake cleaner. You want every metal fragment, sand grain, and dust cleaned out before this gets sealed back up. After that coat the seal, needle bearings, and shaft itself with some gear oil to help re-assembly. Carefully feed the shaft through the housing and through the seal, I turned the shaft slightly as it went through the seal so it didn't snag anything. I took the mallet and placed the wooden handle down into the house against the shaft and one light knock with a hammer onto the mallet head and the shaft\bearing slide easily into place. Now install the second snap ring we saved from earlier.

-Slide in the engagement collar for the 4wd motor, make sure to add a bit of oil to it so there's no binding. I added a THIN line of RTV to the shift motor base before bolting it down, figured it couldn't hurt.

-Grab one of the new metal dust shields (they look like giant washers) and put it over the exterior shaft, use a socket extension and mallet to knock it down to the base of the shaft, spin the shaft and look for a visual wobble will tell you if it's down flat evenly or not. Now grab some wheel bearing or other high quality, high pressure, water repellent grease and coat the exterior stub shaft that mates to the CV. Get the LONGER of the two rubber boots and push it down over the shaft to the metal dust shield and then pack some more grease into the boot. It doesn't need to be completely full, but not dry. Open the tiny bag of rings and take one of the black circlips and install it onto the shaft in the groove centered on it.

View attachment 568158

Final Prep
-Take some gear oil (maybe an oz or so) and pour it into the axle tube with it slanted towards the send with the seal so oil works its way to the needle bearing at the end and slowly turn the shaft. This will just make sure there's an initial amount of lube on it so the thing isn't spun dry.

-Put some RTV around the mating surfaces of both the axle tube and the diff itself. Don't get any inside the workings of the diff. It probably won't hurt the gears but it could plug up a passageway that oil is meant to be flung through.

(contd)
I'm getting ready to do both the inner stub shaft and outer cv shaft on the passanger side of my 2018 ecodiesel 1500 Ram. Does anyone know if you can buy a matched set? I'm thinking if they are a matched set the splines might fit with minimum slop.
 

Members online

Forum statistics

Threads
211,381
Posts
3,065,840
Members
171,790
Latest member
ChloeBrooks
Back
Top