Wirring Switches and Lights

Disclaimer: Links on this page pointing to Amazon, eBay and other sites may include affiliate code. If you click them and make a purchase, we may earn a small commission.

Unfused

Member
Joined
Mar 20, 2013
Posts
81
Reaction score
8
Location
Ontario, CA
Ram Year
2004, 2010
Engine
Hemi 5.7, 6.7 Cummins
Alright, I know how much people hate when duplicate questions are posted. I spent several hours searching the threads before I decided to post this. I'm sure this has been asked and answered, I just couldn't find it.

Is there a guide or walk through with tips on how to just run wiring throughout a truck? Maybe which panels come off or channels you can run through.

A start to finish guide on how to wire lights onto a Back Rack including where to run the wires and where to put inline fuses ect? I have no idea where to start.

I have 4, 55w lights I'd like to wire and have rocker switches inside the cab for it. Along with 3 various beacon lights. I was going to pay a shop to do it but the cheapest quote I found was for 110$ per hour and they said it could take more then a day to do. (That will remain as a last resort)

If any information is required to help you help me simply tell me what you need and I will add it. If you need pictures I can do that too.

Thanks a lot to all of you, I appreciate it,

Unfused
 

4x4Hemi

Senior Member
Joined
Apr 25, 2012
Posts
2,441
Reaction score
264
Location
Edmonton, Alberta
Ram Year
2012
Engine
Hemi 5.7
You just have to lift up panels and trim and you can run it under the carpet. All the peiced will come ouy along the door jams I'm not positive how to on an 04 though. On my rear facing lights I found a hole from where the in floor storage bins go in. I'm not sure if you have those to possibly squeeze a wire through some where.


I'm sure someone will help more though
 

Texasez

Senior Member
Joined
Aug 25, 2012
Posts
618
Reaction score
27
Location
Dallas tx
Ram Year
2018
Engine
6.7 Cummins
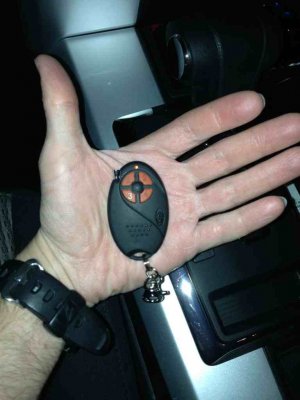
I found a wireless switch to use on mine so I didn't have to run any wires in or have to mount any switches. It has a small remote with four switches on it for four accessories. I have my fogs hooked up to it and it works well.
 

99RamSport360

Senior Member
Joined
Oct 9, 2012
Posts
557
Reaction score
91
Ram Year
1999
Engine
5.9L Magnum 360
I found a wireless switch to use on mine so I didn't have to run any wires in or have to mount any switches. It has a small remote with four switches on it for four accessories. I have my fogs hooked up to it and it works well.

Where did you get this????
 

Texasez

Senior Member
Joined
Aug 25, 2012
Posts
618
Reaction score
27
Location
Dallas tx
Ram Year
2018
Engine
6.7 Cummins
Amazon

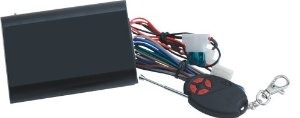
There's a trick to the wiring. It's different than the instructions. It's listed in he review below. Very easy and works well. You just have to use different instructions to wire it.

http://www.amazon.com/gp/aw/d/B000BRJF62/ref=ya_aw_oh_pit
ImageUploadedByTapatalk1364005974.360977.jpg

This is off an amazon review

I bought the PL-SW29 to remotely control four different accessory lights on my car. Some I had to activate using 12v (+), some I had to activate using a ground (-) signal, and the PL-SW29 can do both with ease. The instructions on the back, as mentioned many times in other reviews, is very vague. However here's a proper wiring instruction/guide:

RED - 12v (+) Power
A. Connect it to a 12v (+) switched ACC (accessory) line (cigarette lighter, etc). The PL-SW29 will only work if you have the key in the ignition and the key is in the ACC or ON position; or
B. Connect it to a 12v (+) CONSTANT (direct to battery positive) if you want to use the PL-SW29 at all times, even with the car off.

BLACK - Ground (-)
connect this to your battery (-) or to the chassis.

Now then, there are 4-channels to control with the PL-SW29, and there are 4-pairs of wires - 2 per channel:

- Grey pair for channel 1
- Brown pair for channel 2
- Blue pair for channel 3
- Green pair for channel 4

Each pair of wires can be connected in-line with an accessory, or can be connected to provide either power (+) or ground (-) to an accessory to turn it on. Each pair of wires are also interchangeable with each other; that means that there is no specific "input" and no specific "output" wire per pair. Note that the PL-SW29 does NOT directly provide 12v+ or ground for an accessory; there is however a very easy solution to this, as I'll explain below.

We'll use channel 1 (grey wires) for this example:
Let's say you have an accessory that needs 12v (+) to turn on. To wire the PL-SW29 you would connect one of the grey wires (which becomes the "input") to the PL-SW29's red "power" wire, and the other grey wire (which becomes the "output") to the accessory's (+) wire. Hit the remote channel 1 button and the accessory turn on. Hit the button again and it will turn off.

The same goes for grounded signals. We'll use channel 2 (brown wires) for this example:
Let's say you have an accessory that needs a ground (-) to turn on, connect one of the brown wires (which becomes the input) to the PL-SW29's black "ground" wire, and the other brown wire (which becomes the "output") to the accessory's (-) wire. Hit the remote channel 2 button and the accessory should turn on. Hit the button again and it will turn off.

Thus, each channel can be wired to control all (+), all (-), or any combination of signals to activate any accessories - provided that the accessory requirement is no more than 15 amps. Anything that draws more than 15 amps will blow the PL-SW29's built in 15-amp micro relays.

Also, if you want "momentary" operation (accessory stays on when you push and hold the button, but turns off when you let the button go) you'll have to open up the PL-SW29's case (4 small Phillips screws on the bottom) and remove the jumper for that channel, as shown on the diagram on the back of the packaging.

The range of the remote varies by the surrounding environment, the location of the PL-SW29 antenna, and the length of the PL-SW29 antenna. I have my PL-SW29 mounted underneath the passenger seat, so its antenna wire was low and underneath the carpet. With that setup I had a range of about 100 feet in an open, obstacle-free parking lot with the remote controller's antenna extended. However, I added another 5 feet of regular wire to the end of the PL-SW29's antenna, and ran the now longer antenna wire up behind the car's A-pillar. With this new setup I have about 250 feet of range with the same conditions.

All in all once the installation procedure is figured out, the PL-SW29 works good. It doesn't cost much, the remote is decent (though I wish it didn't have an old-school telescopic antenna), and so far it's performed as expected.
 
OP
OP
U

Unfused

Member
Joined
Mar 20, 2013
Posts
81
Reaction score
8
Location
Ontario, CA
Ram Year
2004, 2010
Engine
Hemi 5.7, 6.7 Cummins
Well.... That Might be way easier. And it can be done from a distance. Thanks a lot for that info.
 

Texasez

Senior Member
Joined
Aug 25, 2012
Posts
618
Reaction score
27
Location
Dallas tx
Ram Year
2018
Engine
6.7 Cummins
Looks like that would work too. The only thing I like on mine over that one is its way smaller. The remote in mine is really small. Plus I like being able to lock it so I don't accidentally turn it on by accident. The small switch below the buttons will lock it so your kids don't turn it on.

ImageUploadedByTapatalk1364264459.868007.jpg
 
OP
OP
U

Unfused

Member
Joined
Mar 20, 2013
Posts
81
Reaction score
8
Location
Ontario, CA
Ram Year
2004, 2010
Engine
Hemi 5.7, 6.7 Cummins
Alright. Makes sense. I'm going to go ahead and buy that one and see where it goes from there. I will keep you guys posted. Thanks for all your help.
 

Redtruck-VA

Senior Member
Joined
Jun 29, 2010
Posts
5,864
Reaction score
984
Location
Virginia
Ram Year
2003 & 1989 D250 RWD
Engine
Hemi-5.7, 5.9 12v & 24v diesel
That is a very clever solution, well done.
 

Surfsideram

Junior Member
Joined
Mar 28, 2013
Posts
4
Reaction score
4
Location
Myrtle beach SC
Ram Year
2004
Engine
5.7
your going to need a positive in positive out relay to the lights so the switch just turns on the relay to send power to the lights. you dont want to run power straight to the switch then to the lights because i asure you you will burn up that switch with that many amps running through it
 
Top