Bilstein Installation 2ND time around

Disclaimer: Links on this page pointing to Amazon, eBay and other sites may include affiliate code. If you click them and make a purchase, we may earn a small commission.

SOKY_RAM

Senior Member
Joined
Mar 17, 2016
Posts
457
Reaction score
789
Location
Bowling Green, KY
Ram Year
2021
Engine
6.4
Today I took my 5100's out to move the washer to the correct location (under the plate). In doing so I was able to use some new tools I picked up this week. It made tightening the top nut so much easier than my first go round. I thought I would share for those that are going to install in the future. I used a craftsman Max access through socket wrench and another ratchet with 6mm hex socket. uploadfromtaptalk1462677541512.jpguploadfromtaptalk1462677548326.jpg
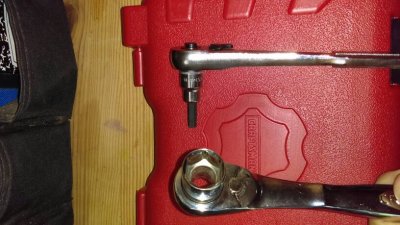
The first time I used an Allen wrench stuck through a deep well with a pipe wrench to turn the socket. This works too but kind of cumbersome and hard to get leverage on Allen wrench. Hope this helps!

Sent from my HTC Desire 626 using Tapatalk
 

Drummin4jc

WWG1WGA!
Joined
Feb 3, 2015
Posts
2,375
Reaction score
1,218
Location
SW Pennsylvania
Ram Year
2024 Ram 2500 CC
Engine
6.4 Hemi
Today I took my 5100's out to move the washer to the correct location (under the plate). In doing so I was able to use some new tools I picked up this week. It made tightening the top nut so much easier than my first go round. I thought I would share for those that are going to install in the future. I used a craftsman Max access through socket wrench and another ratchet with 6mm hex socket. View attachment 70881View attachment 70882
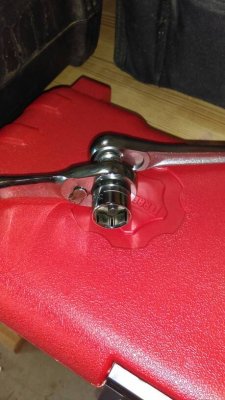
The first time I used an Allen wrench stuck through a deep well with a pipe wrench to turn the socket. This works too but kind of cumbersome and hard to get leverage on Allen wrench. Hope this helps!

Sent from my HTC Desire 626 using Tapatalk

Good stuff!!

Adam
 

EagleChief

Senior Member
Joined
Jan 6, 2015
Posts
1,884
Reaction score
889
Location
Oklahoma
Ram Year
2014 Big Horn
Engine
5.7 Hemi
Luckily for me, my helper had these tools in his selection. Made the install SO much easier.

Sent from my SM-N910V using Tapatalk
 

R.L.K.

Senior Member
Supporting Member
Joined
Dec 1, 2013
Posts
12,803
Reaction score
12,500
Location
Bristol , Tn.
Ram Year
2014 4X4 QC Express 6 speed auto 355 differentials
Engine
5.7 Hemi
That's a fantastic tool set up ! Thanks for posting that up .

Glad to see your washer in its correct location .
How many miles did you have on the washer installed incorrectly?
Any offroading during that time .

Did you have the clunking sound ?
How much damage was done to the under side of the upper cover assy ?
Did you have to replace them , if so post the p/n here , this may help someone in the future , I've heard the are only like $25.00 each .
 

jknappen

Senior Member
Joined
Aug 27, 2013
Posts
671
Reaction score
92
Location
Kentucky
Ram Year
2018
Engine
Hemi 5.7
I replaced my washer as well i only had mine on for 2 weeks and only drove it a couple of times no damage and no noises. What a pain in the ass. This needs to be emphasized to all with bilsteins.


Sent from my iPhone using Tapatalk
 

R.L.K.

Senior Member
Supporting Member
Joined
Dec 1, 2013
Posts
12,803
Reaction score
12,500
Location
Bristol , Tn.
Ram Year
2014 4X4 QC Express 6 speed auto 355 differentials
Engine
5.7 Hemi
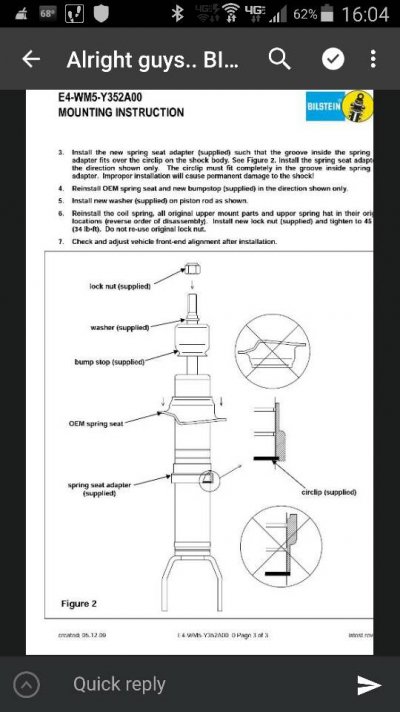
The location of the nut & washer that comes with the bilsteins 5100 is properly stated in step # 5 & #6 with the instructions that come with the bils 5100


c40f452873e8a120307fe16c2c458958.jpg

I've seen 3 things contribute to the washer ending up installed improperly.

1) bilsteins not coming with instructions

2) "professionals techs" not following the instructions, and likely not taking the instructions out of the box largely in part to complacency, because they've installed many many shocks .

3) DIYers failing to read the instructions fully and using common sense instead.
I'd say most anyone without instructions would place the washer under nut instead of on the piston below the theads where it should be


The " clunking " noise heard by some post bilsteins 5100 s installed are linked two separate installation errors .
1) installing the washer improperly under the nut .
This issue usually takes several thousand miles to reveal itself I'd say we'll over 7-10 k if only ridden on paved roads with no offroading .

2) the top nut ( the one the washer does NOT go directly under) not being tight enough .
This issue usually reveals the clunking right away if left badly loose , but even if snug this would allow clunking over larger bumps or offroading .
Even torquing this nut to specs isn't good enough if the coil is not compressed sufficiently.

For anyone planning on installing the Bilstein 5100s themselves OR having a shop do it read the post I'm linking below . There are some good tips that may help you or your installers .

Hope this helps !

https://tapatalk.com/shareLink?url=...&share_tid=79370&share_fid=17770&share_type=t

Alright guys.. BILSTEINS post your pics!!!
 
Last edited:

jknappen

Senior Member
Joined
Aug 27, 2013
Posts
671
Reaction score
92
Location
Kentucky
Ram Year
2018
Engine
Hemi 5.7
Awe cmon we are men we dont read instructions.... Although I will say I agree with shops being notified. I will say that 2 washers should be included as insurance one for under mount and one on top of mount.


Sent from my iPhone using Tapatalk
 

jknappen

Senior Member
Joined
Aug 27, 2013
Posts
671
Reaction score
92
Location
Kentucky
Ram Year
2018
Engine
Hemi 5.7
As a side note..... Compressing coils sucks ass and can kill you if not done properly.


Sent from my iPhone using Tapatalk
 

R.L.K.

Senior Member
Supporting Member
Joined
Dec 1, 2013
Posts
12,803
Reaction score
12,500
Location
Bristol , Tn.
Ram Year
2014 4X4 QC Express 6 speed auto 355 differentials
Engine
5.7 Hemi
As a side note..... Compressing coils sucks ass and can kill you if not done properly.


Sent from my iPhone using Tapatalk
True , this is no.area to skimp on tools !
I used a beefy compressor that had safety latches to keep the springs from popping out .
 
OP
OP
SOKY_RAM

SOKY_RAM

Senior Member
Joined
Mar 17, 2016
Posts
457
Reaction score
789
Location
Bowling Green, KY
Ram Year
2021
Engine
6.4
That's a fantastic tool set up ! Thanks for posting that up .

Glad to see your washer in its correct location .
How many miles did you have on the washer installed incorrectly?
Any offroading during that time .

Did you have the clunking sound ?
How much damage was done to the under side of the upper cover assy ?
Did you have to replace them , if so post the p/n here , this may help someone in the future , I've heard the are only like $25.00 each .
I only ran for two weeks with it wrong. I figured it out early so no offloading and drove it like a grandma. I reused the plates. They were fine but you could tell where the rod was working on it. I also didn't get these as tight as I should have the first time so it's a good thing I had to do again. I had a lot more thread above the nut after using this tool setup. Also found that putting some oil on the spring compressor threads makes it a hell of a lot easier to get coil compressed.
Today I took my 5100's out to move the washer to the correct location (under the plate). In doing so I was able to use some new tools I picked up this week. It made tightening the top nut so much easier than my first go round. I thought I would share for those that are going to install in the future. I used a craftsman Max access through socket wrench and another ratchet with 6mm hex socket. View attachment 70881View attachment 70882
The first time I used an Allen wrench stuck through a deep well with a pipe wrench to turn the socket. This works too but kind of cumbersome and hard to get leverage on Allen wrench. Hope this helps!

Sent from my HTC Desire 626 using Tapatalk


Sent from my HTC Desire 626 using Tapatalk
 
Top