Twistedshadows
Junior Member
- Joined
- Nov 4, 2017
- Posts
- 17
- Reaction score
- 9
- Ram Year
- 2014
- Engine
- 5.7
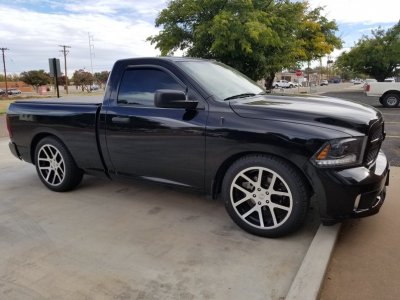
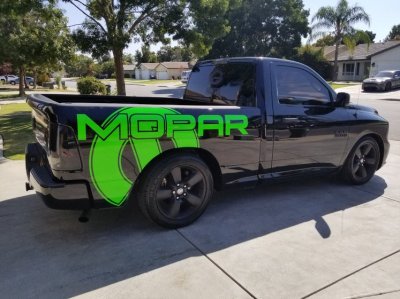
Hey guys just finished my install of inez 4/6 and got it aligned and a few miles put on it so I thought I'd let everybody know my thoughts as well as the problems I've had.
I ordered the kit through moes only took 3 days to show up. There where 2 box's one is the inez parts and the other is the rear bellteck parts (springs bump stops rear sway bar end links shocks and panerd bar bracket)
The kit comes with no install instructions they do have a video with a walk around and a little info but it doesn't go in-depth.
So for the install first and foremost this is deffenetly in the medium category for mechanic skills (took me about 12-15 hours to install). You only need basic wrenches and sockets going up to about 1-1/8. You will probably need a ball joint remover (even with a good ball joint remover the lower ball joints were a pain) out back I used a plasma cutter and grinder to remover the braket. I can't see any way to do it with just a grinder, but maybe with a sawzall or good automotive jigsaw you can do it.
The front is just unbolt and reinstall. You will want to get the f150 front sway bar end links (they should come with the kit the factory ones will have your sway bar at the top of your tire). The only. Two issues I had with the install on the front was with the castle nuts for the new lower ball joint. I couldn't get them far enough on to get the cotter pin in so I had to grind them down a little (no body had small ones in stock and I didn't want to wait a week for ones to be special ordered). I also had to massage the upper control arm brackets with a hammer to get the new control arms in (they were to close so I had to hammer each side on a bit)
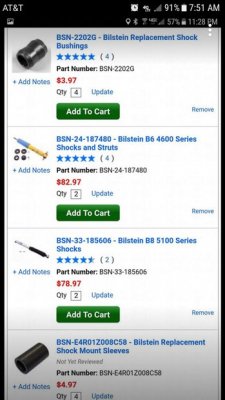
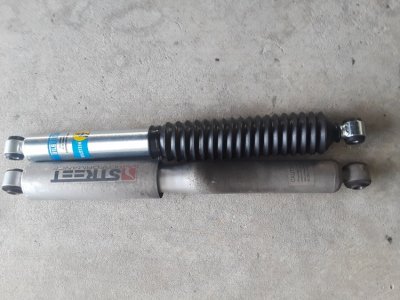
The rear is a fair bit more involved. First cutting off the upper brackets is very awkward ( really can't think of a good way to do it without a plasma cutter). Once you have the brackets cut out you can then put the new brackets in place and mark them for the 2 holes you have to drill in the sway bar mount bracket (I started with a small bit then finished with a step bit went fast). Install you brackets (leave them a little lose) and proceed to reinstall your control arms ( prepare for a lot of pushing pulling and prying to get the bolts lined up). There is 1 bracket for the parking brake cable that bolts to the upper control arm mount on the passenger side that you won't be able to reinstall ( I zip ties mine to the axle. The bellteck stuff just bolts on (panhard relocation bracket and sway bar end links). I only cut 1 coil out of my rear springs for 5 inches ( I may go back and cut another half coil but I'm gonna let it settle). I didn't use the shocks in the kit I order the beilstiens recommended in another post and installed those (remember if you get the beilstiens to get the bushings and sleeves for them). I also used the new bump stops from bellteck but you may not want to and ill get to why in the alignment and driving review.
I ordered the kit through moes only took 3 days to show up. There where 2 box's one is the inez parts and the other is the rear bellteck parts (springs bump stops rear sway bar end links shocks and panerd bar bracket)
The kit comes with no install instructions they do have a video with a walk around and a little info but it doesn't go in-depth.
So for the install first and foremost this is deffenetly in the medium category for mechanic skills (took me about 12-15 hours to install). You only need basic wrenches and sockets going up to about 1-1/8. You will probably need a ball joint remover (even with a good ball joint remover the lower ball joints were a pain) out back I used a plasma cutter and grinder to remover the braket. I can't see any way to do it with just a grinder, but maybe with a sawzall or good automotive jigsaw you can do it.
The front is just unbolt and reinstall. You will want to get the f150 front sway bar end links (they should come with the kit the factory ones will have your sway bar at the top of your tire). The only. Two issues I had with the install on the front was with the castle nuts for the new lower ball joint. I couldn't get them far enough on to get the cotter pin in so I had to grind them down a little (no body had small ones in stock and I didn't want to wait a week for ones to be special ordered). I also had to massage the upper control arm brackets with a hammer to get the new control arms in (they were to close so I had to hammer each side on a bit)
The rear is a fair bit more involved. First cutting off the upper brackets is very awkward ( really can't think of a good way to do it without a plasma cutter). Once you have the brackets cut out you can then put the new brackets in place and mark them for the 2 holes you have to drill in the sway bar mount bracket (I started with a small bit then finished with a step bit went fast). Install you brackets (leave them a little lose) and proceed to reinstall your control arms ( prepare for a lot of pushing pulling and prying to get the bolts lined up). There is 1 bracket for the parking brake cable that bolts to the upper control arm mount on the passenger side that you won't be able to reinstall ( I zip ties mine to the axle. The bellteck stuff just bolts on (panhard relocation bracket and sway bar end links). I only cut 1 coil out of my rear springs for 5 inches ( I may go back and cut another half coil but I'm gonna let it settle). I didn't use the shocks in the kit I order the beilstiens recommended in another post and installed those (remember if you get the beilstiens to get the bushings and sleeves for them). I also used the new bump stops from bellteck but you may not want to and ill get to why in the alignment and driving review.