dapepper9
Senior Member
- Joined
- Feb 7, 2013
- Posts
- 5,908
- Reaction score
- 2,224
- Location
- Iowa/Nebraska Border
- Ram Year
- 2001
- Engine
- 5.9L V8
So I recently installed a transmission temperature gauge so as to have a better idea of what is going on inside. Decided to make this write up after it was requested lol.
I'm going to start out by saying that my install will be different than most. The reason being is I have a deeper aftermarket pan with a drain plug and a pre-drilled and tapped sensor port. However I will provide the info to do it without an aftermarket sensor port or pan.
Things you'll need:
-Gauge, I went with GlowShift for looks and low price
-means to mount it, I went with a single pod A-pillar mount also from GlowShift
-Extra wire, to connect to the power and ground wires on the gauge to the battery, switched power, ground, and the optional dimmer power
-Butt connectors/solder equipment, to make all the connections
-Drill
-1/8" drill bit
-3/8 to 1/2" drill bit
-Phillips drill bit
To start, connect the quick plugs to the gauge and mount it into the pod. Just slides in, pretty tight. Then drill 4 holes, 1 in each corner, of the pod using the 1/8" bit. Now pop off the stock a-pillar and use the pod as a template to drill 4 more holes in the a-pillar for the screws included in the gauge kit. Will look like this when put together. 4 black dots are the screw caps that came included as well.

Next drill a hole with the bigger bit in the center of those 4 holes, should look like the 5 side of a pair of dice. This bigger hole is where the wires will go through the a-pillar. Run the gauge wires through the hole and splice some longer wire for each lead (orange wire on my kit gets spliced into headlight switch, dims the gauge 30% when headlights are on, optional and I didn't do it). Red is power, white is switched power (key on power, like the radio), and black is ground. Run the now longer wires down the A-pillar and out through the fuse panel.

Red power wire will go under the dash and through the firewall to the battery, or you can find another constant power source to splice into. Supposed to install a fuse as well but I neglected to. Oops. Ground I took one of the nuts off where the steering column bolts to the firewall and slipped an eyelet over one of the studs. I've used this point before so I knew it was a good ground. White switched power I spliced into an add-a-fuse I had for my LED lighting inside, plugged into the radio fuse.

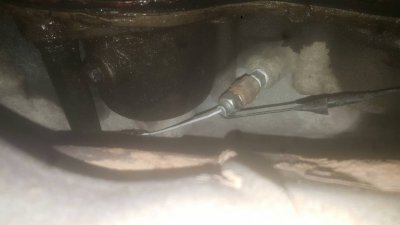
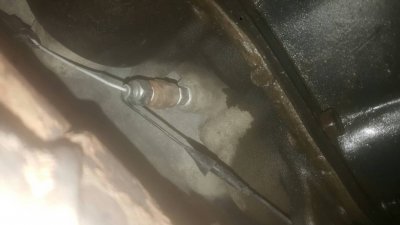
Thicker black cord for the sensor will follow, down the a-pillar, out the firewall and down the engine bay. Skirt past the exhaust and follow the trans down to the sensor that i installed in the port when i swapped my valvebody prior.


I'm going to start out by saying that my install will be different than most. The reason being is I have a deeper aftermarket pan with a drain plug and a pre-drilled and tapped sensor port. However I will provide the info to do it without an aftermarket sensor port or pan.
Things you'll need:
-Gauge, I went with GlowShift for looks and low price
-means to mount it, I went with a single pod A-pillar mount also from GlowShift
-Extra wire, to connect to the power and ground wires on the gauge to the battery, switched power, ground, and the optional dimmer power
-Butt connectors/solder equipment, to make all the connections
-Drill
-1/8" drill bit
-3/8 to 1/2" drill bit
-Phillips drill bit
To start, connect the quick plugs to the gauge and mount it into the pod. Just slides in, pretty tight. Then drill 4 holes, 1 in each corner, of the pod using the 1/8" bit. Now pop off the stock a-pillar and use the pod as a template to drill 4 more holes in the a-pillar for the screws included in the gauge kit. Will look like this when put together. 4 black dots are the screw caps that came included as well.
Next drill a hole with the bigger bit in the center of those 4 holes, should look like the 5 side of a pair of dice. This bigger hole is where the wires will go through the a-pillar. Run the gauge wires through the hole and splice some longer wire for each lead (orange wire on my kit gets spliced into headlight switch, dims the gauge 30% when headlights are on, optional and I didn't do it). Red is power, white is switched power (key on power, like the radio), and black is ground. Run the now longer wires down the A-pillar and out through the fuse panel.
Red power wire will go under the dash and through the firewall to the battery, or you can find another constant power source to splice into. Supposed to install a fuse as well but I neglected to. Oops. Ground I took one of the nuts off where the steering column bolts to the firewall and slipped an eyelet over one of the studs. I've used this point before so I knew it was a good ground. White switched power I spliced into an add-a-fuse I had for my LED lighting inside, plugged into the radio fuse.
Thicker black cord for the sensor will follow, down the a-pillar, out the firewall and down the engine bay. Skirt past the exhaust and follow the trans down to the sensor that i installed in the port when i swapped my valvebody prior.