Repairing stripped throttle body bolts.

Disclaimer: Links on this page pointing to Amazon, eBay and other sites may include affiliate code. If you click them and make a purchase, we may earn a small commission.

Wild one

Senior Member
Joined
Jan 17, 2016
Posts
23,788
Reaction score
54,731
Ram Year
14 Sport
Engine
5.7
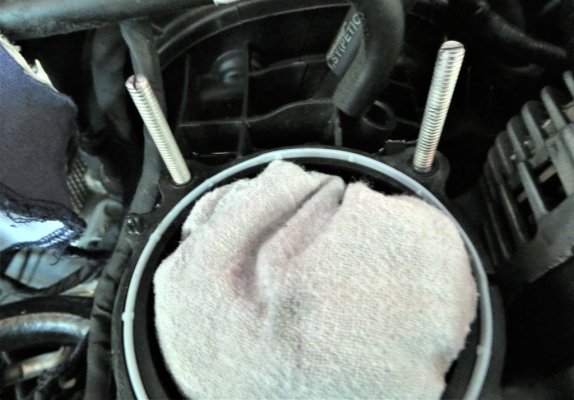
Just came back from fixing a neighbours stripped out throttle body bolts.Figured i'd repost this pic again of how i repair throttle body bolts that no longer bite into the manifold.
I run a 1/4" tap into the holes,i don't even drill the holes,just run a tap into the existing holes,then cut pieces of 1/4" ready rod/all thread to length,and thread them into the tapped holes,basically creating a threaded stud. If your holes are badly stripped out,and won't grab the ready rod good,you could use some JB Weld and glue them in place,but i've never had any that needed gluing.
It's a better fix then trying to rebuild the plastic holes so that the original bolts will thread back in,and alot cheaper then scrounging up another intake manifold, in my opinion.
Personally i think this is what they should have done instead of the goofy bolts threaded into a composite plastic manifold
 

Attachments

  • IMG_4250 (2).JPG
    IMG_4250 (2).JPG
    121 KB · Views: 26

Streetsport

Member
Joined
May 25, 2025
Posts
30
Reaction score
33
Location
Colorado
Ram Year
2013
Engine
5.7
I have 2 stripped bolts on mine right now, I see what you did there, it’s interesting. What would be your thought on ordering some sexy stainless flanged hex head bolts m6-1 x40mm and using a standard sized m6 thread repair system? The stock throttle body bolts are a random size and super garbage quality I guess because they can be, but seems like converting to a standard size bolt that looks good would be a nice upgrade
 

Ken226

Senior Member
Joined
Mar 12, 2017
Posts
2,300
Reaction score
5,956
Location
Washington State
Ram Year
2013
Engine
Hemi
Just my random thought of the day. I wonder if this would be a good application for some brass heat-set inserts.

I've been using them for years in 3d printed parts.

Years ago when I first started using them, I was worried that they might not be able to take much torque, so I tested some. In the smaller m3 and m4 sizes, the bolts break off before the inserts came loose. I never did that test with bigger sizes, but i've use alot in the m5-m8 sizes and never had one come loose.


In the smaller sizes, I just buy them in bulk on eBay, but for larger sizes I make them myself on my lathe.


The cheap kits on ebay have them up to 1/4-20 and even some M6 size inserts, which is probably what would be appropriate for this application:


Why do all the eBay links say "pardon our interruption"?


After melting them in, i press it the last few thousandths in with a 123 block, to insure a flush installation and prevent any raised plastic around the insert.


I've used them alot my some of my 3d printed designs and they hold up better than threading directly into plastic.

1749570368580.png


Disclaimer: Just my random thought of the day. If you try it and **** up your intake, don't blame me.
 
Last edited:
OP
OP
W

Wild one

Senior Member
Joined
Jan 17, 2016
Posts
23,788
Reaction score
54,731
Ram Year
14 Sport
Engine
5.7
All 3 are good ideas that'd probably work good to.The beauty of a stud,is once it's threaded in you don't remove it,and it helps displace the force loads and actually provides more clamping force then a bolt,hence why you replace head bolts with head studs in an engine with high cylinder pressures.Not that you really need a stud on a throttle body though,lol.
I normally just use what i have laying around,and i've got lots of ready rod on hand,in several sizes ;)
So far the ready rod studs have panned out well,as most guys stop reefing on the nuts long before the stud pulls out of the manifold.
I like your idea of the melted in insert Ken,that would probably be as good a fix as the ready rod stud idea over the long term
 

Ken226

Senior Member
Joined
Mar 12, 2017
Posts
2,300
Reaction score
5,956
Location
Washington State
Ram Year
2013
Engine
Hemi
Both are good ideas that'd probably work good to.The beauty of a stud,is once it's threaded in you don't remove it,and it helps displace the force loads and actually provides more clamping force then a bolt,hence why you replace head bolts with head studs in an engine with high cylinder pressures.Not that you really need a stud on a throttle body though,lol.
I normally just use what i have laying around,and i've got lots of ready rod on hand,in several sizes ;)
So far the ready rod studs have panned out well,as most guys stop reefing on the nuts long before the stud pulls out of the manifold.
I like your idea of the melted in insert Ken,that would probably be as good a fix as the ready rod stud idea over the long term

Yea, i prefer studs wherever I can use them too. With more threads in contact with the plastic manifold, it moves the alot of the weakness in the fastening system away from the expensive part and up to the nut/stud junction.
Just tends to be a stronger setup, with less risk of damaging the part. I'd tend to go that way too.


I think if i ever need to do this repair on mine, i'll do both. I'll install the heat set inserts, then install the studs into the threaded inserts with a drop of blue locktite on each stud/insert interface. The insert would provide alot of strength in torsion/moment, and pretty much eliminate the risk of overtightening to pull out the plastic threads. The huge increase in surface area due to the knurled surface of the inert would help prevent pulling out due to axial forces too.

Then, after I **** it up and ruin my intake, i'll order another one on eBay! :anitoof:
Just like I did with my headlights.
 
Last edited:
OP
OP
W

Wild one

Senior Member
Joined
Jan 17, 2016
Posts
23,788
Reaction score
54,731
Ram Year
14 Sport
Engine
5.7
Yea, i prefer studs wherever I can use them too. With more threads in contact with the plastic manifold, it moves the alot of the weakness in the fastening system away from the expensive part and up to the nut/stud junction. Just tends to be a stronger setup, with less risk of damaging the part. I'd tend to go that way too.


I think if i ever need to do this repair on mine, i'll do both. I'll install the heat set inserts, then install the studs into the threaded inserts with a drop of blue locktite on each stud/insert interface.

Then, after I **** it up and ruin my intake, i'll order another one on eBay! :anitoof:
Pretty hard to screw up the manifold to where it can't be repaired :Big Laugh: A stud into the heat insert would be a very good fix:waytogo:
 

Ken226

Senior Member
Joined
Mar 12, 2017
Posts
2,300
Reaction score
5,956
Location
Washington State
Ram Year
2013
Engine
Hemi
Pretty hard to screw up the manifold to where it can't be repaired

When I was a kid back in Oklahoma, my uncle's two favorite one liners were:

"Boy, you could **** up an anvil with a rubber mallet".

or

"Boy, you could **** up a wet dream with Elvis in it".

So, i'm confident that if it can be done, i can do it!
 
OP
OP
W

Wild one

Senior Member
Joined
Jan 17, 2016
Posts
23,788
Reaction score
54,731
Ram Year
14 Sport
Engine
5.7
When I was a kid back in Oklahoma, my uncle's two favorite one liners were:

"Boy, you could **** up an anvil with a rubber mallet".

or

"Boy, you could **** up a wet dream with Elvis in it".

So, i'm confident that if it can be done, i can do it!
Those are best 2 quotes i've heard in years Ken,damn near hit the floor laughing :Big Laugh: :Big Laugh::Big Laugh:
 

04fxdwgi

Senior Member
Joined
May 19, 2023
Posts
1,784
Reaction score
3,747
Location
Coastal NE North Carolina
Ram Year
2016 1500 Sport
Engine
5.7 Hemi
Just my random thought of the day. I wonder if this would be a good application for some brass heat-set inserts.

I've been using them for years in 3d printed parts.

Years ago when I first started using them, I was worried that they might not be able to take much torque, so I tested some. In the smaller m3 and m4 sizes, the bolts break off before the inserts came loose. I never did that test with bigger sizes, but i've use alot in the m5-m8 sizes and never had one come loose.


In the smaller sizes, I just buy them in bulk on eBay, but for larger sizes I make them myself on my lathe.


The cheap kits on ebay have them up to 1/4-20 and even some M6 size inserts, which is probably what would be appropriate for this application:


Why do all the eBay links say "pardon our interruption"?


After melting them in, i press it the last few thousandths in with a 123 block, to insure a flush installation and prevent any raised plastic around the insert.


I've used them alot my some of my 3d printed designs and they hold up better than threading directly into plastic.

View attachment 567863


Disclaimer: Just my random thought of the day. If you try it and **** up your intake, don't blame me.
Here is a really detailed process from the manufacturer . https://markforged.com/resources/blog/heat-set-inserts
 

MAJ_Charlie

Senior Member
Supporting Member
Joined
Nov 28, 2018
Posts
498
Reaction score
387
Location
VA and NC
Ram Year
2013
Engine
5.7
I put the AFE 90mm TB on my RAM a few days ago only to have two of the factory bolts strip out on the intake. I used the M5x0.8 heli-coil repair kit from NAPA. Unfortunately the only bolts I could find that were long enough were at Home Depot. They were the socket head bolts. I was able to source the flat washers from AutoZone. Found out 60mm was just a bit too long, but used extra washers to fill in the space. TB is definitely on there now. Decided to get shorter bolts, but now if feels like two of the heli-coil inserts are turning as well. Looks like I'll be doing the heat set inserts instead.
 
Last edited:

MAJ_Charlie

Senior Member
Supporting Member
Joined
Nov 28, 2018
Posts
498
Reaction score
387
Location
VA and NC
Ram Year
2013
Engine
5.7
Finally did the heat set inserts on mine today. Of course it didn't go "smoothly". Found out two of the four bolts were not tight. Won't be using the heli-coil inserts again. I went with the M5 size inserts since I wanted to have some "wiggle room" if all four were not to "exact" dimensions. The first one (driver's side front) was pretty easy. The second one (DS rear) didn't cooperate. After waiting for it to cool I attempted to put a test bolt in to see how straight it was. Was probably a "me" issue since the bolt wouldn't thread...then the insert started to spin. Removed that insert and put in another allowing it to sink deeper. While that was "cooling" I started on the third (PS rear). Was able to get it nearly aligned with DS front. Moved on to PS front and took some time to get it aligned with DS front and PS rear. Went back to DS rear, inserted a test bolt, but while removing the bolt this insert started to spin. Third try was the charm. Sunk this insert in even further. Let that one cool while I started on changing the plugs and coil packs. The plugs were definitely due for a change. Once I got all the plugs and coil packs done on the passenger side I went back to the DS rear insert. All was in order and I was able to put the TB back on and torque it to spec without any bolts spinning. If this hadn't worked I was going to end up doing the "stud" method. Small victory. As we all know...the plugs and coil packs on the driver's side are a major PITA to get to, but I was able to get it all done. Fired up and purrs like a kitten.

If you do the heat set inserts...be patient. Check your work with test bolts. Make sure you stuff a towel or something in the TB hole to prevent anything from accidentally falling into the manifold...making this a huge PITA. Eventually, I'll get around to installing my Jay Green .5HL cam, Hellcat lifters, and MDS delete plugs. Just not today.
 
Back
Top