HOW-TO: Custom Made LED Bed Light Kit For Under $50

Disclaimer: Links on this page pointing to Amazon, eBay and other sites may include affiliate code. If you click them and make a purchase, we may earn a small commission.

OnSale

5th Gen Crew
Joined
Nov 12, 2016
Posts
3,218
Reaction score
1,723
Location
Philadelphia, Pa
Ram Year
2020
Engine
Hemi 5.7L
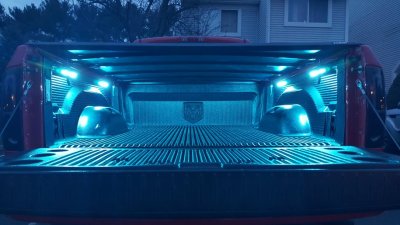
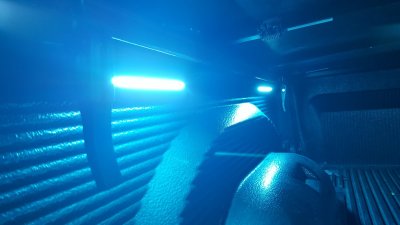
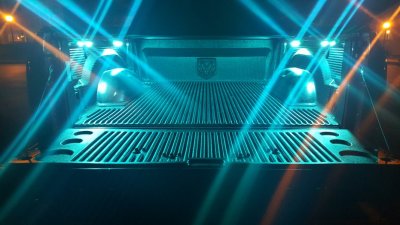
So I put on a Lund Tonneau Cover about a month ago and I found it near impossible to see under it at night, and even during a bright sunny day I couldn't see up front by the cab.

So I looked around online and saw a bunch of light kits but decided to head to Pep Boys and just make my own kit.

I will do my best to list everything I needed to buy, and the prices of each item. Some items were bought on pepboys.com with their 35% off discount with "pay in store" option, basically I walked around the store picking out what I needed and each item I picked up, I put in its product ID from the sticker on the shelf into pepboys.com's search bar and each item came right up, clicked add to cart, then selected "pay in store" and headed to the register. I also did this with my Lund Tonneau Cover and payed $276 after tax when the shelf price was $379.99.

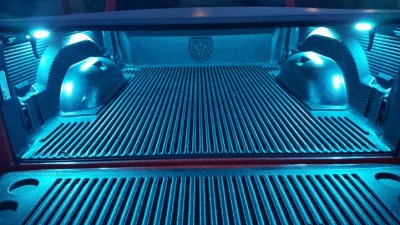
Pep Boys had 3 different styles of Pilot Automotive LED Bars. 4,500K Cool White, 6,500K Pure White and 10,000K Cool Blue. For this guide, I am using the 10,000K Cool Blue LED's.

List of stuff bought from Pep Boy's:

•• (2) Pilot Automotive 8" COB 10,000K LED Strips, Polar Blue - $25.98 ($12.99 each, normally $19.99 each)
•• (1) Littelfuse SMART FUSE MINI FUSE HOLDER - $1.62
•• (2) Lynx Primary Wire / Red / 28 Feet / 16g - $9.34 ($4.67 each)
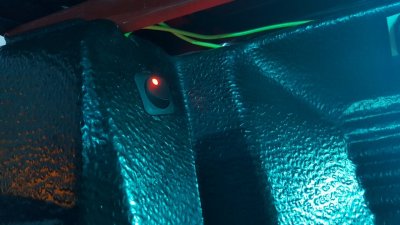
•• (1) Red LED On/Off Switch - $2.37 (normally $3.99)

Stuff Bought From Ace Hardware:
•• (1) 8 Pack of 18" Zip Ties - $3.99
•• (1) 100 Pack of 8" Zip Ties - $5.49

Total: $49.xx

Now I'm sure this could have been done for alot less, either by buying an already made kit online, buying cheaper LED'Strips online or by having all this stuff already except for the led lights, either way, I was happy with the outcome for under $50.

So first I tried to find a constant 12v wire in my 7 wire tow package harness. Members on this forum suggested that it was the Red wire with Violet Stripe on it. This was not the case for my truck. When I hooked up my multimeter to this wire I got no power at all. So I ran 2 wires from the back of the bed to the battery under my hood for the + and the - wires.

(... continued in next 2 posts...)
 

Attachments

  • 20161128_164512.jpg
    20161128_164512.jpg
    100.1 KB · Views: 73
  • 20161128_164517.jpg
    20161128_164517.jpg
    104.7 KB · Views: 69
  • 20161128_164522.jpg
    20161128_164522.jpg
    91.6 KB · Views: 64
  • 20161128_164532.jpg
    20161128_164532.jpg
    97.7 KB · Views: 64
  • 20161128_181001.jpg
    20161128_181001.jpg
    98.4 KB · Views: 70
Last edited:
OP
OP
OnSale

OnSale

5th Gen Crew
Joined
Nov 12, 2016
Posts
3,218
Reaction score
1,723
Location
Philadelphia, Pa
Ram Year
2020
Engine
Hemi 5.7L
Part 2

☆☆☆☆☆ HOW-TO GUIDE ☆☆☆☆☆

*** This guide was written using the above items, and will vary for each person doing this, depending on year of truck and other features (short/long bed, regular/quad cab etc). ***

DISCLAIMER: USE THIS GUIDE AS A REFERENCE! I AM NOT RESPONSIBLE FOR ANY DAMAGE THAT MAY RESULT FROM FOLLOWING THIS GUIDE. BY CONTINUING TO READ THIS GUIDE, AND BY FOLLOWING THE STEPS, YOU ARE AGREEING TO RELEASE ME OF ANY LIABILITY OR WRONGDOING FOR ANYTHING THAT MAY GO WRONG OR GET DAMAGED BY FOLLOWING THIS GUIDE. IF YOU CONTINUE AND USE THIS GUIDE, YOU DO SO AT YOUR OWN RISK AND WITH THE UNDERSTANDING THAT I AM NOT RESPONSIBLE FOR ANY DAMAGE YOU MAY CAUSE.

YOU ARE DOING THIS AT YOUR OWN RISK! I AM NOT RESPONSIBLE FOR ANYTHING YOU DO WRONG. IF YOU DONT FEEL COMFORTABLE OR EXPERIENCED ENOUGH TO CONFIDENTLY COMPLETE THIS MOD, PLEASE HAVE THIS DONE BY A PROFESSIONAL!!!

________________________________________________

Step 1: Testing & Mounting LED Bars

Take all of your LED strips and test them to make sure they work before you do all this work and they end up being defective. If you bought the same exact Pilot Automotive LED Bars that are listed above, they have a battery pack inside to test one of the light bars on store shelves. Simply cut the wires off, strip an inch or so, and now you have a battery tester for each led strip. Just connect the wires from the battery box to the wires on the LED Bars and you will see if they work properly.

Next, decide where you want the led strips to be placed. Then take the 3M double sided tape that came with the LED's and apply it to the back of the led bar. Then mount them and make sure to apply lots of pressure so they stick nice and good. Do this to all 4 (or 2 if you only bought 2).

Step 2: Combining Wires

Once you have the LED bars mounted, you want to combine the wires on each side. Starting on the driverside of the bed, take the black/white wire from the led bar closest to the cab and the black/white wire from the 2nd led bar, the one closest to the tailgate, twist them together and put both of them into the same end of a connector, making sure to crimp it tightly and leaving the other end of the connector open. Do the same for the black wire for both driverside lights. Repeat this step for the passenger side led bars until you have 2 combined sets of wires on each side of the bed.

Step 3: Removing Taillights + Cutting Hole For Switch

Take a T25 torx driver (or bit) and remove the 2 t25 torx bolts that hold in each taillight. Pull both taillights off and put them in a safe place where they won't get scratched. Now, decide which side you want to have your switch at. (For this how-to, we will go with installing the switch inside the bed, behind the driverside taillight, near the top of the bed. This guide will show you how to install the switch into a truck with a plastic bed protector cover.)

Take a drill, or dremel and cut a hole in your plastic bed cover. If you dont have a plastic bed cover, then cut into the metal of your bed. Make sure to not make the hole to big as you only have 1 shot at this. What I did was measure my switch and found it was 1 inch by 1inch. So I took a 1/2 inch drill bit and drilled a 1/2 inch hole into my plastic bed cover. Then I took my dremel and put on a heavy grit sandpaper tip (200-400) and I slowly rounded out the hole bigger and bigger, stopping every second or two and trying to fit the switch into the hole. Once i was able to push my switch into the hole WITH SOME FORCE AND EFFORT, I put a fine grit sandpaper tip on my dremel and cleaned up the opening, making sure NOT to enlarge the opening!! Your hole for you switch should be TIGHT when you try to push the switch into it. DO NOT OVER CUT your hole because it will become too loose and the switch will just fall out. If you accidently make the hole too big, once your are 100% done this install and everything is complete, use some RTV silicone on the inside lip of your switch and put it in place. Apply pressure for 1 or 2 minutes and it should hold your switch into place, aslong as your hole isn't so big, your switch falls through it. If that happens, you need to either buy a bigger switch, or make a new hole somewhere else.

Remove the switch, set it aside and proceed to the next step.


Step 4: Running 12v + wire and - Wire

You want to take your spool of wire you bought and take one end and put it through the switch hole you just made and then run it thru the factory cut 1 inch hole that's already in the bed which should be right behind the hole you drilled. This factory cut hole leads to the open taillight area. Pull the wire thru the small opening and out into the area the taillight would normally sit. Pull the entire spool of wire thru, but be sure to leave about 6 inches of wire sticking out the switch hole. What I did was take an old pair of scissors and tied the 6 inches of wire sticking out the switch hole in a knot around the scissor handle so the wire wouldn't accidently get pulled through the switch hole later on. I did this with all wires after this, so none of them would get pulled out when running other wires.

Once you have the wire coming out the taillight area, put it back in the taillight area and drop it down so it falls out the bottom of the truck, the open area of the taillight has an opening at the bottom, pull the wire all the way through so now it's all under the truck and on the ground except what's running up into the taillight area and out the switch hole.

Stretch the wire out and run it up under the truck all the way up to underneath the engine. An easy way to reach the wire and pull it up through the engine bay so you can get to it from above the engine, is take an old strip of wire or a long piece of string and tie the one end (string or old wire) in a knot around something by the headlight or radiator and drop the other end down into the engine bay so it lands on the ground. Go under your truck and tie the old wire or string around the new wire you just ran from the back of the truck. Go back to standing above your engine bay and pull the string or old wire until the new wire is up and out in your hand. Put on a circle connector (to connect to your battery terminal bolt) and crimp it. Let this wire sit for now in the engine bay. I tied mine around another wire so it wouldnt fall down to the ground. We will come back and connect this wire later.

****OPTIONAL STEP**** You can run a ground to anywhere at the back end, but I chose to run my ground wire to the negative terminal of my battery. Just follow the same steps described above in step 4. Or you can run your ground to something near your tailgate. Just make sure it's a good ground on pure metal, with no paint.


(...continued in next post...)
 
OP
OP
OnSale

OnSale

5th Gen Crew
Joined
Nov 12, 2016
Posts
3,218
Reaction score
1,723
Location
Philadelphia, Pa
Ram Year
2020
Engine
Hemi 5.7L
Part 3

Step 5: Connecting The LED Wires

Connect your 12v + wire you ran to the battery, to the LOAD part of your switch. My switch had a male post, and luckily I had female connectors that matched the posts size, so I just crimped the connector onto the wire and now I can just quick connect/disconnect my wires from my switch.

Go back to the wires on the LED lights. On the FAR side, the passenger side (or whichever side you DID NOT install the switch on) and grab the 2 black/white wires that you combined into the same end of a connector earlier. You should have an open end on the connector, take a new piece of wire and connect it. Run that wire behind your plastic bed cover and into the area behind your passenger taillight (which should be removed already). Once you have the wire inside the taillight area, drop it down so it comes out underneath the truck to the ground. Proceed to run the wire across to the driverside, making sure to hide it up under the bed/bumper. Run the wire up into the driverside taillight area. (Easiest way to do this is drop an old wire (or string) down through the taillight to the ground. Make a knot around your new wire and proceed to pull the old wire (or string) until your new wire comes up through and into your hand.) Once you have the wire inside the driverside taillight area, fish it through the factory hole the other wires (12v + and - ground) are going through and pull it out the switch hole. Do the exact same thing for the 2 Black wires you combined into 1 from the other LED's on the passenger side until they too are ran out the taillight, under the bed, and up into the driver taillight and out the switch hole.

Now on the driverside (or whichever side is the closest to the switch) take the 2 black/white wires you connected into the same end of a connector and put a new wire into the open end of the connector. Crimp it and run it behind your plastic bed cover until your behind the switch hole you drilled. Run the wire out the switch hole and let it sit. Do the same for the 2 black wires you put into the same end of a connector.

Step 6: Connecting all the wires together

Now that your wires from the passenger side (or far side) are ran to the driverside (or close side) of the bed take the black/white wire from the driverside LEDS and take the black/white wire from the passenger side LED'S and put both wires into the same end of a connector. The other (open end) of the connector, take a new piece of wire, put it in the open end of the connector, Crimp it and run this to the POWER/ON post of the switch.

Do the same thing as above for the Black wires from the passenger side LED and driverside LED. Make sure you take the ground wire you either ran to the battery earlier or if you decided to ground it elsewhere, make sure you put that wire inside the SAME SIDE of the connector with the 2 combined black wires from both sides of the led lights. Connect all 3 of them into the same side of a connector. Then run a new wire into the other open end of the connector and once you Crimp it, run that wire to the GROUND/OFF post of your switch.

Step 7a: Adding Inline Fuse

This step is optional, although I highly recommend it. Take the power wire you ran from the bed to the battery. Cut the wire about 8-10 inches away from the battery. Wire in the inline fuse, either soldering it or using connectors. Install a 15a fuse into the fuse box on the wire.

Step 7b: Connecting 12v + Power and - Ground
Connect your 12v power wire either to your battery or whatever wire you chose to tap into. Do the same for your ground wire.

Now test your bed lights!!! If they work, congratulations!! Now go back to your bed, you can finally push your switch into the hole because it will be in their for good now and make sure it's nice and tight. If for some reason it's loose, add some RTV silicone around the inside lip of the switch so it seals.

Be sure to tuck away and hide all your wires behind your plastic bed cover and anywhere else you ran wires. Be sure to zip tie ANY wires you ran underneath your truck and inside your engine bay. You do not want any wires to fall and hang down while your drivingband you don't want any wires being loose in your engine bay and getting stuck in your fans or pulleys or anything.

Step 8: Clean Up And Enjoy!!
Clean up your tools, crack open a brewski (or soda for you non-alcoholics and under 21 members) and enjoy your new 10,000K LED Bed lights!!!
 
Top