which bulbs for 2013 Ram?

Disclaimer: Links on this page pointing to Amazon, eBay and other sites may include affiliate code. If you click them and make a purchase, we may earn a small commission.

jawzs2

Senior Member
Military
Joined
Mar 24, 2014
Posts
1,871
Reaction score
2,301
Location
South Jersey
Ram Year
2010, 2014
Engine
1500, 3500
That's it, pretty straightforward install.

The bulbs I got came with a new seal, unless you're referring to something else. Doesn't make a difference on the alcohol, one is just a diluted version of the other. I plugged my bulbs in and turned on the headlights to check them before I bolted the housing back up, but all four of mine were working before I started.
 

Sherman Bird

Senior Member
Joined
Jun 28, 2019
Posts
1,552
Reaction score
2,352
Location
Houston, Texas
Ram Year
1998
Engine
5.2
In my case, I have a shop and an air compressor. I took my tail light assemblies, cleaned them, and used throttled compressed air to dry the insides as much as was possible, and repaired the cracks as I previously stated. I could not get every last drop of moisture out of either of them, so, I just left them on the workbench overnight, and let my dehumidifier do it's magic. Next morning, I put them back together noticing a slight bit of fogginess in the back up light compartment on both units.

After she drove the car a few days, the heat of the bulbs, combined with a now weather tight repair done to the light fixtures, the fog was gone... the vents allowing the small amount to escape!
 

Sherman Bird

Senior Member
Joined
Jun 28, 2019
Posts
1,552
Reaction score
2,352
Location
Houston, Texas
Ram Year
1998
Engine
5.2
That's it, pretty straightforward install.

The bulbs I got came with a new seal, unless you're referring to something else. Doesn't make a difference on the alcohol, one is just a diluted version of the other. I plugged my bulbs in and turned on the headlights to check them before I bolted the housing back up, but all four of mine were working before I started.
alcohol is so chemically active, that I choose to use a high quality glass cleaner, plus I wear nitrile gloves to handle the bulbs in the first place, to keep sebaceous oils from my skin off the glass.
 

jawzs2

Senior Member
Military
Joined
Mar 24, 2014
Posts
1,871
Reaction score
2,301
Location
South Jersey
Ram Year
2010, 2014
Engine
1500, 3500
alcohol is so chemically active, that I choose to use a high quality glass cleaner, plus I wear nitrile gloves to handle the bulbs in the first place, to keep sebaceous oils from my skin off the glass.

Yes, I agree, alcohol actively interferes with the chemical reaction in my brain :).

Unless you are extremely diligent about getting the bulb absolutely clean, it can leave a film on the glass, but yes, a good ammonia-based glass cleaner will work as well.
 
OP
OP
B

bcraig

Member
Joined
Jul 15, 2016
Posts
68
Reaction score
9
Ram Year
2013
Engine
5.7 Hemi
That's it, pretty straightforward install.

The bulbs I got came with a new seal, unless you're referring to something else. Doesn't make a difference on the alcohol, one is just a diluted version of the other. I plugged my bulbs in and turned on the headlights to check them before I bolted the housing back up, but all four of mine were working before I started.
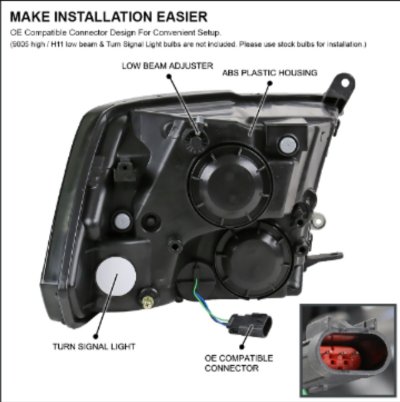
I am talking about the cover that goes on the head light housing after the bulb has been put in to seal the Headlight
Where there is a roumd piece that says ABS plastic Housing.
Given that I am already habing a lot of condensation inside the headlights I am just wanting to keep as much moisture from entering the headlight as possible while i am in there as possible.

It may and probably is ok to use either type of alcohol to clean the bulbs,I was just thinking that maybe the stronger Alcohol would somehow clean the bulbs better ehich in turn would mean less of a chance for oil contamination and longe lasting bulbs.
And I sure want them to last as long as possible as the cost was $20.74 for the 2 Phillips H9 bulbs and $53.16 for the 2 Phillips 9011 Bulbs plus 7% tax came to a total of $79.07 with free shipping.
Plus the hassle of having to disasemble the truck to change the bulbs !lol

And for sure want to test the bulbs before the reassembly .
 
OP
OP
B

bcraig

Member
Joined
Jul 15, 2016
Posts
68
Reaction score
9
Ram Year
2013
Engine
5.7 Hemi
In my case, I have a shop and an air compressor. I took my tail light assemblies, cleaned them, and used throttled compressed air to dry the insides as much as was possible, and repaired the cracks as I previously stated. I could not get every last drop of moisture out of either of them, so, I just left them on the workbench overnight, and let my dehumidifier do it's magic. Next morning, I put them back together noticing a slight bit of fogginess in the back up light compartment on both units.

After she drove the car a few days, the heat of the bulbs, combined with a now weather tight repair done to the light fixtures, the fog was gone... the vents allowing the small amount to escape!
Good deal !
Glad you got them 'fixed without the condensation !
 
OP
OP
B

bcraig

Member
Joined
Jul 15, 2016
Posts
68
Reaction score
9
Ram Year
2013
Engine
5.7 Hemi
I am talking about the cover that goes on the head light housing after the bulb has been put in to seal the Headlight
Where there is a roumd piece that says ABS plastic Housing.
Given that I am already habing a lot of condensation inside the headlights I am just wanting to keep as much moisture from entering the headlight as possible while i am in there as possible.

It may and probably is ok to use either type of alcohol to clean the bulbs,I was just thinking that maybe the stronger Alcohol would somehow clean the bulbs better ehich in turn would mean less of a chance for oil contamination and longe lasting bulbs.
And I sure want them to last as long as possible as the cost was $20.74 for the 2 Phillips H9 bulbs and $53.16 for the 2 Phillips 9011 Bulbs plus 7% tax came to a total of $79.07 with free shipping.
Plus the hassle of having to disasemble the truck to change the bulbs !lol

And for sure want to test the bulbs before the reassembly .
I got to looking at the link that I provided and I thought it would go directly to the image that I wanted to show but it did not so if you use the link it starts at the top and you have to scroll down from the top image down I think to the 10 image down on the left where it shows the backside of the headlight.
It says eBay right beside the image.
 

RamDiver

Senior Member
Joined
Jan 23, 2022
Posts
2,141
Reaction score
3,526
Location
Marlborough, Ontario, Canada
Ram Year
2021
Engine
Hemi 5.7
I got to looking at the link that I provided and I thought it would go directly to the image that I wanted to show but it did not so if you use the link it starts at the top and you have to scroll down from the top image down I think to the 10 image down on the left where it shows the backside of the headlight.
It says eBay right beside the image.

Is this the view you were looking for?

Quad headlight backside.jpg


I recently changed the bulbs on a friend's 2014 Electra GT that had projector housings.

They were a serious PITA to unthread the back covers, the gromets or O-rings seemed to be dried out and sticking.

After removing the covers and O-rings, I lubed them with food-grade silicone which made the covers much easier to open & close.

Adding a thin layer of food-grade silicone will likely prevent or at least reduce moisture ingress too.

I keep a big tub of food-grade silicone primarily for use on scuba mask skirts but it has many other household uses too.

Don't use petroleum jelly, it will slowly cause the disintegration of silicone seals and gaskets.

.
 
OP
OP
B

bcraig

Member
Joined
Jul 15, 2016
Posts
68
Reaction score
9
Ram Year
2013
Engine
5.7 Hemi
Yes that is the image that I was wanting to show.
Thanks for posting it and thanks for the information
 
OP
OP
B

bcraig

Member
Joined
Jul 15, 2016
Posts
68
Reaction score
9
Ram Year
2013
Engine
5.7 Hemi
Now I am having another issue in that I cant get the Headlight to come out !
I have the top and bottom bolts out and the Headlight capture pushed up through fender well and can get movement but unable to get the headlight removed.
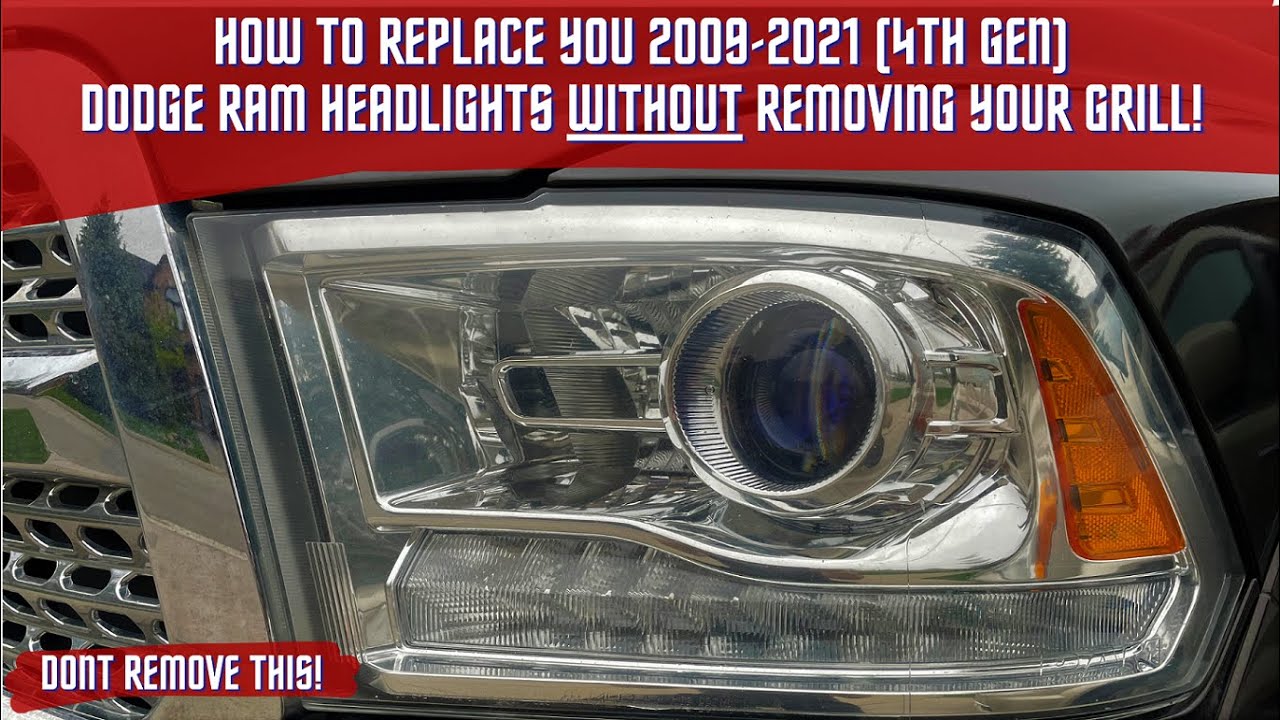
I have even tried this video to help but I am not sure this applies to my 2013 Ram 1500 with Hemi engine and Quad lights That my truck has.
or maybe I am just putting enough pressure ?
Anyway before I mess something up I wanted to Ask here .
Thanks
 

RamDiver

Senior Member
Joined
Jan 23, 2022
Posts
2,141
Reaction score
3,526
Location
Marlborough, Ontario, Canada
Ram Year
2021
Engine
Hemi 5.7
Now I am having another issue in that I cant get the Headlight to come out !
I have the top and bottom bolts out and the Headlight capture pushed up through fender well and can get movement but unable to get the headlight removed.
I have even tried this video to help but I am not sure this applies to my 2013 Ram 1500 with Hemi engine and Quad lights That my truck has.
or maybe I am just putting enough pressure ?
Anyway before I mess something up I wanted to Ask here .
Thanks

Wow!

They have some great details in that video, but there are too many errors for my liking.
Don't ever follow the directions for installing LED bulbs, they're sloppy and wrong.

First, I have no experience with Quad headlight housings, only projectors (the same as the video demo). So, any references I make are for projector housings and I'm not positive they apply to the quads but, if I had to guess, they are the same for attachment points.

I've taken mine off a few times now and have picked up a few tricks to make it easier, from my POV.

I've removed the grill every time because I decided the extra time required for the grill removal would be saved later and make the headlight extraction/installation far easier. The first time, I broke no clips on the grill, the third time, I found 1 broken clip from removal #2 and may have broken a second on removal #3.

When I reassembled the grill, it seemed pretty secure so I have no immediate plans to replace the broken clips. I do plan to purchase a monster bag set of clips from Amazon at some near future date and be ready for the next grill removal event.

Once you have the 2 bolts removed and are confident that the inside capture clip is fully released, try this technique I used during my last removal.

Reach through the inner fender hatchway, locate the lower corner of the housing, and push it forward while holding your other hand on the outside of the housing. I have a size large hands and didn't have too much difficulty finding a spot to push the housing forward.

If your hands are too large or if you feel that you can't get enough forward movement of the housing, I would try using a soft silicone screwdriver handle or something similar to push on the backside of the housing.

I may try this technique on my next R&R. Just be careful about what you're pushing against, the wiring connector may be close.

.
 
Last edited:
OP
OP
B

bcraig

Member
Joined
Jul 15, 2016
Posts
68
Reaction score
9
Ram Year
2013
Engine
5.7 Hemi
Wow!

They have some great details in that video, but there are too many errors for my liking.
Don't ever follow the directions for installing LED bulbs, they're sloppy and wrong.

First, I have no experience with Quad headlight housings, only projectors (the same as the video demo). So, any references I make are for projector housings and I'm not positive they apply to the quads but, if I had to guess, they are the same for attachment points.

I've taken mine off a few times now and have picked up a few tricks to make it easier, from my POV.

I've removed the grill every time because I decided the extra time required for the grill removal would be saved later and make the headlight extraction/installation far easier. The first time, I broke no clips on the grill, the third time, I found 1 broken clip from removal #2 and may have broken a second on removal #3.

When I reassembled the grill, it seemed pretty secure so I have no immediate plans to replace the broken clips. I do plan to purchase a monster bag set of clips from Amazon at some near future date and be ready for the next grill removal event.

Once you have the 2 bolts removed and are confident that the inside capture clip is fully released, try this technique I used during my last removal.

Reach through the inner fender hatchway, locate the lower corner of the housing, and push it forward while holding your other hand on the outside of the housing. I have a size large hands and didn't have too much difficulty finding a spot to push the housing forward.

If your hands are too large or if you feel that you can't get enough forward movement of the housing, I would try using a soft silicone screwdriver handle or something similar to push on the backside of the housing.

I may try this technique on my next R&R. Just be careful about what you're pushing against, the wiring connector may be close.

.
Yea that is my issue in not knowing where to push against and how hard to push against it.
Does the bottom bolt have to be taken completely out?

I have turned the bottom bolt at least a zillion times(well maybe)!
And it feels like it is loosened all it is going to but has not come out with 10 mm socket.
 

RamDiver

Senior Member
Joined
Jan 23, 2022
Posts
2,141
Reaction score
3,526
Location
Marlborough, Ontario, Canada
Ram Year
2021
Engine
Hemi 5.7
Yes, both bolts on the housings must be completely removed.

The bottom bolt threads into a sort of floating adjuster nut. Compare the bottom bolt receptacle end on both sides and you will get an idea.

The last one I took apart, the nut stayed attached to the bolt and spun, the screw never released.

I used a large set of needle nose pliers to hold the nut portion and un-threaded the bolt completely so it could be lifted away.

If the bolt is not completely removed, the housing can't be removed.

Once both bolts are removed, the housing is only held in place by a knuckle, pressed into a fitting.

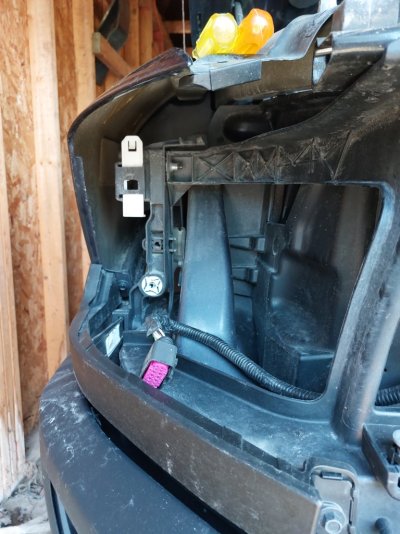
I'm not certain if the white fitting on the lower left, just above the electrical connector, is the receptacle for the knuckle or if it's the opening immediately above that.

It's one of those. If I had to guess, I'd say it's the hole immediately above the white fitting. :cool: Passenger side is shown.

20240410_162754.jpg


So, when reaching through the inner fender hatchway, press on the lower outside corner of the housings, which will be immediately below the knuckle receptacle.

The first couple of times that I removed the housings, I was able to pull from the front while holding the back edge with my fingernails.

Then I discovered that pressing them out from the backside was much easier.


The first couple of times, removing the electrical connector was easy, but then it became a PITA.

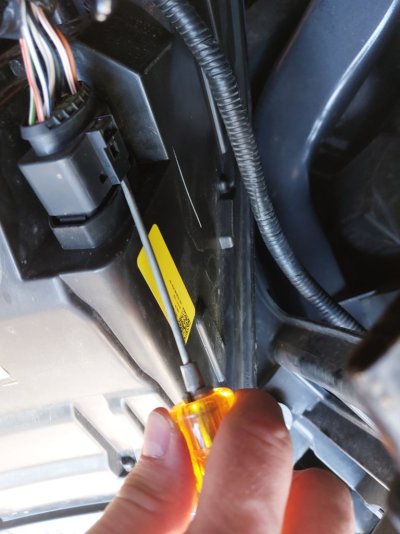
After some experimentation, I found a simple method. I used a 1/8" slot drive, slipped it into the notched opening and gently pried up while pulling on the connector.

20240410_163053.jpg

.
 
Last edited:

18CrewDually

Senior Member
Joined
Nov 17, 2019
Posts
2,042
Reaction score
2,618
Location
U.S.- New Jersey
Ram Year
2018
Engine
Cummins 6.7 H.O.
Yea that is my issue in not knowing where to push against and how hard to push against it.
Does the bottom bolt have to be taken completely out?

I have turned the bottom bolt at least a zillion times(well maybe)!
And it feels like it is loosened all it is going to but has not come out with 10 mm socket.


I posted in your other thread. See my reply there. But that bottom bolt is also the adjuster Nut. You have to hold the adjuster Nut while unscrewing the bolt. YOU NEED TO REMOVE THE GRILL so you can hold the Nut. Shortcuts aren't helping here, pull the grill.
 
OP
OP
B

bcraig

Member
Joined
Jul 15, 2016
Posts
68
Reaction score
9
Ram Year
2013
Engine
5.7 Hemi
I decided to remove the grill and it worked.
They just made it look so easy without removing it.

Both headlights had at least an inch and a half of water sitting in the bottom.

I pulled the Vents and blew though them best I could and they got a tiny bit better as they had water in them,also did not push them on all the way.

Barely any air would blow through the screens.

And the high beam that was out on the passenger side was broke and at least 75% missing.

As far as changing from H11 bulbs to the H9 bulbs all I need to do is take the plastic tab off the inside of the female end at the top and take a little off the metal piece on the left side ?

Do I need to get some dialectic grease or will regular wheel bearing grease work ?
 
OP
OP
B

bcraig

Member
Joined
Jul 15, 2016
Posts
68
Reaction score
9
Ram Year
2013
Engine
5.7 Hemi
Also will I need to do the same thing with the 9011 bulbs ?
 

Sherman Bird

Senior Member
Joined
Jun 28, 2019
Posts
1,552
Reaction score
2,352
Location
Houston, Texas
Ram Year
1998
Engine
5.2
I decided to remove the grill and it worked.
They just made it look so easy without removing it.

Both headlights had at least an inch and a half of water sitting in the bottom.

I pulled the Vents and blew though them best I could and they got a tiny bit better as they had water in them,also did not push them on all the way.

Barely any air would blow through the screens.

And the high beam that was out on the passenger side was broke and at least 75% missing.

As far as changing from H11 bulbs to the H9 bulbs all I need to do is take the plastic tab off the inside of the female end at the top and take a little off the metal piece on the left side ?

Do I need to get some dialectic grease or will regular wheel bearing grease work ?
Wheel bearing grease is flammable, so, there's that!
 
OP
OP
B

bcraig

Member
Joined
Jul 15, 2016
Posts
68
Reaction score
9
Ram Year
2013
Engine
5.7 Hemi
Anyone have a link to modifying the 9011 Replacement bulb ,or can tell me in detail how to do it ?

Also when I clean the bulbs with Alcohol clean with toilet paper,paper towel or a clean wash rag,shop rag ?
 

RamDiver

Senior Member
Joined
Jan 23, 2022
Posts
2,141
Reaction score
3,526
Location
Marlborough, Ontario, Canada
Ram Year
2021
Engine
Hemi 5.7
Also when I clean the bulbs with Alcohol clean with toilet paper,paper towel or a clean wash rag,shop rag ?

I'd say, dealers choice.

Using alcohol is primarily to remove any oil residues caused by skin contact or handling.

I usually used a paper towel with alcohol or peroxide, whatever was handy.

Some shop rags have leave more lint buildup than I'd prefer on a halogen bulb.

Those things run kind of hot.

.
 
Top