MarineBSP
Senior Member
My 2018 RAM 1500 has about 90K miles and five Minnesota winters. I recently did a full brake job on all four corners . . . in the process I realized I needed new Parking Brakes (PB’s) and their hardware too.
For those of you who may replace your PB’s (and rear brakes), this is my “Road Map to Avoid Frustration” – hope it helps someone who doesn’t do this every day. I link one video (there are lots) on removing stuck RAM rear rotors by pressing them off, and I link two videos on PB replacement – these are the only ones I’ve found so far that cover the removal and installation of the PB actuator levers. Here’s my take on
1) Removing the rear rotors: If you live anywhere near salt, step one is to FULLY run the star wheel adjusters as short as possible (PB’s loose means the star wheel bolt screwed fully into the barrel). The star wheels are behind rubber plugs in each backing plate. To “loosen” the PB’s turn the star wheel teeth toward the axle.
The two sides use the same PB hardware, but flipped – Driver side, turn teeth toward the axle (down); Passenger side, turn the teeth toward the axle (up). In case this is new to you, imagine all the PB parts behind the rear rotor are attached to the drive shaft and flip the left side parts 180 degrees around the drive shaft to put them on the right side. Springs and actuator levers have the same front-back orientation on both sides, but they are upside down from each other.
2) Remove and hang the caliper, remove the caliper bracket, and remove any disk retainer clips on the studs. TRY to remove the rotor by hand. If the rotor doesn’t move and has been on five years or more, I advise watching this Stuck Rotor Removal LINK. Pressing a stuck rotor off the hub and PB assembly is the best removal method I’ve found and saves the risk & inconvenience of using a torch.
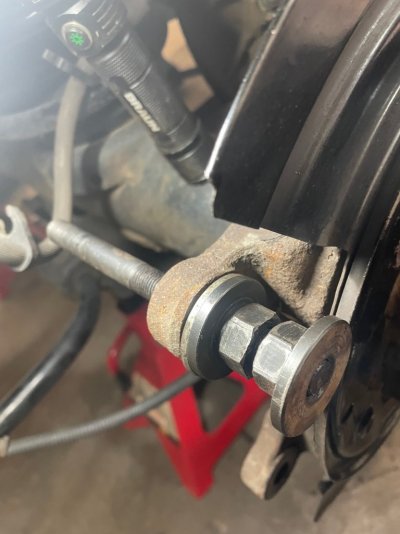
I used a slightly different procedure than the video – 2 large bolts or threaded rods, 4 nuts, and 2 washers. The bolts need to pass through the 14mm diameter caliper bracket mounting holes, and threaded portions need to be at least 3 inches long. 12mm or 1/2” are good diameters for these bolts and nuts. Use either metric 10.9 or SAE grade 8 for strength, and apply grease. I put the washer between the axle ear and the inner nut, with grease on both sides of the washer and on the bolt threads. I put the (optional) nut against the rotor just bottomed on the end of the bolt and on the rotor. With tension on the nuts, I turned only the inner one (against the axle ear), and the pressure kept the bolt (threaded rod for me) from turning. I used threaded rods and nuts from a bushing puller set I have (see photo – but I used 2 sets). Press until you get the first clunk of release; remove some pressure and check to see if the rotor is loose. If it is not loose, rotate the rotor about half a turn, then repeat pressing until the rotor moves again. When you get the first rotor off, take a break & celebrate for a few minutes, because the second one might be worse!
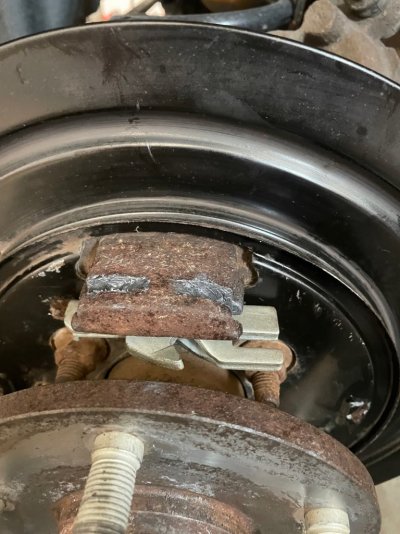
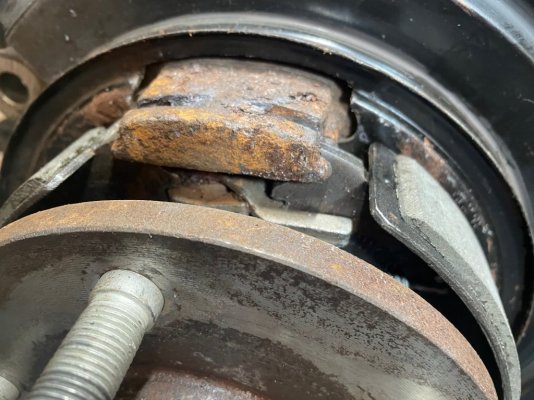
3) Before you disassemble the PB pads and hardware, take pictures with your phone. You’ll save time surfing to find how things go back together. The pad lining may have parted from the metal backing and wedged itself over part of the pad that still has its lining – this was part of why one of my rotors was so stuck.
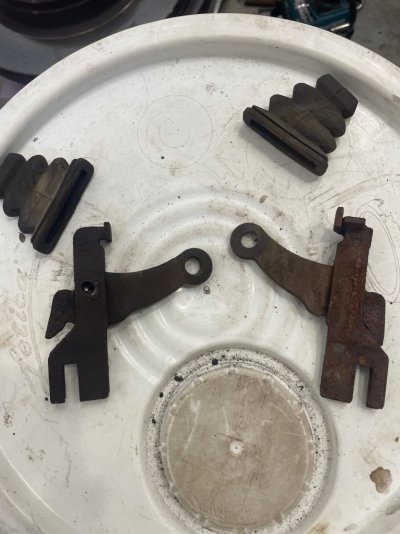
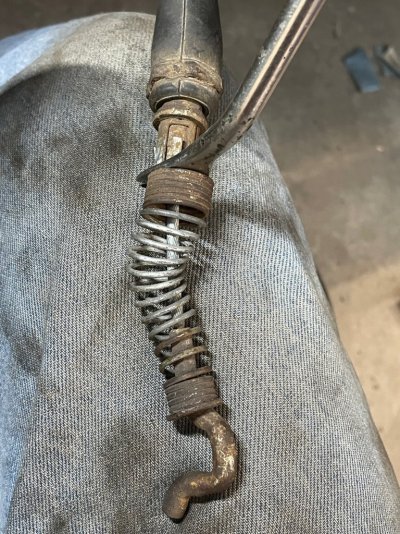
4) Rust ! On my Driver side, as I removed the front PB shoe, it wouldn’t part from the PB lever. Then I noticed how the lever was rusted solid and wouldn’t move on its pivot pin. This meant it was not working, AND it means I could not remove it without some extra work. It also meant I needed new actuator levers, and it meant that I needed to compress the PB cable spring and remove it from the axle so I could remove the lever. See these: PB Link 1 and PB Link 2. The barbs on the PB cable end and the very strong cable spring make the task challenging. I used a trim tool to hold the spring back and a small hose clamp like a miniature piston ring compressor to compress the barbs (see photo and PB Link 2).
5) Once the cable end is removed, how do you get that actuator lever to move so you can remove it? As in PB Link 1, I removed the rubber boot first. Access is awkward. My large adjustable plumbers’ pliers and my screw clamp had bad angles and failed to move it. I had just enough space to drill out the pivot pin in the lever using a new 3/16” Cobalt drill bit. There was rust on all the surfaces of the lever’s “sandwich” joint, and the pin is also a rivet holding the sides of the lever body together. Drilling it out released enough pressure that my large adjustable plumbers’ pliers could make the lever move the amount necessary to remove it from the backing plate.
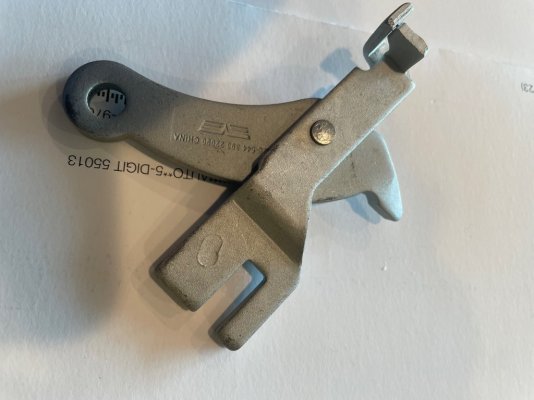
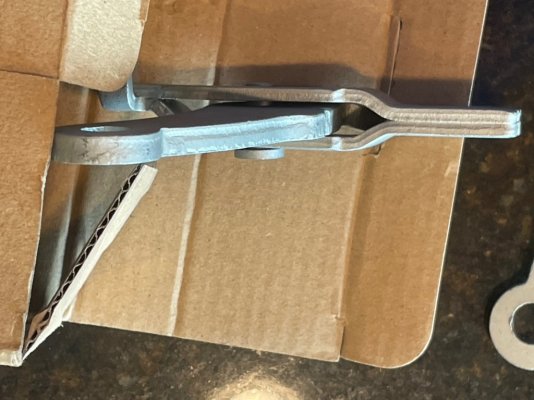
6) New PB parts came from Napa (brake pads, hardware kit) and RockAuto (Dorman PB actuator levers). The parts from Napa looked on par with the OE parts I was replacing. The Dorman levers are good quality, but the pivot pins for the levers are not flush like Mopar, and there’s significant clearance at the pivot joint. I think this added clearance is intentional, and these levers will need a lot more corrosion to freeze up like the OE parts did.
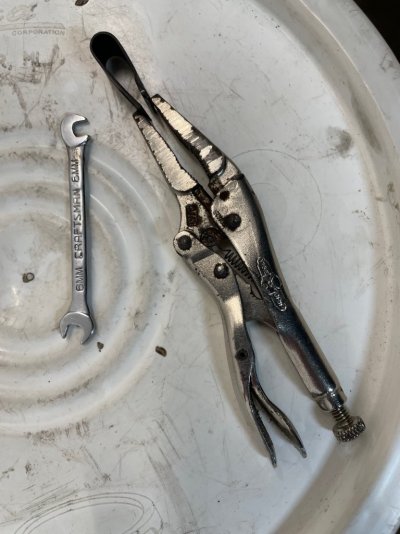
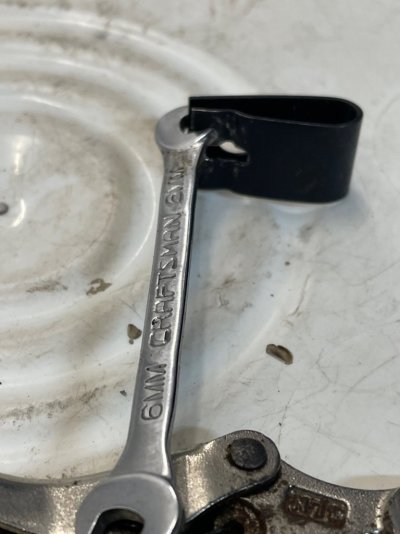
The new hardware uses “quarter-turn” PB pad retaining clips and pins. I found these hard to install until I used a small 6mm ignition wrench to hold the clip compressed. This let me set the compressed clip in place over the locating pin, give it a quarter turn, and remove the wrench to release the clip (photo).
I’ll finish with two thoughts: I should have inspected my RAM parking brakes earlier, and it would have been nice to have the videos linked in this post as my initial reading before starting my PB replacement.
 .
.
For those of you who may replace your PB’s (and rear brakes), this is my “Road Map to Avoid Frustration” – hope it helps someone who doesn’t do this every day. I link one video (there are lots) on removing stuck RAM rear rotors by pressing them off, and I link two videos on PB replacement – these are the only ones I’ve found so far that cover the removal and installation of the PB actuator levers. Here’s my take on
1) Removing the rear rotors: If you live anywhere near salt, step one is to FULLY run the star wheel adjusters as short as possible (PB’s loose means the star wheel bolt screwed fully into the barrel). The star wheels are behind rubber plugs in each backing plate. To “loosen” the PB’s turn the star wheel teeth toward the axle.
The two sides use the same PB hardware, but flipped – Driver side, turn teeth toward the axle (down); Passenger side, turn the teeth toward the axle (up). In case this is new to you, imagine all the PB parts behind the rear rotor are attached to the drive shaft and flip the left side parts 180 degrees around the drive shaft to put them on the right side. Springs and actuator levers have the same front-back orientation on both sides, but they are upside down from each other.
2) Remove and hang the caliper, remove the caliper bracket, and remove any disk retainer clips on the studs. TRY to remove the rotor by hand. If the rotor doesn’t move and has been on five years or more, I advise watching this Stuck Rotor Removal LINK. Pressing a stuck rotor off the hub and PB assembly is the best removal method I’ve found and saves the risk & inconvenience of using a torch.
I used a slightly different procedure than the video – 2 large bolts or threaded rods, 4 nuts, and 2 washers. The bolts need to pass through the 14mm diameter caliper bracket mounting holes, and threaded portions need to be at least 3 inches long. 12mm or 1/2” are good diameters for these bolts and nuts. Use either metric 10.9 or SAE grade 8 for strength, and apply grease. I put the washer between the axle ear and the inner nut, with grease on both sides of the washer and on the bolt threads. I put the (optional) nut against the rotor just bottomed on the end of the bolt and on the rotor. With tension on the nuts, I turned only the inner one (against the axle ear), and the pressure kept the bolt (threaded rod for me) from turning. I used threaded rods and nuts from a bushing puller set I have (see photo – but I used 2 sets). Press until you get the first clunk of release; remove some pressure and check to see if the rotor is loose. If it is not loose, rotate the rotor about half a turn, then repeat pressing until the rotor moves again. When you get the first rotor off, take a break & celebrate for a few minutes, because the second one might be worse!
3) Before you disassemble the PB pads and hardware, take pictures with your phone. You’ll save time surfing to find how things go back together. The pad lining may have parted from the metal backing and wedged itself over part of the pad that still has its lining – this was part of why one of my rotors was so stuck.
4) Rust ! On my Driver side, as I removed the front PB shoe, it wouldn’t part from the PB lever. Then I noticed how the lever was rusted solid and wouldn’t move on its pivot pin. This meant it was not working, AND it means I could not remove it without some extra work. It also meant I needed new actuator levers, and it meant that I needed to compress the PB cable spring and remove it from the axle so I could remove the lever. See these: PB Link 1 and PB Link 2. The barbs on the PB cable end and the very strong cable spring make the task challenging. I used a trim tool to hold the spring back and a small hose clamp like a miniature piston ring compressor to compress the barbs (see photo and PB Link 2).
5) Once the cable end is removed, how do you get that actuator lever to move so you can remove it? As in PB Link 1, I removed the rubber boot first. Access is awkward. My large adjustable plumbers’ pliers and my screw clamp had bad angles and failed to move it. I had just enough space to drill out the pivot pin in the lever using a new 3/16” Cobalt drill bit. There was rust on all the surfaces of the lever’s “sandwich” joint, and the pin is also a rivet holding the sides of the lever body together. Drilling it out released enough pressure that my large adjustable plumbers’ pliers could make the lever move the amount necessary to remove it from the backing plate.
6) New PB parts came from Napa (brake pads, hardware kit) and RockAuto (Dorman PB actuator levers). The parts from Napa looked on par with the OE parts I was replacing. The Dorman levers are good quality, but the pivot pins for the levers are not flush like Mopar, and there’s significant clearance at the pivot joint. I think this added clearance is intentional, and these levers will need a lot more corrosion to freeze up like the OE parts did.
The new hardware uses “quarter-turn” PB pad retaining clips and pins. I found these hard to install until I used a small 6mm ignition wrench to hold the clip compressed. This let me set the compressed clip in place over the locating pin, give it a quarter turn, and remove the wrench to release the clip (photo).
I’ll finish with two thoughts: I should have inspected my RAM parking brakes earlier, and it would have been nice to have the videos linked in this post as my initial reading before starting my PB replacement.


 .
.
