- Joined
- Mar 30, 2014
- Posts
- 6,112
- Reaction score
- 4,201
- Location
- SC
- Ram Year
- 2022 Ram 1500 (5th Gen)
- Engine
- 5.7L
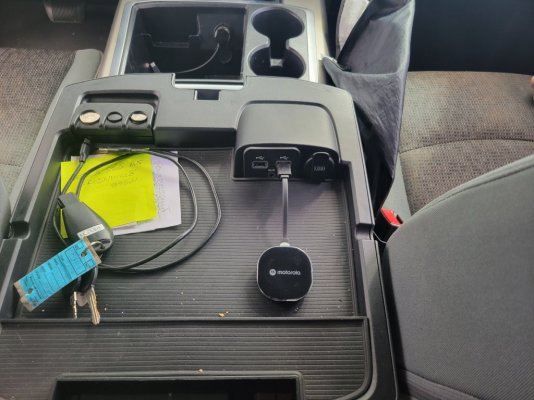
So I recently upgraded mom's 14ram1500 BigHorn which had a previous 2018 UAQ radio upgrade (Android Auto/Apple Carplay) with a Motorola MA1 Wireless Android Auto adapter plugged into the USB Hub port. (or AAwireless adapter or CarLink for Apple Carplay)
What bit me in butt, was I overlooked the fact that the USB Hub in 13-18/classic trucks is powered directly off the battery vs the RUN or SW 12V Accessory circuit.
Meaning you have to manually unplug it everytime to shut off the truck to avoid draining the battery, which makes the Wireless adapter nearly useless IMO.
Here’s what I’ve got to fix it and move the circuit over to SW 12v … (remember for USB software updates to keep the truck running during it, low battery voltage will brick a radio).
-------------------------------------------------
The plan .... (Console equipped truck)
I will attached some schematics to help. Use them to identify connector pinouts/color codes used in the diagrams.
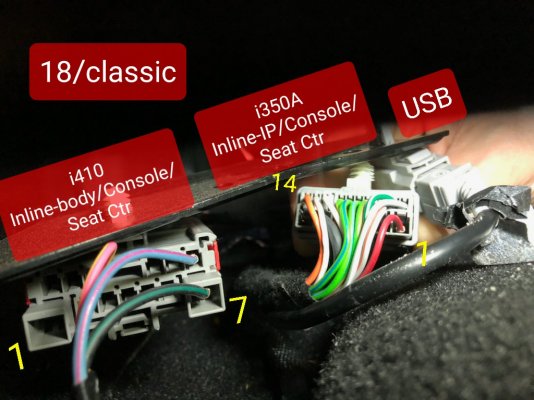
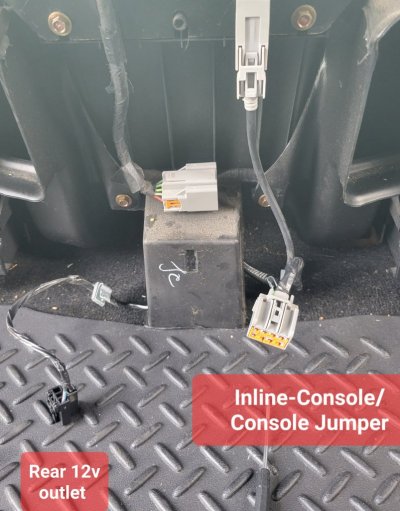
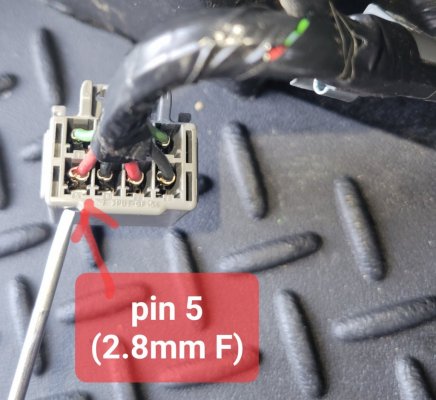
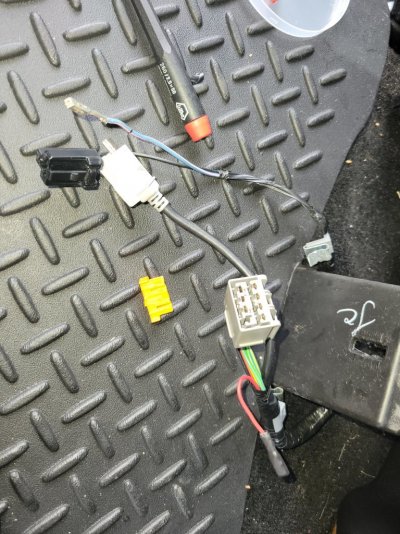
Inline-Console/Console Jumper is 8pin connector (2.8mm terminals) on the back of the console when you remove the rear panel. Pin 5 is power to the Hub… pin 7 should be to the 12v outlet next to it. (Pin7 it's Panel Backlighting ckt for the hub on 18/classic trucks)
>> Both are direct fed off the battery… Fuse (67) and Fuse (104) respectively. (See fuses --- Battery, diagram).
……… I was hoping to just swap pins 5 & 7 but it won’t work. Especially on 18/classic trucks... No No don't do it.
Next idea …
i350 INLINE-IP/CONSOLE/SEAT CENTER is a 14pin Hybrid connector at the front of the console with pin 1 being power for the hub & CDplayer if equipped (non console trucks have the connector under the driver seat)… This is fuse (67) also.
** Option 1 (not my favorite)
>>>> remove pin 1 at i350 going backwards and splice it into the forward 12v switched outlet in the console.
… That outlet looks to be fed off the Run/ACC circuit (Fuse 93) via the i410 Inline-Body/Console/Seat Center connector (under driver seat) at pin 13…
** Option 2
(Reference FUSES_RELAY---RUN_ACC diagram)
>>> The rear/back panel console 12v outlet is the one that can also be switched or direct off the battery depending on the position of the fuse (91)… Position 1 is direct to battery and Position 2 is off the Run/Acc Circuit (see owners manual also) via the i410 Inline-Body/Console/Seat Center connector (under driver seat) at pin 10…
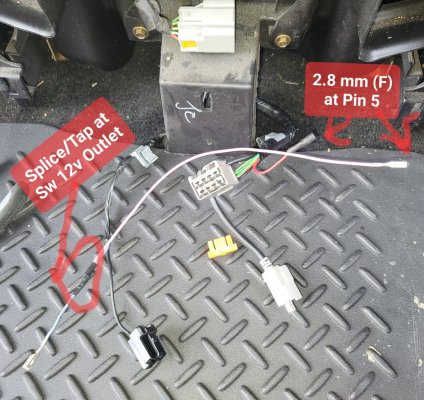
>> Remove Inline-Console/Console Jumper pin 5 (Red Wire to the hub) and splice it into the rear 12v outlet (Light Blue/Pink Wire) at the inside back of the console panel. (Req's Move F91 to Position 2)
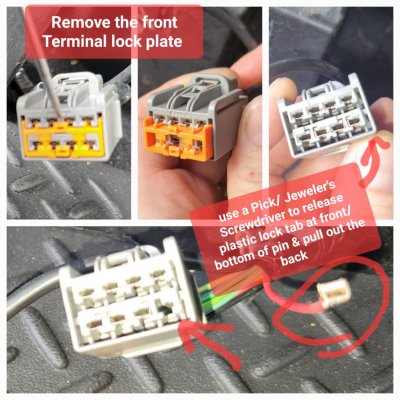
… This is what I will ended up doing. (I was be able to remove the original pin/feed wire (Tape it out of the way) and install a 2.8mm Female terminal/lead to splice into the rear 12v Outlet.
*** You could also use a ScotchLok style splice at the 12v outlet and Cut off the original pin 5 wire/splice the pin 5 Pigtail to SW 12v feed wire but I'm not particularly fond of cutting off connector wires for splicing. ***
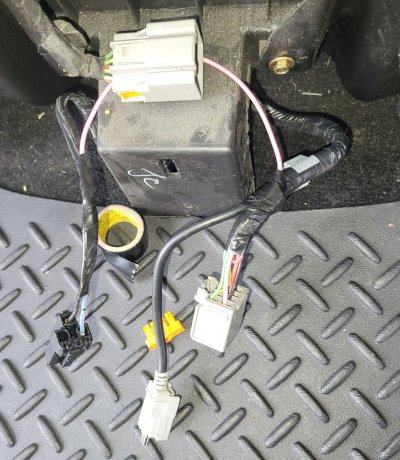
** Option 2 worked out great! The Motorola Ma1 switches on/off with the truck now and is fantastic with the 18/classic UAQ/UAS radio upgrade !!
----------------------------------------------
For Jumpseat equipped trucks, you will have to
>>>> remove pin 1 at i350 (Red Wire) under the driver seat and splice it into the i410 Inline-Body/Console/Seat Center connector (under driver seat) at pin 10… (Pink/Yel one side & LtBlue/Pink on other)
… That signal is fed off the Run/ACC circuit (Fuse 91) ONLY after moving the fuse to Position 2
Mike G.
M2 Mods (on Ramforum)
www.M2Mods4Ram.com
What bit me in butt, was I overlooked the fact that the USB Hub in 13-18/classic trucks is powered directly off the battery vs the RUN or SW 12V Accessory circuit.
Meaning you have to manually unplug it everytime to shut off the truck to avoid draining the battery, which makes the Wireless adapter nearly useless IMO.
Here’s what I’ve got to fix it and move the circuit over to SW 12v … (remember for USB software updates to keep the truck running during it, low battery voltage will brick a radio).
-------------------------------------------------
The plan .... (Console equipped truck)
I will attached some schematics to help. Use them to identify connector pinouts/color codes used in the diagrams.
Inline-Console/Console Jumper is 8pin connector (2.8mm terminals) on the back of the console when you remove the rear panel. Pin 5 is power to the Hub… pin 7 should be to the 12v outlet next to it. (Pin7 it's Panel Backlighting ckt for the hub on 18/classic trucks)
>> Both are direct fed off the battery… Fuse (67) and Fuse (104) respectively. (See fuses --- Battery, diagram).
……… I was hoping to just swap pins 5 & 7 but it won’t work. Especially on 18/classic trucks... No No don't do it.
Next idea …
i350 INLINE-IP/CONSOLE/SEAT CENTER is a 14pin Hybrid connector at the front of the console with pin 1 being power for the hub & CDplayer if equipped (non console trucks have the connector under the driver seat)… This is fuse (67) also.
** Option 1 (not my favorite)
>>>> remove pin 1 at i350 going backwards and splice it into the forward 12v switched outlet in the console.
… That outlet looks to be fed off the Run/ACC circuit (Fuse 93) via the i410 Inline-Body/Console/Seat Center connector (under driver seat) at pin 13…
** Option 2
(Reference FUSES_RELAY---RUN_ACC diagram)
>>> The rear/back panel console 12v outlet is the one that can also be switched or direct off the battery depending on the position of the fuse (91)… Position 1 is direct to battery and Position 2 is off the Run/Acc Circuit (see owners manual also) via the i410 Inline-Body/Console/Seat Center connector (under driver seat) at pin 10…
>> Remove Inline-Console/Console Jumper pin 5 (Red Wire to the hub) and splice it into the rear 12v outlet (Light Blue/Pink Wire) at the inside back of the console panel. (Req's Move F91 to Position 2)
… This is what I will ended up doing. (I was be able to remove the original pin/feed wire (Tape it out of the way) and install a 2.8mm Female terminal/lead to splice into the rear 12v Outlet.
*** You could also use a ScotchLok style splice at the 12v outlet and Cut off the original pin 5 wire/splice the pin 5 Pigtail to SW 12v feed wire but I'm not particularly fond of cutting off connector wires for splicing. ***
** Option 2 worked out great! The Motorola Ma1 switches on/off with the truck now and is fantastic with the 18/classic UAQ/UAS radio upgrade !!
----------------------------------------------
For Jumpseat equipped trucks, you will have to
>>>> remove pin 1 at i350 (Red Wire) under the driver seat and splice it into the i410 Inline-Body/Console/Seat Center connector (under driver seat) at pin 10… (Pink/Yel one side & LtBlue/Pink on other)
… That signal is fed off the Run/ACC circuit (Fuse 91) ONLY after moving the fuse to Position 2
Mike G.
M2 Mods (on Ramforum)
www.M2Mods4Ram.com
Attachments
-
 20220508_161104.jpg155.9 KB · Views: 142
 -
 20220508_161153.jpg137.5 KB · Views: 146
 -
 20220511_013524.jpg184.2 KB · Views: 149
 -
 20220508_162246.jpg250.2 KB · Views: 149
 -
 20220508_163225.jpg314.3 KB · Views: 136
 -
 20220508_164534.jpg271.2 KB · Views: 135
 -
 20220508_164821.jpg160.5 KB · Views: 150
 -
 20220508_165719.jpg153.9 KB · Views: 156
 -
MEDIA-PORT---PREMIUM.pdf125.3 KB · Views: 49
-
FUSES---BATTERY.pdf470 KB · Views: 29
-
FUSES_RELAY---RUN_ACC.pdf222.3 KB · Views: 24
-
2014-15 Inline-IP Console Seat Center i350.pdf231.9 KB · Views: 21
-
2014-15 Inline-IP Console Seat Center i350 (1).pdf231.9 KB · Views: 14
-
2014-15 Inline-Body Console Seat Center i410.pdf244 KB · Views: 22
-
 i340 Mirror Header TPA Release.jpg130.9 KB · Views: 149
Last edited: