Aux Reverse Lighting - Let's see your setup!

Disclaimer: Links on this page pointing to Amazon, eBay and other sites may include affiliate code. If you click them and make a purchase, we may earn a small commission.

blackbetty14

Senior Member
Joined
Oct 23, 2014
Posts
2,769
Reaction score
1,548
Location
CT
Ram Year
2024
Engine
Hemi 5.7 VVT/Etorque
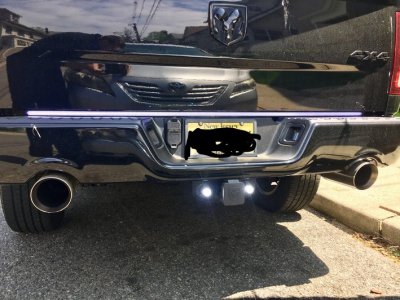
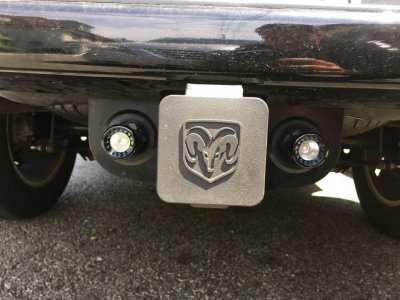
Morimoto mod pod LEDs. Super bright!
 

Attachments

  • IMG_5009.jpg
    IMG_5009.jpg
    101 KB · Views: 71

Johnnymac2k6

Senior Member
Joined
Oct 5, 2016
Posts
914
Reaction score
520
Location
Ohio
Ram Year
2007 Ram 1500
Engine
5.7 Hemi
I'd love to see something high mount that could double as a cargo light. maybe using some smaller "rock lights"?

I have a dent here i need to hide.lol
 

Attachments

  • 000.JPG
    000.JPG
    18 KB · Views: 143

St3althM0de

Member
Joined
Mar 13, 2017
Posts
95
Reaction score
51
Ram Year
2016 1500 Express black out
Engine
5.7Hemi
Is that a specific mount or stock?

@blackbetty. Forgot to quote your post.
 

Curlyp

Senior Member
Joined
Mar 17, 2017
Posts
1,189
Reaction score
451
Location
OH
Ram Year
2017
Engine
Hemi 5.7
I am a little late posting this as I set mine up a few weeks ago, but here is my setup.

I started from the engine bay to run the switch into the truck console (still working on the finalized setup of where it will sit) and the light wires underneath the truck back to the AUX lights. I followed the factory wires and zip ties underneath and zip tied mine to them. It took a total of 32 zip ties.

The AUX wire kit was not long enough so I had to extend the red and black wires. I used water proof connectors and completely covered the extended wires with wire wrap and used a heat gun to make it form fitting. I also used Tartan Vinyl Electric tape (which is waterproof) and completely wrapped all the wires to the AUX light (for extra piece of mind).

I left the zip ties uncut for the pictures to make it easier to show where they are. Also, the last picture showing the AUX light in the side mirrors through the tinted windows.

28181d1982a16ae09ead532753103cf7.jpg
77a8c0967ddc78321f97eae9b3b725ee.jpg
79086e3ecf5c08a12afda91571935a6a.jpg
aa4c30b9d6e967c63c6141a336e6784b.jpg
7c07cd93be9b9720635b1e3e3e9e69ab.jpg
e854aa93b61adb3b15a5f456261a0657.jpg
cbc0b8a5cfd2d52dbbaeebc5adb84237.jpg
f4a6ca2e48d36145aec2fb84aa93a55c.jpg
54e94dd07c1e2857b6933afc90fca522.jpg
a5934a156cfce786e1191b2ad73dcc6c.jpg
2f4a216163c68242ee2a3759371e0a4f.jpg
ded03ff8351deb155360a66d2998b882.jpg
bb6889b447a29b95cd96904628edc0b4.jpg
239c80c3e8101f50a420c34f1162b860.jpg
26893c5c186cc11c999fd972ced683ff.jpg
91f91f4001dd1508bc4b590952309ba0.jpg
91795b793f2a8f914a84b07860ce57b7.jpg
bdca21451289e864a7431949710c16d8.jpg
17044359739e4ed73615b9748cd819cd.jpg
7e325ad35e1dc8f7797e75a11cb305fe.jpg
4a2ff601405fe5d9db27c9992e5c420a.jpg
20c4fda82d8f724468db7cfa38eda3ce.jpg
8728ab39e10960c527b95efa3d44bfc3.jpg
477694b16320941228b9e55f3018427b.jpg
9fb41c2c1446a63f5393fdff9a7a6677.jpg
ff0a2aad139f972cbd5e4e0779150e49.jpg
03267e65cbbf23485fd2137b0ff59550.jpg

EDIT: here are a few pictures of how the rack and AUX light are mounted.

bd7eb193d519082424a8740bc102c27f.jpg
5f6477d69319a98d84b97a9c4e0d7e04.jpg


Sent from my iPhone using Tapatalk
 
Last edited:

blackbetty14

Senior Member
Joined
Oct 23, 2014
Posts
2,769
Reaction score
1,548
Location
CT
Ram Year
2024
Engine
Hemi 5.7 VVT/Etorque
Is that a specific mount or stock?

@blackbetty. Forgot to quote your post.

Not sure which mount you are talking about. The trailor hitch was not originally on the truck at the dealer but I had them install it as per our agreement in my lease. I assume its a stock style Mopar hitch but it seems slightly different than the others I have seen but it is a class 5 hitch and came with that fancy rubber Ram hitch cover so I assume its mopar aftermarket.

The mounts for the LED modpods I made. The aluminum and the plastic sheet metal caps would cost you like $10 and then $15 each for the MOD pod and rear screw mounting adapter.

They are extremely bright! So bright I get the same "washed out" look that you see with the really bright back up lights in this thread when looking through the backup camera. The lights can actually be too bright when using the camera.
 

02ramboi

Senior Member
Joined
Mar 30, 2017
Posts
1,765
Reaction score
1,108
Location
live oak florida
Ram Year
2002
Engine
4.7 v8
I am a little late posting this as I set mine up a few weeks ago, but here is my setup.

I started from the engine bay to run the switch into the truck console (still working on the finalized setup of where it will sit) and the light wires underneath the truck back to the AUX lights. I followed the factory wires and zip ties underneath and zip tied mine to them. It took a total of 32 zip ties.

The AUX wire kit was not long enough so I had to extend the red and black wires. I used water proof connectors and completely covered the extended wires with wire wrap and used a heat gun to make it form fitting. I also used Tartan Vinyl Electric tape (which is waterproof) and completely wrapped all the wires to the AUX light (for extra piece of mind).

I left the zip ties uncut for the pictures to make it easier to show where they are. Also, the last picture showing the AUX light in the side mirrors through the tinted windows.

28181d1982a16ae09ead532753103cf7.jpg
77a8c0967ddc78321f97eae9b3b725ee.jpg
79086e3ecf5c08a12afda91571935a6a.jpg
aa4c30b9d6e967c63c6141a336e6784b.jpg
7c07cd93be9b9720635b1e3e3e9e69ab.jpg
e854aa93b61adb3b15a5f456261a0657.jpg
cbc0b8a5cfd2d52dbbaeebc5adb84237.jpg
f4a6ca2e48d36145aec2fb84aa93a55c.jpg
54e94dd07c1e2857b6933afc90fca522.jpg
a5934a156cfce786e1191b2ad73dcc6c.jpg
2f4a216163c68242ee2a3759371e0a4f.jpg
ded03ff8351deb155360a66d2998b882.jpg
bb6889b447a29b95cd96904628edc0b4.jpg
239c80c3e8101f50a420c34f1162b860.jpg
26893c5c186cc11c999fd972ced683ff.jpg
91f91f4001dd1508bc4b590952309ba0.jpg
91795b793f2a8f914a84b07860ce57b7.jpg
bdca21451289e864a7431949710c16d8.jpg
17044359739e4ed73615b9748cd819cd.jpg
7e325ad35e1dc8f7797e75a11cb305fe.jpg
4a2ff601405fe5d9db27c9992e5c420a.jpg
20c4fda82d8f724468db7cfa38eda3ce.jpg
8728ab39e10960c527b95efa3d44bfc3.jpg
477694b16320941228b9e55f3018427b.jpg
9fb41c2c1446a63f5393fdff9a7a6677.jpg
ff0a2aad139f972cbd5e4e0779150e49.jpg
03267e65cbbf23485fd2137b0ff59550.jpg

EDIT: here are a few pictures of how the rack and AUX light are mounted.

bd7eb193d519082424a8740bc102c27f.jpg
5f6477d69319a98d84b97a9c4e0d7e04.jpg


Sent from my iPhone using Tapatalk


Those are really bright I need those so when cars tailgate me I turn them on lmao. Nice set up


4.7 v8
Hi flow cat/flowmaster exhaust
7 inch lift/5 inch lift
20 inch falken wildpeak at3/33's
 

w6pea

U.S.Marine Corps Veteran
Joined
Dec 22, 2014
Posts
770
Reaction score
2,483
Location
Yuma,Az
Ram Year
2024Ram 3500 "Laramie" 4x4 CC/LB SRW 6.7L CTD Leer 100-S Campershell
Engine
6.7L IL6 Cummins Turbo Diesel
Here is my Aux Reverse Light set-up
 

Attachments

  • Ram Lights 3 DSCN1732.jpg
    Ram Lights 3 DSCN1732.jpg
    94 KB · Views: 96

Stefan N

Senior Member
Joined
Nov 27, 2015
Posts
1,090
Reaction score
2,062
Location
Sweden
Ram Year
2015 Sport
Engine
5,7
To your first question, they make splice connectors that you don't need to cut your original wire. Wire slips right in and just slices it to make contact. The new wire tip goes in next to it and the splicer is a conductor. You can take it off and the original wire will still be whole, but you will need to put a piece of electrical tape over the contact spot.

Thats not a good way to go, coppar cable will not like to be exposed to the element and will start looking like this soon (or google corroded coppar cable)
altpostcable.jpg

Better way to go is with a relay that don't tap in to anything, just sits beside the cable that has the signal https://xbb.nu/eng

The current sensor that just "hugs" the sending cable
36231607-origpic-06f15d.png


If you have salt on the roads you will have problem first winter I'm guessing :( In Sweden we call that connection for power/electrical thief :puke:
 

Deepc6

Senior Member
Joined
May 11, 2017
Posts
514
Reaction score
335
Location
Long Island
Ram Year
2020
Engine
Hemi 5.7 Etorque

blackbetty14

Senior Member
Joined
Oct 23, 2014
Posts
2,769
Reaction score
1,548
Location
CT
Ram Year
2024
Engine
Hemi 5.7 VVT/Etorque
Do you happen to have the part number for the modpod?

The only ones I’ve found are these:
Morimoto MP-M-SWITCH Black ModPod Mini Switchback Modular Light Pod https://www.amazon.com/dp/B072284NR1/ref=cm_sw_r_cp_api_i_hErwBb3412074

These look like they will stick past the tow chain holes. Do you have any side and behind pictures of them installed?

https://www.theretrofitsource.com/morimoto-mod-pod-led-lights.html

Then select under mounting options, shaft mount, you need one for each. I originally got the prototype mod pod so I paid like $10 each so it was a good buy.

It only covers 1/4 if the chain hole if that. This is on the factory class5 hitch on my 18 Laramie. Used a curt hitch wiring adapter so I didn’t have to touch the factory wiring.

13EA3AFA-AEFF-44C4-BC2E-D4290CAF5C83.jpeg

image.jpg

image.jpg
 

blackbetty14

Senior Member
Joined
Oct 23, 2014
Posts
2,769
Reaction score
1,548
Location
CT
Ram Year
2024
Engine
Hemi 5.7 VVT/Etorque
I might actually some yellow/amber lenses on them to help with glare and washout from the camera. Since they now sell them with all the options which I didn’t have when I originally bought the prototypes.
 

Deepc6

Senior Member
Joined
May 11, 2017
Posts
514
Reaction score
335
Location
Long Island
Ram Year
2020
Engine
Hemi 5.7 Etorque
https://www.theretrofitsource.com/morimoto-mod-pod-led-lights.html

Then select under mounting options, shaft mount, you need one for each. I originally got the prototype mod pod so I paid like $10 each so it was a good buy.

It only covers 1/4 if the chain hole if that. This is on the factory class5 hitch on my 18 Laramie. Used a curt hitch wiring adapter so I didn’t have to touch the factory wiring.

View attachment 135755

View attachment 135756

View attachment 135757

Thank you for the pictures, I am now on the hunt to find the shaft mount. Apparently it is sold out everywhere.
 
Back
Top