awilstead86
Junior Member
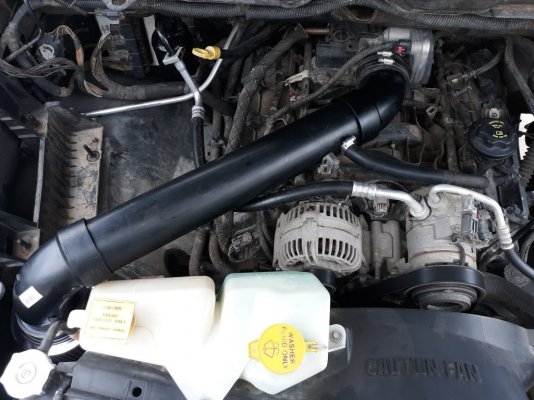
Hello everyone! Thought I'd take on the challenge of building a custom cold air intake. I know that CAI's really don't do much but this was only for fun. In total doesn't less than $80. Took about an hour. Tried to keep things as close to stock as possible under the hood with little trimming here and there (Remember to measure twice and cut once ") . Have fun!
. Have fun!
Autozone:
($43) Large Spectre universal cone air filter (3", 3.5" and 4" coupling options. K&N works too. Whatever your preference)
($2/$4) 1 or 2 feet of 5/8" rubber hose
Home Depot:
($8) 3" ABS pipe, 2ft cut (trim as needed for custom fitment)
($7) 3" rubber coupling (cut in half to have pipe close to TB as possible)
($7) 3" ABS 45° street elbow
($7) 3" ABS 90° street elbow
($2) 1/2" sprinkler head extension/riser (came in 10 pack)
Tools needed:
10mm socket
8mm socket
Hacksaw or something to cut ABS
RTV silicone
Drill
INTAKE REMOVAL
1) 10mm socket remove two bolts holding in intake resonator. These are located behind the oil cap and in front of the resonator.
2) Carefully twist and remove air intake temperature sensor. Check if it needs cleaning.
3) Pull off oil crankcase hose from intake box. Leave rubber hose connection to crankcase.
4) Carefully lift and remove the whole intake as one unit. Remove the TB gasket.
Building the CAI
1) Connect 3" rubber coupler clamp to TB. (Cut mine in half for better fitment).Tighten with 8mm socket.
2) Insert 45° elbow into coupler.
3) Insert ABS pipe into elbow. Should reach above headlamp area next coolant reservoir.
4) Insert 90° elbow to open end of pipe facing down.
5) Measure where you need to trim pipe so elbow is centered for proper fitment of filter.
6) If you have a smaller filter you may not need to do this next step. To fit the large filter you need to trim an inch off where the stock intake box used to be off the base. You could remove it completely with a couple of bolts located underneath accessing them by opening fender well.
7) Crankcase hose is important. This is used to suck out blowby debris and vapors from the crankcase.
a) Measure and cut the amount of 5/8 hose connecting to the crankcase vent. Mark pipe where to drill.
b) If OEM hose was left on for crankcase, measure and cut how much 5/8 hose you need to connect to pipe. Make mark where to drill pipe. Connect hoses with male/male piece from sprinkler extension.
8) For air temperature sensor location, place wiring where you want it to be and make marking to be drilled. (I did mine in front of other marking so no crankcase debris will collect on it).
9) Drill markings big enough for air sensor and vent hose.
10) For vent hose connection place a piece of sprinkler extension into pipe. I used some quick dry super glue to hold in place, then seal with high heat RTV silicone. Insert hose onto fitting. I used a clamp for secure connection for piece of mind.
11) Find a rubber grommet that'll fit hole for air sensor. Insert grommet then sensor making sure sensor is vertical and not horizontal for proper readings.
12) When installing air filter onto 90° elbow use the 3.5" coupling. This be placed behind the headlight.
13) Check that connections are snug and tight from filter to TB and back. You may use pipe glue or more couplings if wanted. My pipe connections are so tight I didn't bother.
This isn't perfect. I do know that there are other ways to go about this, but as I said before it was for fun. I also do know to get noticeable results you need to dyno tune. And purchase a REAL CAI. Thought about taping a threaded 5/8" plastic or metal hose connector with pipe neck instead of my fabrication for crankcase hose vent. Also COULD secure unit with metal hanger. COULD build a heat shield. NAH.
. Have fun!Autozone:
($43) Large Spectre universal cone air filter (3", 3.5" and 4" coupling options. K&N works too. Whatever your preference)
($2/$4) 1 or 2 feet of 5/8" rubber hose
Home Depot:
($8) 3" ABS pipe, 2ft cut (trim as needed for custom fitment)
($7) 3" rubber coupling (cut in half to have pipe close to TB as possible)
($7) 3" ABS 45° street elbow
($7) 3" ABS 90° street elbow
($2) 1/2" sprinkler head extension/riser (came in 10 pack)
Tools needed:
10mm socket
8mm socket
Hacksaw or something to cut ABS
RTV silicone
Drill
INTAKE REMOVAL
1) 10mm socket remove two bolts holding in intake resonator. These are located behind the oil cap and in front of the resonator.
2) Carefully twist and remove air intake temperature sensor. Check if it needs cleaning.
3) Pull off oil crankcase hose from intake box. Leave rubber hose connection to crankcase.
4) Carefully lift and remove the whole intake as one unit. Remove the TB gasket.
Building the CAI
1) Connect 3" rubber coupler clamp to TB. (Cut mine in half for better fitment).Tighten with 8mm socket.
2) Insert 45° elbow into coupler.
3) Insert ABS pipe into elbow. Should reach above headlamp area next coolant reservoir.
4) Insert 90° elbow to open end of pipe facing down.
5) Measure where you need to trim pipe so elbow is centered for proper fitment of filter.
6) If you have a smaller filter you may not need to do this next step. To fit the large filter you need to trim an inch off where the stock intake box used to be off the base. You could remove it completely with a couple of bolts located underneath accessing them by opening fender well.
7) Crankcase hose is important. This is used to suck out blowby debris and vapors from the crankcase.
a) Measure and cut the amount of 5/8 hose connecting to the crankcase vent. Mark pipe where to drill.
b) If OEM hose was left on for crankcase, measure and cut how much 5/8 hose you need to connect to pipe. Make mark where to drill pipe. Connect hoses with male/male piece from sprinkler extension.
8) For air temperature sensor location, place wiring where you want it to be and make marking to be drilled. (I did mine in front of other marking so no crankcase debris will collect on it).
9) Drill markings big enough for air sensor and vent hose.
10) For vent hose connection place a piece of sprinkler extension into pipe. I used some quick dry super glue to hold in place, then seal with high heat RTV silicone. Insert hose onto fitting. I used a clamp for secure connection for piece of mind.
11) Find a rubber grommet that'll fit hole for air sensor. Insert grommet then sensor making sure sensor is vertical and not horizontal for proper readings.
12) When installing air filter onto 90° elbow use the 3.5" coupling. This be placed behind the headlight.
13) Check that connections are snug and tight from filter to TB and back. You may use pipe glue or more couplings if wanted. My pipe connections are so tight I didn't bother.
This isn't perfect. I do know that there are other ways to go about this, but as I said before it was for fun. I also do know to get noticeable results you need to dyno tune. And purchase a REAL CAI. Thought about taping a threaded 5/8" plastic or metal hose connector with pipe neck instead of my fabrication for crankcase hose vent. Also COULD secure unit with metal hanger. COULD build a heat shield. NAH.