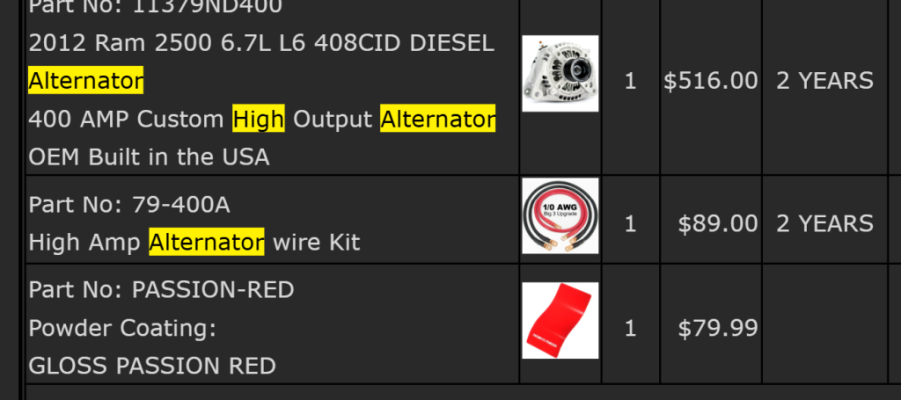
The XS Power D4800 is a direct-fit replacement for the current and previous Rams, and Duramax trucks since 2008
Just for fun, I threw your pdf into Grok and asked what it's thoughts were...
### Likely Root Causes
1. **Battery or Charging System Issue**:
- A weak battery, failing alternator, or loose battery connection could cause the low voltage codes (B2199-16, B210D, etc.), leading to communication issues (U0100, U0184, etc.) and sensor errors (B1602, B1472, etc.).
- **Evidence**: Multiple modules report low voltage, and communication issues are widespread.
2. **Grounding Issue**:
- A loose or corroded ground (e.g., battery-to-chassis, battery-to-engine, or TIPM ground) could cause voltage drops, triggering the low voltage and communication codes, as well as sensor circuit issues.
- **Evidence**: The variety of codes across unrelated systems suggests a systemic electrical issue, often tied to grounding.
3. **TIPM Failure**:
- The TIPM (Total Integrated Power Module) manages power distribution and communication between modules. A failing TIPM can cause low voltage, communication losses, and sensor circuit issues, as seen in many 2010–2014 Dodge Rams (per DodgeTalk.com threads).
- **Evidence**: Codes like U0431-00 (implausible data from IPM) and widespread communication issues (U0100, U0184) point to a potential TIPM problem.
4. **Wiring or Connector Issue**:
- A damaged wiring harness or loose connector (e.g., at the ECM/PCM, TIPM, or battery) could cause the communication and sensor issues. This might have occurred during recent maintenance or due to age (the truck is a 2012 model).
- **Evidence**: The variety of sensor circuit codes (high, low, open, short) across multiple systems suggests a wiring or connector issue.
### Steps to Resolve the DTCs
#### 1. Test Battery and Charging System
- **Battery Voltage**: Use a multimeter to check battery voltage with the engine off (should be ~12.6V) and running (should be 13.8–14.4V). A weak battery or alternator issue could cause the low voltage codes.
- **Load Test**: Perform a load test on the battery to ensure it holds a charge. A failing battery can cause voltage drops, triggering these codes.
- **Alternator Output**: Ensure the alternator is charging properly. If voltage drops below 12V while running, it could be the root cause.
#### 2. Inspect Grounds and Wiring
- **Check Ground Connections**:
- Battery-to-chassis ground (typically on the frame near the battery).
- Battery-to-engine ground (on the engine block).
- TIPM ground (on the firewall or chassis).
- Look for corrosion, looseness, or damage, and clean/tighten as needed.
- **Inspect Wiring Harnesses**:
- Check the ECM/PCM connectors (C1, C2) for bent pins, corrosion, or loose connections.
- Inspect the TIPM connectors and wiring for damage.
- Look for damaged or pinched wires in the main harness, especially near the battery, ECM/PCM, and TIPM.
#### 3. Test the TIPM
- **TIPM Diagnostics**: Use a scan tool to check TIPM communication and power distribution. If the TIPM is failing, it may need replacement (a common issue in 2010–2014 Rams, often costing $500–$1,000 including labor).
- **Power and Ground at TIPM**: Use a multimeter to check voltage and ground at the TIPM. Low voltage or poor ground can cause the communication and sensor issues.
#### 4. Clear DTCs and Recheck
- **Clear Codes**: Use your scan tool (Autel MaxiIM IM508) to clear all DTCs.
- **Drive and Recheck**: Drive the truck for 10–20 miles to see if the codes return. If they don’t, the issue may have been a temporary glitch. If they return, proceed with further diagnostics.
- **Log Data**: Log battery voltage, CAN bus communication, and sensor data (e.g., wheel speed, solar sensors) to confirm they’re within spec.
#### 5. Address Specific Codes
- **C1020 (Left Rear Wheel Speed Sensor)**: Inspect the left rear wheel speed sensor and its wiring for damage or disconnection. Test the sensor resistance (typically 1,000–2,000 ohms) and voltage (should vary with wheel rotation).
- **B1296-11 (PTS Sensor 9)**: Inspect the parktronic sensor 9 (likely a rear parking sensor) for a short to ground. Check the wiring and connector for damage.
- **AMP Codes (B1472, B1477, etc.)**: The audio speaker output circuit open codes suggest a wiring issue or disconnected speakers. Check the speaker wiring harnesses for opens or disconnections.
- **HSM Codes (B1EB3-1B, B1EB4-1B)**: The heated seat sensor codes indicate high resistance, likely due to a wiring issue or sensor failure. Inspect the rear seat heater wiring and sensors.
#### 6. Complete Drive Cycles
Once the DTCs are resolved, drive the truck through various conditions (e.g., cold start, steady speeds, stop-and-go) to complete the readiness monitors. This typically takes 50–100 miles of mixed driving.
### Recommendation for Your Friend’s Truck
The common link among these DTCs is **low battery voltage and potential grounding or TIPM issues**. Start by:
1. Testing the battery and charging system (multimeter: 12.6V off, 13.8–14.4V running).
2. Inspecting and cleaning/tightening all grounds (battery-to-chassis, battery-to-engine, TIPM).
3. Checking the ECM/PCM and TIPM connectors for damage or loose connections.
4. Clearing the DTCs and driving to see if they return, logging data to confirm voltage stability.
If the codes persist, test the TIPM for proper operation and consider replacing it if necessary. Then address specific codes like C1020 and B1296-11 by inspecting the respective sensors and wiring.