Service Airbag System

Disclaimer: Links on this page pointing to Amazon, eBay and other sites may include affiliate code. If you click them and make a purchase, we may earn a small commission.

OP
OP
ram1500rsm

ram1500rsm

Senior Member
Joined
Jul 24, 2018
Posts
4,891
Reaction score
5,413
Location
Trabuco Canyon, CA
Ram Year
2014
Engine
Hemi 5.7
Are you certain that your truck has a steering angle sensor there? Mine is a 2013, and when I look at the diagrams on MoparPartsGiant, it only shows the clock spring.

And If I remember right, when I replaced my electronic power steering rack/pinion, it had the steering angle sensor built into the steering rack.

Your 2014 should have the EPS as well. So, is it only the 2012 and older with hydraulic power steering, that had a steering angle sensor in the column?
I wish i knew whether mine has it or not in the darn clokspring. i don't have any idea how that looks or what it's, Mine is a simple Express 4x4 :) not steering wheel heating, and yes mine has the electring steering rack.
 

Ken226

Senior Member
Joined
Mar 12, 2017
Posts
2,293
Reaction score
5,934
Location
Washington State
Ram Year
2013
Engine
Hemi
I wish i knew whether mine has it or not in the darn clokspring. i don't have any idea how that looks or what it's, Mine is a simple Express 4x4 :) not steering wheel heating, and yes mine has the electring steering rack.

Well,

When you take the old one out, you'll know what's in there.
 
OP
OP
ram1500rsm

ram1500rsm

Senior Member
Joined
Jul 24, 2018
Posts
4,891
Reaction score
5,413
Location
Trabuco Canyon, CA
Ram Year
2014
Engine
Hemi 5.7
How does one go about centering a used clock spring? I have the same airbag codes in my 09 SLT, planning on stealing the heated wheel and clockspring out of my 2010 Laramie. Hopefully the 09 has the heated wheel wiring
I read in the Haynes manual i have for the RAM you rotate the clock spring all the way to the right for example until it stops. then count 2 1/2 turns backwards and that should be center. You can also turn until it stops to the rigth for example, then count how many full turns take to reach all the way to the left until it stops. I watched a video yesterday and in the RAM that seems to take 5 full turns so 2.5 turns back from either end should be the middle.

That was the other reason i went with a new clogspring unit, they're supposed to be at center already and so when you install it you just have to remove the tab that is supposed to be keep the thing in the middle and you're done so there is nothing to mess up with, or at least that was the thought :)
 
OP
OP
ram1500rsm

ram1500rsm

Senior Member
Joined
Jul 24, 2018
Posts
4,891
Reaction score
5,413
Location
Trabuco Canyon, CA
Ram Year
2014
Engine
Hemi 5.7
************************************************
Important, see post#26,27 and 33 for all notes and gotchas
************************************************


The ol girl is back after the minor surgery, and no more service airbag system 200.gif

I did this not knowing what a damn clockspring was until now and i can only tell this install was really nothing, super easy if you have basic wrenching skills and have the little tools that you're going to need to replace it

Tools:
13mm and 16mm sockets, socket extension, phillips screwdriver, T20 torx screwdriver, T20 torx socket, T10 Torx Hollow socket, electric impact tool but you should also be able to do it with a breaker bar though If the bolt has never been out it'll be in there pretty good. Impact tool will make the removal of that bolt a breeze, if you don't have one you may need somebody helping hold the steering wheel in place i'd guess while you rachet the bolt out.

Also the airbag remover tool was pretty awesome, again for somebody who have never done this before i thought having this little one was great.
https://www.amazon.com/dp/B073QWMHMP?ref=ppx_yo2ov_dt_b_fed_asin_title

The steering wheel puller didn't fit out of the box on my steering, but if you have a grinder its a very easy fix, you need to grind down a little bit of material at the end of the legs and the elbows and they will go in like a glove.
https://www.amazon.com/dp/B000N37EFS?ref=ppx_yo2ov_dt_b_fed_asin_title


I used this video for the visuals, this covers the entire clockspring replacement

But to give you more ideas/visuals/details for those who may need to have more info like me to grab the cojones and do this, and i swear there was nothing to this install now i know better....

1.) I disconnected both positive/negative terminals from the battery and waited abound 5 min. The Haynes manual says to wait 2 minutes supposedly to make sure the capacitors are discharged.

Because the battery was disconnected i couldn't move the steering wheel to release the airbag, my truck was on my driveway and it's on an incline with the front facing forward. If you are parked flat and on a epoxy surface it may be easier to turn. You need to move the steering wheel to 3 different positions, literally at 10, then 2 oclock and turn the bottom of the steering to the 12oclock position to get your airbag remover tool inside the back of the steering wheel and release the airbag tabs. In my case I simply jacked the front of my truck. Problem solved.

2.) jack the front up until the wheels are in the air so now you can easily move the steering wheel any way you want.

3.) Remove the 3 screws holding the steering cover, then remove those plastic covers out
1729378591247.png


4.) remove the big cover underneath the steering, it's held by 2 phillip screws at the bottom. Once they're removed just pull from the bottom to release the tabs, then lay it down with care

1729378890170.png

It took me a couple of minutes to figure out how to angle the airbag remover tool and apply leverage to release the airbag from the factory tabs inside the steering wheel.
basically the teeth on the tool needs to go below the metal tabs,see pic below. then you lift them with the tool which has already the correct angle to apply the needed leverage and gets in there like it was meant to be. The catch here is that you can't see the tabs so you would have to feel them. But again that little tool will do wonders in the 3 spaces it needs to go. Put in there and feel for something until there is resistance. Then push in and angle the tool down while your other hand grabs the airbag.

This is a picture with the one tab at the bottom of the steering. You'll want to turn that one to the 12 o'clock to be able to fit the tool in the proper space.

54077826002_e91ba1542b_o.jpg20241019_083801 by RAM RSM, on Flickr

******** The video above will you show the angles you want to put the steering wheel.

5.) Remove the airbag from the steering wheel releasing the airbag connectors from behind, super easy just squeze the little tabs and pull

54077826192_b69006db01_o.jpg20241019_085402 by RAM RSM, on Flickr

54078699871_e349535d02_o.jpg20241019_085456 by RAM RSM, on Flickr

6.) Also easy to know how to put the plugs back, the connectors have colored tabs, match them up black with black and yellow with yellow and you're done when you're putting this back at the end.
54078699896_3b90b3d92f_o.jpg20241019_085635 by RAM RSM, on Flickr


This is my factory airbag part#
54078955543_e5a2943c60_o.jpg20241019_085436 by RAM RSM, on Flickr


Once the airbag is out of the way, now you need to remove the steering wheel bolt, easy peasy with an impact tool, 13mm socket.

***** Before you do this, remember you jacked up the front of the truck in the air, now it's time to lower the truck to the ground and remove the jack. You don't want to make it easy for the wheels to turn after taking the steering wheel bolt out. so remove the jack first, then remove the steering wheel bolt

54079157640_9793e8e1f7_o.jpg20241019_085656 by RAM RSM, on Flickr
 

Attachments

  • 1729379657529.png
    1729379657529.png
    193.1 KB · Views: 14
  • 1729379927917.png
    1729379927917.png
    1.3 MB · Views: 13
  • 1729380161917.png
    1729380161917.png
    1.4 MB · Views: 14
  • 1729380257075.png
    1729380257075.png
    1.1 MB · Views: 14
  • 1729380562610.png
    1729380562610.png
    1.3 MB · Views: 14
Last edited:
OP
OP
ram1500rsm

ram1500rsm

Senior Member
Joined
Jul 24, 2018
Posts
4,891
Reaction score
5,413
Location
Trabuco Canyon, CA
Ram Year
2014
Engine
Hemi 5.7
7.) I marked the steering wheel and inside, no idea if it was needed but it makes me think better this way, there is also a groove that i marked to make it easy to visualize when putting the steering wheel back. also you can see the holes where your steering wheel remover legs will go through. like i said the tool i bought didn't fit those holes out of the box so i had to shave a little bit of material from the leg end and elbow to fit though those holes. i have a grinder so took me a couple of extra minutes to make them fit.


54078701431_ab64b5fb5e_o.jpg20241019_090836 by RAM RSM, on Flickr

I used the black spacer against the steering wheel shaft, the 2 L shaped legs and the bracket and bolt, just make sure the legs are straight when you zip the bolt and it would pull the steering nice and easy

1729382714191.png


8.) Now all you have to do is disconnect 6 plugs super easy nothing special on these ones, just squeze their tabs and pull

One inside the steering before you pull the steering out,

54079157640_9793e8e1f7_o.jpg20241019_085656 by RAM RSM, on Flickr


The white and blue at the top, also remove nylon rivet and the Torx bolt . the blue plug in my case is there but not connected to anything, is just in a slot in the clock spring to hold that blue plug but there is no electrical connections the plug is hooked up like the white one is. That little blue square in the pic below is the release for the blue plug. Push that little square in and pull the plug out.

54078701661_e7ba32096b_o.jpg20241019_095829 by RAM RSM, on Flickrr


***** My new clock spring seems to have a spot for that blue connector to connect in, but in my case i didn't plug it in, My guess that blue plug is prob for the steering wheel heating, or remote pedals or who knows. i don't have such options and because it wasn't used in my case i didn't plug it in the spot available for it in the new clock spring.


And these 3 at the bottom and also that torx bolt right down there.

54079161905_02f27bdfba_o.jpg20241019_095858 by RAM RSM, on Flickr


54077832362_e73b051d88_o.jpg20241019_100037 by RAM RSM, on Flickr


10.) The clock spring is held by those 2 torx bolts, now you can pull it out slowy, disconnect the turn signal lever and the other plug underneath the signal lever, both on the left side of this pic, after that the clockspring will come out free

54079025339_b74eafb400_o.jpg20241019_095552 by RAM RSM, on Flickr

Here is my old and new Clock spring side by side. The new one also has an exta wire (the black one with the white plug at the end), i didn't use that one either.

And notice the white label that says the thing is centered already, and don't remove the yellow tab at the top until you have your clockspring installed and the steering wheel in placed and torqued. I removed the white label because with that in place the steering shaft would have not fitted through the hole on the clock spring, but the yellow tab keeps the clock spring centered and where it should be.


54079033524_d7de82ba65_o.jpg20241019_103530 by RAM RSM, on Flickr

Finally able to see the damn angle sensor, what a f...ing grieve that little chit gave me :). Old clockspring on the left, new one on the right. Notice the spot where the angle sensor will go

54078712876_b89508a9e5_o.jpg20241019_103640 by RAM RSM, on Flickr


The angle sensor is held in place by two T10 hollow torx little bolts

54078712951_8983c60237_o.jpg20241019_105323 by RAM RSM, on Flickr

The white wheels on the angle sensor will fit inside the clock spring, treat with care and it should go fine.

54079036469_4e295b6150_o.jpg20241019_105328 by RAM RSM, on Flickr

This is how the old angle sensor looks like when installed in the new clock spring

54079172260_3a0ccc19cb_o.jpg20241019_112101 by RAM RSM, on Flickr


10.) Now install your new clock spring back, connect the plugs, reinstall the turn signal lever and the other thing underneath the lever, i also started with the cover that has the shifter boot, then installed the steering wheel, then torqued down the bolt to 45 ft/lbs (Per Haynes manual) , then you can remove the yellow tab that keep the steering wheel centered. Do not remove this one without torquing down the steering bolt first.


54078715141_56bf532e9b_o.jpg20241019_123425 by RAM RSM, on Flickr

11.) Grab your airbag and connect the plugs, remember to match the black tab in the plug with the black spot in the airbag, in my case the new airbag plug didn't have a yellow tab, it had one black and one grey, so there is no way to mess it up if you connect the black tab first. i left that other black wire you see below with the white plug hanging in there as well since the new clockspring has that one in there but i don't have a spot to connect it in my setup. No idea what it's either way.

12.) Once the airbag plugs are hooked up to the airbag, simply push the airbag inside the steering wheel and the tabs will lock it in place.


54079038864_93c8d2355b_o.jpg20241019_130739 by RAM RSM, on Flickr

13.) Check your covers are in place and the shift boot looks where it should be and you're done.

54077843377_2d697acc4f_o.jpg20241019_134835 by RAM RSM, on Flickr


Hopefully this will help anybody like me panicking for nothing :), Use at your own risk of course.

Have fun.
 

Attachments

  • 54079036469_4e295b6150_o.jpg
    54079036469_4e295b6150_o.jpg
    633.4 KB · Views: 14
  • 54078712951_8983c60237_o.jpg
    54078712951_8983c60237_o.jpg
    626.9 KB · Views: 14
  • 54078712876_b89508a9e5_o.jpg
    54078712876_b89508a9e5_o.jpg
    611.1 KB · Views: 14
  • 54079033524_d7de82ba65_o.jpg
    54079033524_d7de82ba65_o.jpg
    775.4 KB · Views: 14
  • 54077832362_e73b051d88_o.jpg
    54077832362_e73b051d88_o.jpg
    713.3 KB · Views: 14
  • 54078701431_ab64b5fb5e_o.jpg
    54078701431_ab64b5fb5e_o.jpg
    650.5 KB · Views: 13
  • 54079161905_02f27bdfba_o.jpg
    54079161905_02f27bdfba_o.jpg
    629.3 KB · Views: 8
  • 54078701661_e7ba32096b_o.jpg
    54078701661_e7ba32096b_o.jpg
    770.1 KB · Views: 8
  • 54079157640_9793e8e1f7_o.jpg
    54079157640_9793e8e1f7_o.jpg
    710.8 KB · Views: 8
Last edited:

Ken226

Senior Member
Joined
Mar 12, 2017
Posts
2,293
Reaction score
5,934
Location
Washington State
Ram Year
2013
Engine
Hemi
Nice work! This writeup is nice, in a decade it'll still be helping people with replace their clocksprings.

Awhile back i thought my clock spring was going out, due to a weird rubbing noise that I thought was coming from the steering column.


Turns out, the noise was coming from the electronic rack/pinion. I'd have been better off it it was the clock spring.
 

Adamcr68

Senior Member
Joined
Mar 28, 2020
Posts
817
Reaction score
1,540
Location
Lorton VA
Ram Year
2015
Engine
Hemifever 5.7
7.) I marked the steering wheel and inside, no idea if it was needed but it makes me think better this way, there is also a groove that i marked to make it easy to visualize when putting the steering wheel back. also you can see the holes where your steering wheel remover legs will go through. like i said the tool i bought didn't fit those holes out of the box so i had to shave a little bit of material from the leg end and elbow to fit though those holes. i have a grinder so took me a couple of extra minutes to make them fit.


View attachment 55329920241019_090836 by RAM RSM, on Flickr

I used the black spacer against the steering wheel shaft, the 2 L shaped legs and the bracket and bolt, just make sure the legs are straight when you zip the bolt and it would pull the steering nice and easy

View attachment 553298


8.) Now all you have to do is disconnect 6 plugs super easy nothing special on these ones, just squeze their tabs and pull

One inside the steering before you pull the steering out,

View attachment 55332320241019_085656 by RAM RSM, on Flickr


The white and blue at the top, also remove nylon rivet and the Torx bolt . the blue plug in my case is there but not connected to anything, is just in a slot in the clock spring to hold that blue plug but there is no electrical connections the plug is hooked up like the white one is.

View attachment 55332420241019_095829 by RAM RSM, on Flickrr


***** My new clock spring seems to have a spot for that blue connector to connect in, but in my case i didn't plug it in, My guess that blue plug is prob for the steering wheel heating, or remote pedals or who knows. i don't have such options and because it wasn't used in my case i didn't plug it in the spot available for it in the new clock spring.


And these 3 at the bottom and also that torx bolt right down there.

View attachment 55332520241019_095858 by RAM RSM, on Flickr


View attachment 55330020241019_100037 by RAM RSM, on Flickr


10.) The clock spring is held by those 2 torx bolts, now you can pull it out slowy, disconnect the turn signal lever and the other plug underneath the signal lever, both on the left side of this pic, after that the clockspring will come out free

View attachment 55331820241019_095552 by RAM RSM, on Flickr

Here is my old and new Clock spring side by side. The new one also has an exta wire (the black one with the white plug at the end), i didn't use that one either.

And notice the white label that says the thing is centered already, and don't remove the yellow tab at the top until you have your clockspring installed and the steering wheel in placed and torqued. I removed the white label because with that in place the steering shaft would have not fitted through the hole on the clock spring, but the yellow tab keeps the clock spring centered and where it should be.


View attachment 55330120241019_103530 by RAM RSM, on Flickr

Finally able to see the damn angle sensor, what a f...ing grieve that little chit gave me :). Old clockspring on the left, new one on the right. Notice the spot where the angle sensor will go

View attachment 55330220241019_103640 by RAM RSM, on Flickr


The angle sensor is held in place by two T10 hollow torx little bolts

View attachment 55330320241019_105323 by RAM RSM, on Flickr

The white wheels on the angle sensor will fit inside the clock spring, treat with care and it should go fine.

View attachment 55330420241019_105328 by RAM RSM, on Flickr

This is how the old angle sensor looks like when installed in the new clock spring

View attachment 55329420241019_112101 by RAM RSM, on Flickr


10.) Now install your new clock spring back, connect the plugs, reinstall the turn signal lever and the other thing underneath the lever, i also started with the cover that has the shifter boot, then installed the steering wheel, then torqued down the bolt to 45 ft/lbs (Per Haynes manual) , then you can remove the yellow tab that keep the steering wheel centered. Do not remove this one without torquing down the steering bolt first.


View attachment 55329520241019_123425 by RAM RSM, on Flickr

11.) Grab your airbag and connect the plugs, remember to match the black tab in the plug with the black spot in the airbag, in my case the new airbag plug didn't have a yellow tab, it had one black and one grey, so there is no way to mess it up if you connect the black tab first. i left that other black wire you see below with the white plug hanging in there as well since the new clockspring has that one in there but i don't have a spot to connect it in my setup. No idea what it's either way.

12.) Once the airbag plugs are hooked up to the airbag, simply push the airbag inside the steering wheel and the tabs will lock it in place.


View attachment 55329620241019_130739 by RAM RSM, on Flickr

13.) Check your covers are in place and the shift boot looks where it should be and you're done.

View attachment 55329720241019_134835 by RAM RSM, on Flickr


Hopefully this will help anybody like me panicking for nothing :), Use at your own risk of course.

Have fun.
Great work & write up! I see you can teach/explain all work on our trucks, you were already the go to on suspension setups.
I hope our members appreciate your knowledge & time spent sharing it, I know I do!
 
OP
OP
ram1500rsm

ram1500rsm

Senior Member
Joined
Jul 24, 2018
Posts
4,891
Reaction score
5,413
Location
Trabuco Canyon, CA
Ram Year
2014
Engine
Hemi 5.7
Nice work! This writeup is nice, in a decade it'll still be helping people with replace their clocksprings.

Awhile back i thought my clock spring was going out, due to a weird rubbing noise that I thought was coming from the steering column.


Turns out, the noise was coming from the electronic rack/pinion. I'd have been better off it it was the clock spring.
Ty man. Glad to be able to help our RAM community.
 
OP
OP
ram1500rsm

ram1500rsm

Senior Member
Joined
Jul 24, 2018
Posts
4,891
Reaction score
5,413
Location
Trabuco Canyon, CA
Ram Year
2014
Engine
Hemi 5.7
Well i had to fight another battle with the clockspring and the damn steering angle sensor. I only drove the truck initially around the block to confirm things were working as expected as the service airbag system light when away pretty much right after the clockspring replacement on Saturday.
I drove the truck very shortly Sunday and Monday morning. On Monday afternoon as i'm heading to the supermarket the traction control squigly light went off. Not the one that comes off when you press the traction control though, this one looks the same as that one except it doesn't say off at the bottom, and it's right above the traction control off one. chit i didn't even know that light was a thing :)

I got home and hooked up Alphaobd and there were no DTC's so i figure it was an issue with a sensor instead related to the SRS. I connected to it and the only thing present were the old squib codes or whatever so i cleared them out and that didn't solve the issue.

Then i connected to the ABS modules and bingo, i had 4 codes initially and i thought probably related to the clockspring replacement as well so i cleared them all out

54090960470_fa3618634c_o.jpgScreenshot_20241022_153707_AlfaOBD by RAM RSM, on Flickr

But this one stayed, C0051, Steering Wheel position sensor signal bias level out of range/zero adjustment failure
54090410786_b18c3284ea_o.jpgScreenshot_20241022_154114_AlfaOBD by RAM RSM, on Flickr

It immediately hit me in the face as when i swapped the angle sensor from the old clockspring to the new one, i remember out of curiosity i slighty moved the cog wheels on the angle sensor one way to the other just cause, i bet you know the drill, is it hard to move or soft to move?.. :) it was so slightly but i thought how would this thing know the angle of the steering?..., but whatever i didn't give it too much thought so i moved the sensor to the new clockspring and that was that.

Couple of days later i get this error so i went online again, and found nothing on how to fix this thing other than "you may need to reset the steering angle sensor".
I did some searches in our forum and found a post that dealt with the same problem:


And i did as suggested by one of our forum members:

"Before you spend good money on a tool, try this:
Get in the truck and start the engine.
Turn the steering wheel to the driver's side to full lock. Then turn it to the passenger side to full lock.
Repeat that 3 times.
Turn off the key. Then turn the key back to Run.
You may need three key cycles (On/Off) for the error to go away."

Tried that several times on Monday but the error light stayed.

For whatever reason i thought JScan was going to be able to reset the light so i hooked up JSCAN and found they don't have a reset SAS option, but i was able to see the actual issue at hand.

This is displaying the Angle sensor data connected to the ABS module
With the steering wheel straight the sensor was showing the 23-25* angle

54090744694_6db4cc78a0_o.jpgScreenshot_20241022_162314_OBD JScan by RAM RSM, on Flickr

So i thought ok let me see what's available out there to reset the damn light and i bought this tool from Amazon, Topdon AL600

Got the tool yesterday, hooked it up and ran the SAS reset procedure, the squigly light went away so yay, chalked it up to just needed the SAS light reset.
But the that reset procedure didn't reset the actual angle sensor, the sensor is still showing 23-25*

54089539412_d8b110cdc4_o.jpg

I take the truck out for a spin and not even 1/4 mile away from home and right on the first wide corner with the the steering at around 11 oclock i get the usual steering input you get from the traction control pulsating the abs system even though i'm not on the brakes, and i get the squigly light on again. Come back home, hooked JScan up and i get the same C0051 error, so the reset did nothing to adjust the angle of the sensor back to zero. I don't have any idea if the reset was supposed to zero out the sensor, or if i need a different scanner that can re-calibrate the SAS to zero.

Now i'm thinking what i'm supposed to do ? and i started looking online, then i found this post, again 2 posts in our forum helping the cause :)

"
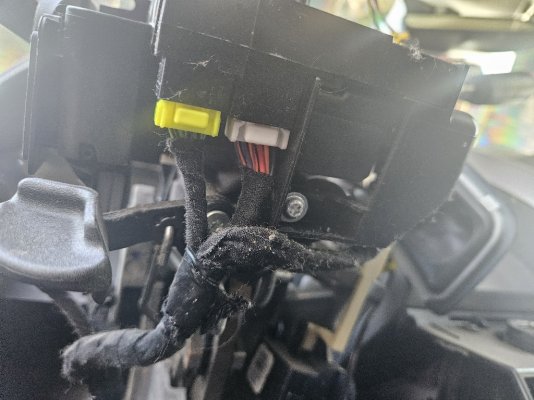
I unpluged and cleaned all the connectors to no avail.

How I solved it:
1. I hooked up the scanner tool.
2. Pulled up the Steering angle sensor.
3. It was reporting I was off by 180+ degrees.
4. Detached the steering sensor from the back of the clock spring.
5. Manually turning the white plastic gear till the scanner read 0 degrees.
6. Re attached the steering sensor to the clock spring in the position 0 where the steering wheel will be in the strait-forward position. (Technically I was off by about 1 degree because it's so sensitive.)
7. Re-attached everyting and test drove. No lights on the dash.
I am not sure the tolerence exactly, but I know if my steering wheel sensor was reporting it was off by 60* (or greater) it immediately threw the ESP light and cruise wouldn't work.

But being off by about 1* is not a problem apparently.
I would have liked to have gotten this fixed properly but I don't know where to go from here. I'm only pretending to know what I do know and it's working right now so I'll leave well enough alone.
Hope this helps someone in the future."

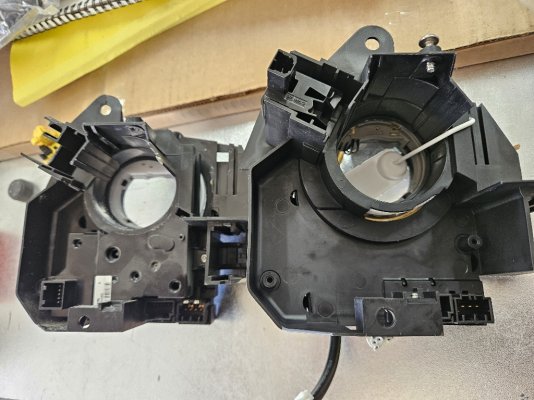
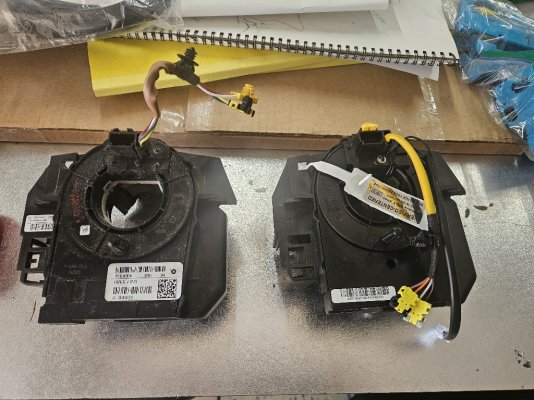
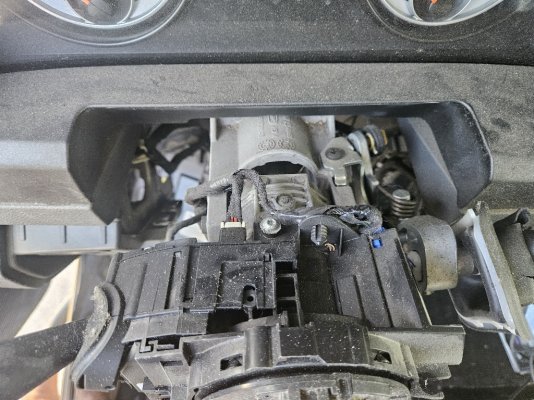
So i did the same thing the OP did and ended up taking the clockspring off again, battery off first to take the airbag out, jack the front up with wheels in the air to turn the steering to take the airbag. I got so good at this i can replace the clockspring if it was needed again in about 15-20 minutes hahaha.
then reconnect battery and now i have Jscan hooked up and ready to measure the SAS as needed.

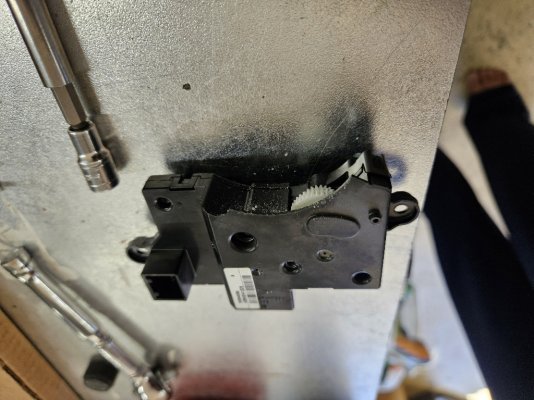
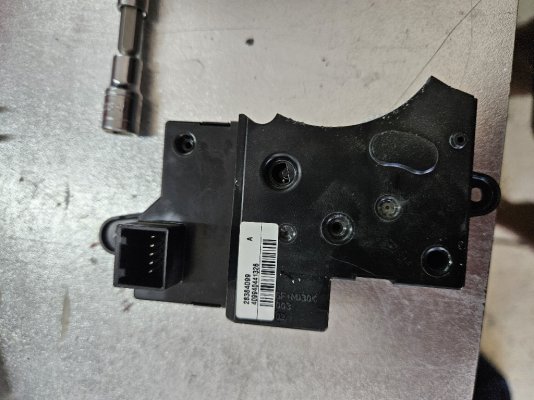
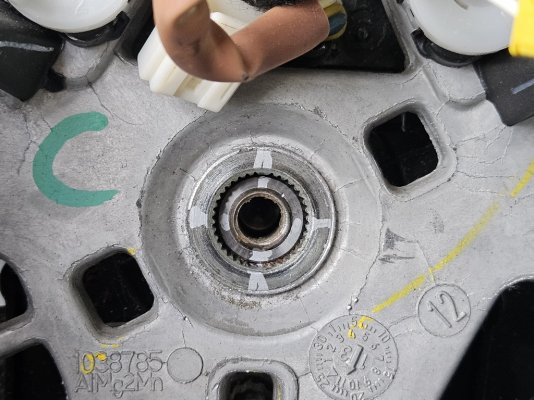
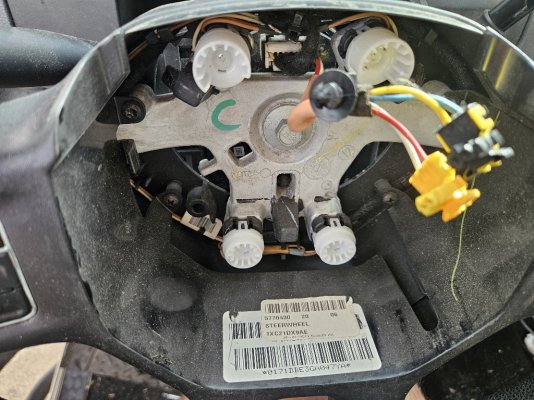
So going at it one more time, disconnect all the harnesses from the clock spring, Take clockpring out, now detached SAS, move the cog wheel on the SAS by hand with the thought that doing so will actually change the SAS angle, re-attach SAS, making sure the arrows in the clock spring are still aligned, See highlighed below,(Important: both arrows in the clockspring are aligned (make sure to keep them there), cause that black pin goes in a spot on the steering wheel in such a way that when your turn the steering wheel the clockspring moves with it, and thus the angle sensor can measure the steering angle...)

54090910704_844a2ccc09_o.png

Plugged the wipers harness into the clockspring (if you don't then when you turn on the ignition the wipers will be on) and the gray harness into the SAS affixed to the clockspring so i can check SAS readings with jscan, now the SAS angle is showing changed with me moving the SAS cog wheels, still not zero but now i know i need to move that cog wheel a tad more.

I repeated the procedure a 2nd time and bingo the angle sensor is now showing in the zero position.

This i'd guess should not be an issue when you buy a new clockspring with the angle sensor already installed, and you have the tab that locks the clockspring in the zero position. But again this is only the 2nd time i've messed up with a clockspring ever in my life so i only have my observations and taking notes on them so i'm learning as i go.

You will need something like JSCan to show you the steering angle, i tried alphaobd but i don't think Alphabod gave me the reading, angle* didn't show any movement at all when i was moving the steering wheel with Alphapbd, maybe i picked the wrong pid so I'll confirm today if Alphaobd can do it. But JScan can do it for sure.

One more time Make sure those arrows in the clockspring are in the same spot when you check the angle sensor with jscan, this is more important now because if you don't have the yellow locking tab that prevents the clockspring for moving when the unit is new, the clockspring will move even when you pass the wiring harness through the steering wheel and bolt it to the steeting shaft., so before you put the steering bolt back and torque it to specs, you want to make sure your clockspring is still aligned to those arrows you see above. I marked the clockspring above so i could look at those marks from above as you'll see when you put the steering wheel in the shaft it would be difficult to watch the arrows.

Obviously your steering wheel have to be straight when you do the SAS zero out and your alignment has to be straigh as well. Don't do if the truck is pulling to one side or your wheels are not straight. Obviously there is some error built in the PCM and that SAS angle but you want the basics to be as straight as you can because your telling your SAS what zero is in this instance.


This is how things look like when functioning

54089539817_b8cb525d09_o.jpgScreenshot_20241023_173921_OBD JScan by RAM RSM, on Flickr


Good luck.
 
Last edited:

Ken226

Senior Member
Joined
Mar 12, 2017
Posts
2,293
Reaction score
5,934
Location
Washington State
Ram Year
2013
Engine
Hemi
It kinda of sounds like something may be slipping in the steering angle sensor.

Like, you reset it with a scan tool and all is well, until you make a turn and something slips inside.

Did you inspect everything, like that plastic gear and whatever it engages?

Zoomed in on your pic it's hard to tell, but is that a white plastic gear in the clock spring that mates with the gear in the angle sensor?

If so, did you check the teeth on this gear, all the way around?


Screenshot_20241024-120602.png
 
Last edited:

Ken226

Senior Member
Joined
Mar 12, 2017
Posts
2,293
Reaction score
5,934
Location
Washington State
Ram Year
2013
Engine
Hemi
Should have been the first thing I asked, so apologies, but did you use an OEM sensor?

These days with so much being made in China, aftermarket parts are bad right out of the box, as often as not. Maybe more often.
 
OP
OP
ram1500rsm

ram1500rsm

Senior Member
Joined
Jul 24, 2018
Posts
4,891
Reaction score
5,413
Location
Trabuco Canyon, CA
Ram Year
2014
Engine
Hemi 5.7
It kinda of sounds like something may be slipping in the steering angle sensor.

Like, you reset it with a scan tool and all is well, until you make a turn and something slips inside.

Did you inspect everything, like that plastic gear and whatever it engages?

Zoomed in on your pic it's hard to tell, but is that a white plastic gear in the clock spring that mates with the gear in the angle sensor?

If so, did you check the teeth on this gear, all the way around?


View attachment 553653

Yep. the angle sensor cog wheels will mesh with another plastic cog thing on the clockspring itself. then as you move the steering wheel, the clock sensor will rotate and the angle sensor will measure the angle.
The problem was the sensor was offset in relation to the centering of the clock spring center i supposed, so while the steering was centered and the clockspring centered, the sensor was saying the steering wheel was rotated 25* to the passenger side.
 
OP
OP
ram1500rsm

ram1500rsm

Senior Member
Joined
Jul 24, 2018
Posts
4,891
Reaction score
5,413
Location
Trabuco Canyon, CA
Ram Year
2014
Engine
Hemi 5.7
Should have been the first thing I asked, so apologies, but did you use an OEM sensor?

These days with so much being made in China, aftermarket parts are bad right out of the box, as often as not. Maybe more often.
Yep i used the OE SAS that i took off from the old clockspring and placed in the new one.
 

Ken226

Senior Member
Joined
Mar 12, 2017
Posts
2,293
Reaction score
5,934
Location
Washington State
Ram Year
2013
Engine
Hemi
Yep. the angle sensor cog wheels will mesh with another plastic cog thing on the clockspring itself. then as you move the steering wheel, the clock sensor will rotate and the angle sensor will measure the angle.
The problem was the sensor was offset in relation to the centering of the clock spring center i supposed, so while the steering was centered and the clockspring centered, the sensor was saying the steering wheel was rotated 25* to the passenger side.

Yea, that's why I suspected a gear could be missing a few teeth, or otherwise slipping.

You said you recalibrated the sensor with a scan tool. That is supposed to negate the need to manually turn the cog to zero, then assemble.

You calibrated it, then it became un-calibrated while you were driving. That sounds like something slipped or stripped.

Or, that's what I understood from your post anyway.
 

Ken226

Senior Member
Joined
Mar 12, 2017
Posts
2,293
Reaction score
5,934
Location
Washington State
Ram Year
2013
Engine
Hemi
OP
OP
ram1500rsm

ram1500rsm

Senior Member
Joined
Jul 24, 2018
Posts
4,891
Reaction score
5,413
Location
Trabuco Canyon, CA
Ram Year
2014
Engine
Hemi 5.7
Yea, that's why I suspected a gear could be missing a few teeth, or otherwise slipping.

You said you recalibrated the sensor with a scan tool. That is supposed to negate the need to manually turn the cog to zero, then assemble.

You calibrated it, then it became un-calibrated while you were driving. That sounds like something slipped or stripped.

Or, that's what I understood from your post anyway.
No the scan tool didn't appear to have recalibrated the SAS at all. the angle sensor was showing 24* before the scan tool reset, and 24* after the scan tool reset. I was really expecting to see the angle sensor at zero after that. It displayed something about abs initialization, then doing someting with a G-sensor something init, and something about clearing rolls while it was running the reset routines.

After i did the physical reset of the sensor myself, moving the angle sensor cogs by hand then checking the angle readings against the centering of the clockspring itself, the angle went to zero, in fact i got to see it twice because as i moved the cog the first time, i saw the SAS angle changing with jscan so i knew right away i was in theory towards the right track. Then i moved the cog a bit more onthe 2nd attempt, checked the angle and lucky enough it was zero.
 

Latest posts

Forum statistics

Threads
211,002
Posts
3,060,889
Members
171,048
Latest member
sigsauerP938
Back
Top