

Kevinx8410
Junior Member
Posting as a general FYI and hopefully this helps others. This is specific to the 360 surround digital cameras (LVDS) they use the coax / FAKRA style connectors. All of the cameras (backup, front, cargo, side mirrors) use the same part number - 68417514AA. Part number 68144068AD (along with the same part number ended in AB or AC) are also compatible and listed as alternates.
On my 2021 / 2500 6.7l I encountered multiple camera issues - in my case the backup, cargo, and front cameras. Symptom was intermittent black screen. When tapping on the camera from the outside I would see it cut in and out. Most common fix here has been well documented - loose connections or crimped coax near the tailgate for the backup camera. I reseated / cleaned the cables and even replaced the tailgate jumper. No joy. Clearly issue was with the camera especially since tapping it would break or restore the display (temporarily). I replaced one of them and it worked perfectly.
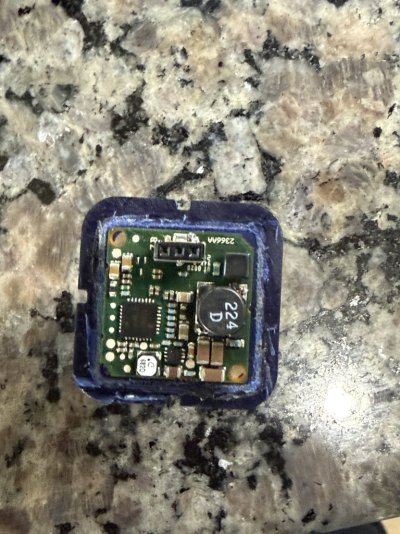
That being said I decided to crack one open and look “under the hood” so to speak. They actually come apart quite easy - even though there are no screws and they are sealed shut. I simply used a razor / utility knife and cut along the seal where the two halves join. Seal was pretty weak considering it’s supposed to keep moisture out. Came apart in less than a minute without damaging the housing. The male FAKRA connection point on the camera connects internally via a simple 3 pin connector - when you separate the halves this just pulls apart. One half is all of the electronics and lens while the other half is simply the external facing FAKRA connection point.
A quick glance and the issue was obvious - the 3 pin PCB soldered connector where the external FAKRA connector connects was poorly soldered - you could jiggle it and see the surface soldered tab move. In my case it was the one representing the center pin (which also represents the coax / LVDS center pin. I fired up my soldering iron - set temp to 680F and used a very fine tip meant for soldering PCB components. I put some flux on the loose tab / connection point and quickly heated / applied a tiny bit of solder. Easy fix. Just be careful not to bridge the solder for the center pin tab to the actual metal housing of the connector assembly - this will short the center pin! The other two pins represent the outer shield / braid so no worries if the solder bridges there. Keep the process quick and don’t let the soldering iron inadvertently touch anything else - easy to damage the circuit board. I only soldered the center pin tab - the others seemed fine so left them alone and wanted to minimize heating. You will see the design and how the connector attaches to the PCB - quite obvious why the center pin tab is the weak point and why it breaks. Bad design as the connector block isn’t well supported on that side and easily stressed by constant heating and vibration.
I put the two halves back together and used JB weld clear 5 minute epoxy to reassemble (more then strong enough). The seal created with the epoxy was superior to the original seal! You could add other sealants to the joint if you like but definitely need a glue as well to ensure the halves won’t split apart. I’m certain there are better options than my clear epoxy but this seemed sufficient.
This was the issue with all three of my cameras. And the solder fix resolved them all without issue. These cameras are ridiculously expensive. The one I replaced (before realizing this was the issue) was with an aftermarket camera on Amazon for under $100 - it works fine (reference the part numbers above for applicable replacements). The other two I reinstalled after repairing and kept the third I repaired as a spare. I suspect this issue isn’t unique to my cameras - clearly a poor design / defect. The AZ heat probably doesn’t help!
Another note - the FAKRA connectors are fragile (from heat) and easy to break when disconnecting from the camera (also orientation makes the release tab hard to reach and access). If you disconnect and break the outer plastic housing / tab you don’t need to crimp on a new connector or replace the harness / jumper. The outer plastic housing alone can be replaced without impacting the actual female connector pin / assembly. You can buy these at digikey - part number 115-3FA1-NASJ-C01E0-ND. You can probably source them elsewhere as well - they are anphenol brand. They come with the plastic housing and the actual connectors - you only need the housing. The FAKRA assemblies on Amazon or eBay won’t fit. You can of course replace the entire harness or crimp a new connector (not that easy) with the Amazon FAKRA Z connectors / jumpers - but no need if the only issue is a cracked / broken plastic housing. Takes time to order and receive these - you can keep existing broken connectors in place temporarily with a little hot glue or heat shrink tubing (aggressive glue will make them hard to remove later). But it won’t hold long term and will vibrate loose eventually!
One last note - if replacing the jumpers (to camera - female - to upstream connection point - male) use RG174 (or RG316) 50 ohm coax. For longer runs use RG58 or you can source the stock coax used for these connections. The stock coax is Dacar 462 - same general dimensions as RG174 but a bit more durable (automative specialty). Also quite expensive and hard to source. For short jumpers probably overkill - but make sure you use outdoor water proof connectors for any external / exterior connections! The stock connectors aren’t that great at the camera connection points but they seem to be adequate. The upstream connections from the cameras use a better and more water tight connection.
Hope this helps someone else! See attached pictures as well.
On my 2021 / 2500 6.7l I encountered multiple camera issues - in my case the backup, cargo, and front cameras. Symptom was intermittent black screen. When tapping on the camera from the outside I would see it cut in and out. Most common fix here has been well documented - loose connections or crimped coax near the tailgate for the backup camera. I reseated / cleaned the cables and even replaced the tailgate jumper. No joy. Clearly issue was with the camera especially since tapping it would break or restore the display (temporarily). I replaced one of them and it worked perfectly.
That being said I decided to crack one open and look “under the hood” so to speak. They actually come apart quite easy - even though there are no screws and they are sealed shut. I simply used a razor / utility knife and cut along the seal where the two halves join. Seal was pretty weak considering it’s supposed to keep moisture out. Came apart in less than a minute without damaging the housing. The male FAKRA connection point on the camera connects internally via a simple 3 pin connector - when you separate the halves this just pulls apart. One half is all of the electronics and lens while the other half is simply the external facing FAKRA connection point.
A quick glance and the issue was obvious - the 3 pin PCB soldered connector where the external FAKRA connector connects was poorly soldered - you could jiggle it and see the surface soldered tab move. In my case it was the one representing the center pin (which also represents the coax / LVDS center pin. I fired up my soldering iron - set temp to 680F and used a very fine tip meant for soldering PCB components. I put some flux on the loose tab / connection point and quickly heated / applied a tiny bit of solder. Easy fix. Just be careful not to bridge the solder for the center pin tab to the actual metal housing of the connector assembly - this will short the center pin! The other two pins represent the outer shield / braid so no worries if the solder bridges there. Keep the process quick and don’t let the soldering iron inadvertently touch anything else - easy to damage the circuit board. I only soldered the center pin tab - the others seemed fine so left them alone and wanted to minimize heating. You will see the design and how the connector attaches to the PCB - quite obvious why the center pin tab is the weak point and why it breaks. Bad design as the connector block isn’t well supported on that side and easily stressed by constant heating and vibration.
I put the two halves back together and used JB weld clear 5 minute epoxy to reassemble (more then strong enough). The seal created with the epoxy was superior to the original seal! You could add other sealants to the joint if you like but definitely need a glue as well to ensure the halves won’t split apart. I’m certain there are better options than my clear epoxy but this seemed sufficient.
This was the issue with all three of my cameras. And the solder fix resolved them all without issue. These cameras are ridiculously expensive. The one I replaced (before realizing this was the issue) was with an aftermarket camera on Amazon for under $100 - it works fine (reference the part numbers above for applicable replacements). The other two I reinstalled after repairing and kept the third I repaired as a spare. I suspect this issue isn’t unique to my cameras - clearly a poor design / defect. The AZ heat probably doesn’t help!
Another note - the FAKRA connectors are fragile (from heat) and easy to break when disconnecting from the camera (also orientation makes the release tab hard to reach and access). If you disconnect and break the outer plastic housing / tab you don’t need to crimp on a new connector or replace the harness / jumper. The outer plastic housing alone can be replaced without impacting the actual female connector pin / assembly. You can buy these at digikey - part number 115-3FA1-NASJ-C01E0-ND. You can probably source them elsewhere as well - they are anphenol brand. They come with the plastic housing and the actual connectors - you only need the housing. The FAKRA assemblies on Amazon or eBay won’t fit. You can of course replace the entire harness or crimp a new connector (not that easy) with the Amazon FAKRA Z connectors / jumpers - but no need if the only issue is a cracked / broken plastic housing. Takes time to order and receive these - you can keep existing broken connectors in place temporarily with a little hot glue or heat shrink tubing (aggressive glue will make them hard to remove later). But it won’t hold long term and will vibrate loose eventually!
One last note - if replacing the jumpers (to camera - female - to upstream connection point - male) use RG174 (or RG316) 50 ohm coax. For longer runs use RG58 or you can source the stock coax used for these connections. The stock coax is Dacar 462 - same general dimensions as RG174 but a bit more durable (automative specialty). Also quite expensive and hard to source. For short jumpers probably overkill - but make sure you use outdoor water proof connectors for any external / exterior connections! The stock connectors aren’t that great at the camera connection points but they seem to be adequate. The upstream connections from the cameras use a better and more water tight connection.
Hope this helps someone else! See attached pictures as well.
Attachments


Last edited: