

RonG
Junior Member
- Joined
- Apr 17, 2019
- Posts
- 17
- Reaction score
- 3
- Location
- Florida
- Ram Year
- 2005
- Engine
- Cummins 5.9 Diesel
For quite a long time, my 2005 Ram 3500 (Cummins diesel, rear wheel drive, SLT) had been very difficult to get out of Park. I studied "YouTube University", as well as some of the online Forums and decided to put in the "Detent repair kit" from TransGo to correct the issue. What should have been much less than , oh, two hours ended up over two weeks due to way too many irons in the fire and snafoos; but finally got everything back together and fluid added as of yesterday. The TransGo kit did exactly what it claimed to and I can't believe how easily my truck shifts out of park now.
Here are a few things I learned along the process way:
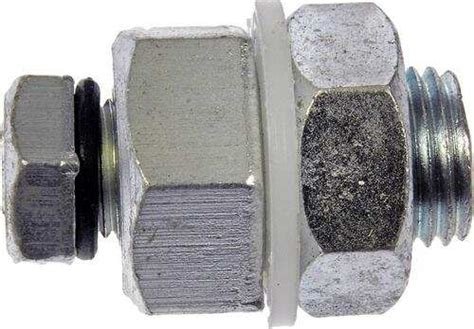
1. Adding a drain plug to your transmission pan is a blessing if you go into your tranny more than once in your lifetime. Just saying. I use Dorman #65128 (pic #1), and I got mine for under $7 from NAPA Auto Parts. Actually, I learned this little tidbit decades ago. When you install the drain plug kit, a simple whack or two with a hammer and center punch to the bolt threads will ensure that the interior nut will never loosen and fall off in the pan. Also, use a wrench to hold the outer bolt tight when removing the plug. I always put the drain on the rear side of the pan so as to be less susceptible to being hit or damaged. I have seen folks use a self-tapping "roofing" type screw/bolt with a rubber washer to add a makeshift drain plug to a transmission pan. Even though some swear they have no leaks from this DIY fix, I don't consider it the best option available.
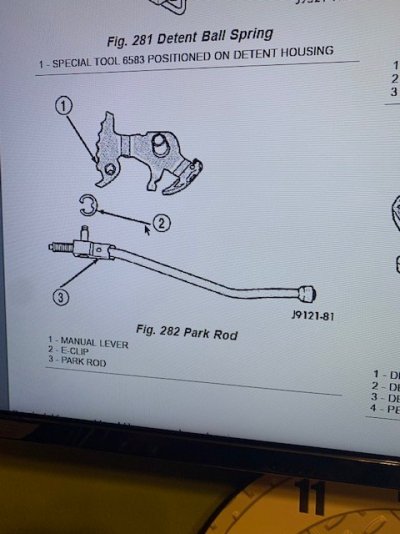
2. Doing valve body work with the transmission still in the vehicle is not "so bad" ... until you go back up with it! Getting the Intermediate Accumulator piston and spring to stay in place while simultaneously lining up the park rod (pic #2), shift/rooster linkage and TCC connector through the case, takes more talent than I figured on. Of course, if your Accumulator piston falls easily from its bore, you probably at the least need new o-ring seals. I went ahead and purchased a new billet piston with double o-rings for good measure.
3. Speaking of the Park Rod... Do yourself a couple of favors: remove the clip that retains the park rod and use the rod by itself to check for proper position/insertion in the transmission BEFORE mounting the valve body onto the transmission. To do this, jack up (and safely support) at least one of your rear wheels so that you can turn the transmission to reposition the placement for the park rod/plunger. Assure that the rod completely/correctly realigns and positions in the transmission housing. This is a little easier if you have a helper to turn the wheel (or drive shaft), but not essential. As you turn the transmission shaft -- very small increments -- you will notice that there is a slight "catch" or lip that will allow the park rod to "click" further into the housing. That's when you know you have it all the way in. THEN re-attach the park rod back on the body and, FINALLY, install the valve body more easily. I know this because ...
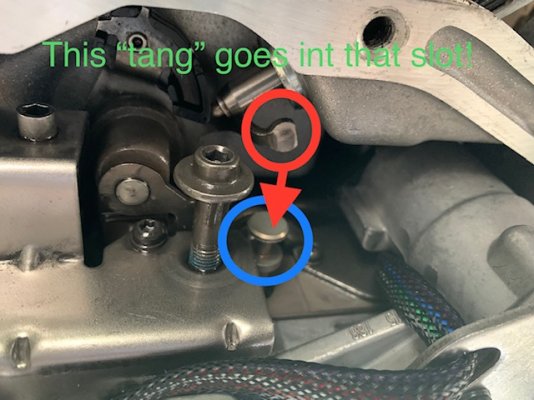
4. After you break the plastic housing for the TCC connector (pic #3) -- a few times @ around $70 a pop -- you will want to truly align the transmission for the park rod/plunger to position so very easily.
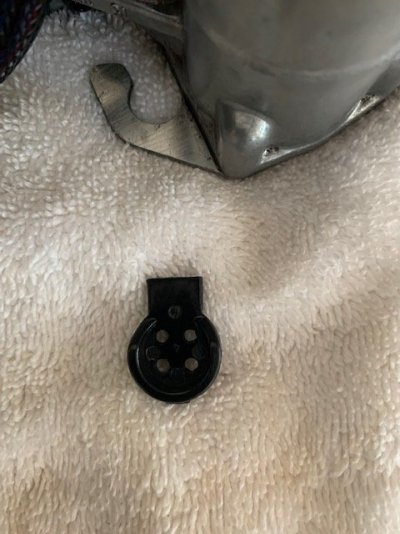
5. All instructions and videos will tell you that when you take the rooster comb loose and install the detent "fix"/bullet, to always make sure that the tangs on the rooster comb rod are in the proper placement with the valve and bolt on the valve body. If you are not familiar with this process, there are lots of YouTube videos and other useful instructions all over the Internet explaining it. The point is, that after all my "careful" notation of this, I somehow managed to completely install the valve body with the tang outside of the valve slot! (pic #4) This makes shifting a NO GO. I absolutely do not recommend what I did to remedy this situation; but because I had already been without my truck for way too long, I decided to NOT take the valve body back off, remove the C-clip and reset the positioning. Instead, I kind-of, sort-of bent the tang lever around and moved the valve into proper placement. Squeezing the tang lever back up into the slot it belongs seemed to do the trick. All this can place too much stress on the retaining clip, tang lever, and the valve itself. Huge fingers crossed here that it doesn't slip out somewhere down the road! Take the time to unbolt the valve body, do it right, and sleep better. While I'm admitting to taking "DIY" to extreme levels, I also decided to glue the last TCC connector base back together rather than spring for a third purchase. I would NOT ever do either of these "home remedies" on anyone else's vehicle and only did it on mine this time due to many overwhelming circumstances.
While I was replacing the part that I broke, I went ahead and ordered a kit that contained OVERDRIVE / TCC (LOCKUP) SOLENOIDS WITH THE MAIN INTERNAL WIRING HARNESS. EXTERNAL 8-PIN ROUND PLUG (*Actual part I broke!), AND 4-PIN RECTANGULAR CONNECTOR ATTACHED.
GOVERNOR PRESSURE TRANSDUCER ( WITH 4-PIN RECTANGULAR CONNECTOR)
BORG-WARNER UPDATED DESIGN GOVERNOR PRESSURE SOLENOID
This updated a few items that had 299k miles on them, provided a much better than OEM Governor Pressure Solenoid, and were cheaper as a kit. *Got them from: TransmissionPartsDistributors.com. Good pricing and service, but not necessarily the fastest at getting parts shipped out. Still, I rank them 9 out of 10.
Due to time constraints, other pressing obligations, and financial concerns, I opted to go with no more than the foregoing repairs. At very close to 300,000 miles, I know it is time to rebuild or replace the transmission and torque converter. I did not go into a full valve body rebuild at this time because, I have no desire to "blow out" what remains of the bands, clutches, seals, etc. in the transmission before I can have the time and financial resources to "do it all right". I have no doubts that many others out there understand that it is not my wish to do no more; it's simply the practical thing for me at this time.
NOW, MY QUESTIONS:
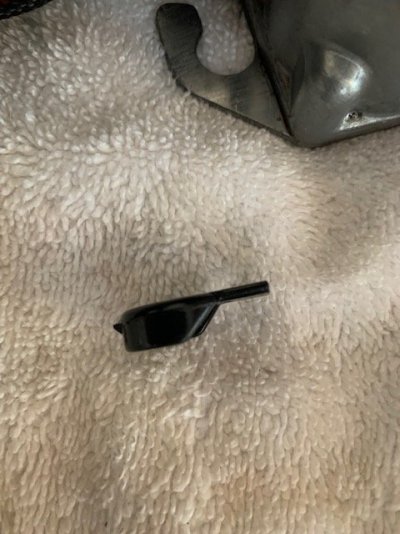
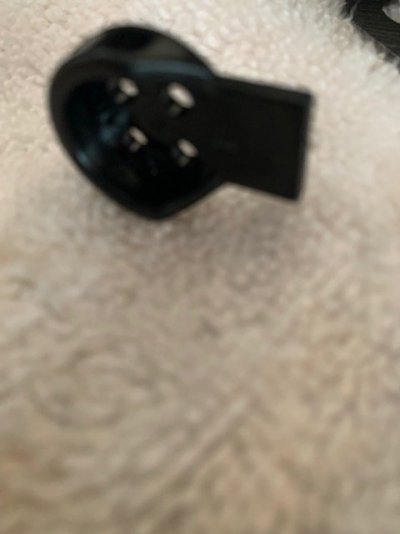
A. When I first attempted to put the valve body back in the transmission, and broke the TCC base, I found a small plastic piece lying on the ground beside me as I brought the valve body down. I have yet to figure out where this piece came from, let alone what the heck it does! Pictures 5, & 6 show it. it can also be seen in picture 3. Does anyone have any idea what this is and where it belongs?
B. I have added 8 quarts of fluid back to the transmission. When I let the truck sit for a few hours, the fluid level is way above the safe mark. When I crank the engine and shift through the gears, allowing several seconds/minutes to flow in each gear and neutral, the fluid doesn't even show up "solid" on the stick at all. Once the engine is off again, the fluid level is just above the (low end) safe mark. What's going on? NOTE: I do not have an oversize pan. The fluid was dripping for many days since the pan was first taken off, but don't think that much fluid kept draining. I don't understand the widely fluctuating levels.
C. When I start the truck, as long as I have my foot on the brake pedal the shift indicator "box" light stays solid in any gear selection. When I release the brake pedal the gear indicator box/light blinks in Reverse (only). I have noticed that I sometimes have to place the shift lever into Park position pretty hard, or a couple of times, for the Park indicator light to come on. And, once in a while, if I change the selection quickly (?), ALL selection positions will blink simultaneously. Again, what is happening? I have readjusted the shift selector cable and TCBI lock indicator a few times, but still get the same results.
I am thinking that someone, somewhere has probably had (at least one of) the same issues. My hope is that the fix is really simple. Thank you in advance for any help and information. Also, a great big THANK YOU to everyone who contributes to the Forum. Your time, knowledge, thoughtfulness and kindness do not go unnoticed or unappreciated. You're all heroes to the others out here who are in need of help, and you are a pleasure for those who simply enjoy any information about their vehicles.
:


Here are a few things I learned along the process way:
1. Adding a drain plug to your transmission pan is a blessing if you go into your tranny more than once in your lifetime. Just saying. I use Dorman #65128 (pic #1), and I got mine for under $7 from NAPA Auto Parts. Actually, I learned this little tidbit decades ago. When you install the drain plug kit, a simple whack or two with a hammer and center punch to the bolt threads will ensure that the interior nut will never loosen and fall off in the pan. Also, use a wrench to hold the outer bolt tight when removing the plug. I always put the drain on the rear side of the pan so as to be less susceptible to being hit or damaged. I have seen folks use a self-tapping "roofing" type screw/bolt with a rubber washer to add a makeshift drain plug to a transmission pan. Even though some swear they have no leaks from this DIY fix, I don't consider it the best option available.
2. Doing valve body work with the transmission still in the vehicle is not "so bad" ... until you go back up with it! Getting the Intermediate Accumulator piston and spring to stay in place while simultaneously lining up the park rod (pic #2), shift/rooster linkage and TCC connector through the case, takes more talent than I figured on. Of course, if your Accumulator piston falls easily from its bore, you probably at the least need new o-ring seals. I went ahead and purchased a new billet piston with double o-rings for good measure.
3. Speaking of the Park Rod... Do yourself a couple of favors: remove the clip that retains the park rod and use the rod by itself to check for proper position/insertion in the transmission BEFORE mounting the valve body onto the transmission. To do this, jack up (and safely support) at least one of your rear wheels so that you can turn the transmission to reposition the placement for the park rod/plunger. Assure that the rod completely/correctly realigns and positions in the transmission housing. This is a little easier if you have a helper to turn the wheel (or drive shaft), but not essential. As you turn the transmission shaft -- very small increments -- you will notice that there is a slight "catch" or lip that will allow the park rod to "click" further into the housing. That's when you know you have it all the way in. THEN re-attach the park rod back on the body and, FINALLY, install the valve body more easily. I know this because ...
4. After you break the plastic housing for the TCC connector (pic #3) -- a few times @ around $70 a pop -- you will want to truly align the transmission for the park rod/plunger to position so very easily.
5. All instructions and videos will tell you that when you take the rooster comb loose and install the detent "fix"/bullet, to always make sure that the tangs on the rooster comb rod are in the proper placement with the valve and bolt on the valve body. If you are not familiar with this process, there are lots of YouTube videos and other useful instructions all over the Internet explaining it. The point is, that after all my "careful" notation of this, I somehow managed to completely install the valve body with the tang outside of the valve slot! (pic #4) This makes shifting a NO GO. I absolutely do not recommend what I did to remedy this situation; but because I had already been without my truck for way too long, I decided to NOT take the valve body back off, remove the C-clip and reset the positioning. Instead, I kind-of, sort-of bent the tang lever around and moved the valve into proper placement. Squeezing the tang lever back up into the slot it belongs seemed to do the trick. All this can place too much stress on the retaining clip, tang lever, and the valve itself. Huge fingers crossed here that it doesn't slip out somewhere down the road! Take the time to unbolt the valve body, do it right, and sleep better. While I'm admitting to taking "DIY" to extreme levels, I also decided to glue the last TCC connector base back together rather than spring for a third purchase. I would NOT ever do either of these "home remedies" on anyone else's vehicle and only did it on mine this time due to many overwhelming circumstances.
While I was replacing the part that I broke, I went ahead and ordered a kit that contained OVERDRIVE / TCC (LOCKUP) SOLENOIDS WITH THE MAIN INTERNAL WIRING HARNESS. EXTERNAL 8-PIN ROUND PLUG (*Actual part I broke!), AND 4-PIN RECTANGULAR CONNECTOR ATTACHED.
GOVERNOR PRESSURE TRANSDUCER ( WITH 4-PIN RECTANGULAR CONNECTOR)
BORG-WARNER UPDATED DESIGN GOVERNOR PRESSURE SOLENOID
This updated a few items that had 299k miles on them, provided a much better than OEM Governor Pressure Solenoid, and were cheaper as a kit. *Got them from: TransmissionPartsDistributors.com. Good pricing and service, but not necessarily the fastest at getting parts shipped out. Still, I rank them 9 out of 10.
Due to time constraints, other pressing obligations, and financial concerns, I opted to go with no more than the foregoing repairs. At very close to 300,000 miles, I know it is time to rebuild or replace the transmission and torque converter. I did not go into a full valve body rebuild at this time because, I have no desire to "blow out" what remains of the bands, clutches, seals, etc. in the transmission before I can have the time and financial resources to "do it all right". I have no doubts that many others out there understand that it is not my wish to do no more; it's simply the practical thing for me at this time.
NOW, MY QUESTIONS:
A. When I first attempted to put the valve body back in the transmission, and broke the TCC base, I found a small plastic piece lying on the ground beside me as I brought the valve body down. I have yet to figure out where this piece came from, let alone what the heck it does! Pictures 5, & 6 show it. it can also be seen in picture 3. Does anyone have any idea what this is and where it belongs?
B. I have added 8 quarts of fluid back to the transmission. When I let the truck sit for a few hours, the fluid level is way above the safe mark. When I crank the engine and shift through the gears, allowing several seconds/minutes to flow in each gear and neutral, the fluid doesn't even show up "solid" on the stick at all. Once the engine is off again, the fluid level is just above the (low end) safe mark. What's going on? NOTE: I do not have an oversize pan. The fluid was dripping for many days since the pan was first taken off, but don't think that much fluid kept draining. I don't understand the widely fluctuating levels.
C. When I start the truck, as long as I have my foot on the brake pedal the shift indicator "box" light stays solid in any gear selection. When I release the brake pedal the gear indicator box/light blinks in Reverse (only). I have noticed that I sometimes have to place the shift lever into Park position pretty hard, or a couple of times, for the Park indicator light to come on. And, once in a while, if I change the selection quickly (?), ALL selection positions will blink simultaneously. Again, what is happening? I have readjusted the shift selector cable and TCBI lock indicator a few times, but still get the same results.
I am thinking that someone, somewhere has probably had (at least one of) the same issues. My hope is that the fix is really simple. Thank you in advance for any help and information. Also, a great big THANK YOU to everyone who contributes to the Forum. Your time, knowledge, thoughtfulness and kindness do not go unnoticed or unappreciated. You're all heroes to the others out here who are in need of help, and you are a pleasure for those who simply enjoy any information about their vehicles.
:
Attachments
-
 Dorman HELP! Drain Plug Kit 65128.jpg33.9 KB · Views: 9
 -
 park rod 001.jpg57.1 KB · Views: 8
 -
 valve body broke connector.jpg66.4 KB · Views: 7
 -
 48re shift lever - valve position WRONG.jpg94.5 KB · Views: 5
 -
 found piece 01.jpg63.2 KB · Views: 2
 -
 found piece 02.jpg66.1 KB · Views: 3
 -
 found piece 03.jpg28.8 KB · Views: 2
 -
 found piece 03.jpg28.8 KB · Views: 3