Oil pan replacement.

Disclaimer: Links on this page pointing to Amazon, eBay and other sites may include affiliate code. If you click them and make a purchase, we may earn a small commission.

LoneWolf3574

Senior Member
Joined
Apr 23, 2018
Posts
400
Reaction score
174
Location
Arizona
Ram Year
2006
Engine
Hemi 5.7
I've started disassembly and thought that it would be okay to remove this cross member, it shifted about 1/8" and, of course, my mechanic sense went off telling me to stop until I found out more information. I know the 4x4 guys can drop their cross members, obviously I have a 4x2, so can we 4x2 folks do the same?

20200317_153222.jpg
 
Last edited:

10 Break

Senior Member
Joined
Jul 20, 2018
Posts
137
Reaction score
71
Location
Dayton, OH
Ram Year
2007
Engine
4.7
I've started disassembly and thought that it would be okay to remove this cross member, it shifted about 1/8" and, of course, my mechanic sense went off telling me to stop until I found out more information. I know the 4x4 guys can drop their cross members, obviously I have a 4x2, so can we 4x2 folks do the same?

Yes, you can remove the crossmember. Don't lay directly under them though...it was like I was being seasoned with rust dust.

I just finished replacing the pan on my 4 x 2 2007 4.7 Separating the old pan from the gasket was a bear...took me 7 hours of playing with different angles and tools to get it all the way around. Everything else was a breeze.

Old.jpg

New.jpg
 

joepenguin

Junior Member
Joined
Jan 21, 2015
Posts
7
Reaction score
0
Ram Year
2003
Engine
Hemi 5.7
Do these instructions also apply for a 2500 4x4 with the 5.7 ? My 2003 is getting pretty bad and I've been dreading the job.
 

10 Break

Senior Member
Joined
Jul 20, 2018
Posts
137
Reaction score
71
Location
Dayton, OH
Ram Year
2007
Engine
4.7
Do these instructions also apply for a 2500 4x4 with the 5.7 ? My 2003 is getting pretty bad and I've been dreading the job.

From all my research leading up to this job, the 4x4 folks also have to unbolt the front differential to access the front oil pan bolts.
 
Joined
Sep 10, 2020
Posts
34
Reaction score
10
Location
London, Ontario
Ram Year
2008
Engine
Hemi 5.7
From all my research leading up to this job, the 4x4 folks also have to unbolt the front differential to access the front oil pan bolts.
I am doing this job on my 2005 SLT 4x4 right now. I live where they put salt on the roads, so rust is a major issue. I have gotten the cross member off. I was going to drop the differential, and when I took most of the day getting the three bolt on the one bracket out, I decided that I might try the instructions earlier in this thread. All the bolts are accessible on a 4x4 with U-joint for two of the ones near the front of the pan without dropping the diff. I got stuck with getting the pan and gasket separated. I tried giving it a bonk with a rubber mallet, and all that achieved was putting a hold in my rusty oil pan, so now I have to replace it. Tomorrow I will see if I can get it separated, and get it out without either dropping the diff or jacking up the engine.
 

kevkev

Senior Member
Joined
Jan 4, 2020
Posts
254
Reaction score
64
Location
SRST,FL
Ram Year
2004
Engine
5.7
Spend 6-8 dollars on a magnetic drain plug. Great for pulling rubbish out and lets you know real quick during an oil change if something is going on.
 
Joined
Sep 10, 2020
Posts
34
Reaction score
10
Location
London, Ontario
Ram Year
2008
Engine
Hemi 5.7
I have been struggling with getting this done over the weekend. I debated whether to raise the engine or drop the differential. It seemed easier to me to raise the engine. The cross member came out easily enough. The transmission mount nuts came out easily also. The motor mounts went easily enough. The biggest issue was the 3 differential bolts. Those took far more time than I ever expected, and when I got them out, it was getting dark so I decided to work on it the next day when I got home.
I jacked up the engine using a piece of wood on my floor jack, and jacking it up from the bell housing. The next struggle was figuring out how to support the engine since the TRQ video I was using for directions didn't show where they put blocks to wood to do so. I eventually figured it out.
That pan didn't want to come loose from the pan. A couple of bonks with a rubber mallet only showed how bad the pan had rusted as it put a hole in it. I eventually worked at it with a putty knife between the gasket and the pan. It took a while, but the gasket came free.
The rest of it went well until I was putting the new pan on. Every bolt would hand thread in except for one. No matter how many times I tried that bolt would not thread properly. I am not sure if the threads have an issue or if the pan is somehow keeping it from going in straight. It was getting dark again, so I stopped for the night. Today we had worship with our church and then family over for Canadian Thanksgiving so I will return to working on this tomorrow.
My hope is after giving it some time and coming at it fresh I will be able to get it to thread. If not, since everything is just finger tightened, I will remove all the bolts, pull the pan out of the way, and see if I can get it to thread in then. If I can, I know it is just a matter of moving the pan around. I will hand thread that one near the beginning, and leave on more accessable for the end. If I can't get it to thread, I guess I will have to run a tap into it and see if I can clean up the thread.
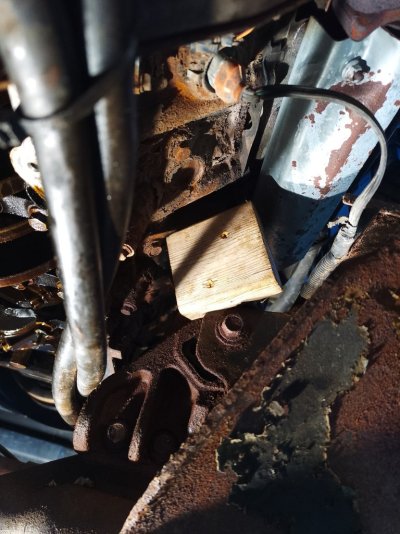
Below are images of how I supported the engine using blocks of wood at the motor mounts.
 

Attachments

  • IMG_20251011_153641.jpg
    IMG_20251011_153641.jpg
    79.3 KB · Views: 2
  • IMG_20251011_155753.jpg
    IMG_20251011_155753.jpg
    164.2 KB · Views: 2
Back
Top