2015 ram 1500 Lifter failure… dreaded

Disclaimer: Links on this page pointing to Amazon, eBay and other sites may include affiliate code. If you click them and make a purchase, we may earn a small commission.

OP
OP
Barr2255

Barr2255

Senior Member
Joined
Aug 27, 2024
Posts
178
Reaction score
264
Location
California
Ram Year
2015
Engine
Hemi 5.7
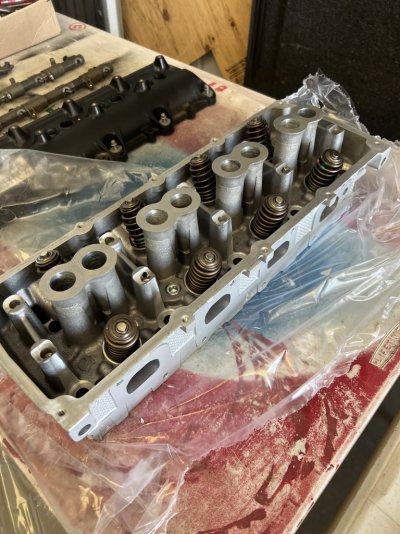
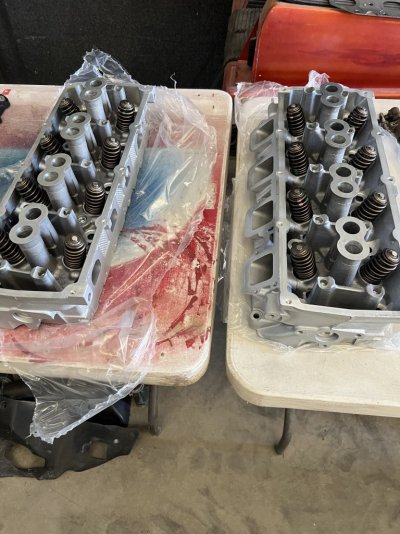
I got a call from the machine shop. I can pick up the heads tomorrow at 9am morning! I will be sure to post pictures of reassembly! I’m so excited to finally get my truck back together.

Something worth mentioning guys. With the world the way it is and the economy the way it is. It’s worth always asking a company that performs service for you, “is there a cash discount?”

I’ve had multiple places discount me when paying with cash the last couple years. These “smaller” locally owned shops get hit a 4.5% charge everytime a customer pays with a card. Moral of the story is the worst they can say is no, it’s worth asking.

With that said, the original guy I spoke with said it was going to be around $900 to cut valve seats and grind valves for both heads, that includes cleaning them up and surfacing as well as vaccum and pressure test…. Well he was wrong. Spoke to the owner he said whoever I spoke with was wrong and the actual price is $480, he dropped $40 off the price for cash pay. That’s only $60 more than what I was going to pay for basic service.

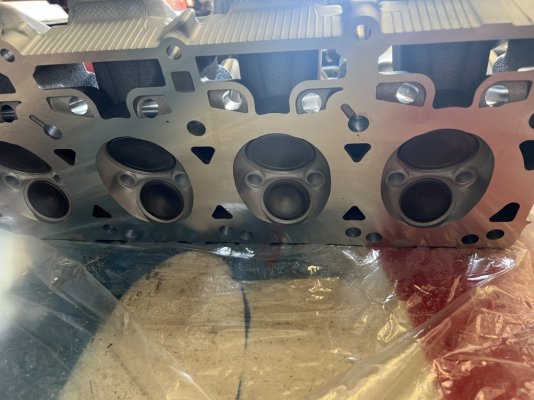
Anyways I digress, my biggest worry with putting everything back together is getting the timing correct. Must of watched every video on YouTube. Cylinder 1 and 6 at TDC camshaft at 12 o’clock. Put the new cam back at 12 o clock regardless of timing chain marks it should be “in time”… right?

I plan on turning the motor over by hand once the new cam is in. Cylinder 1 should be at TDC at 12 o clock and 6 o clock while turning right?
 
OP
OP
Barr2255

Barr2255

Senior Member
Joined
Aug 27, 2024
Posts
178
Reaction score
264
Location
California
Ram Year
2015
Engine
Hemi 5.7
Well I had enough time to get the new cam in, put a bit of Lucas assembly lube on it and install was easy using the cam phaser to push it the rest of the way home. Chain went on easy and all my paint marks lined up. Put the crank bolt on and wedged a breaker bar in place in order to get cam bolt torqued and not allow the cam phaser sprocket to spin. Felt pretty smart doing that

Put the timing cover back on with a bit of black RTV at the corners of the oil pan. The oil pan bolts were a PITA they ALL wanted to cross thread. I purposely left the water pump off for now so I have more room to put the heads on tomorrow. I went ahead and put the exhaust manifolds on the heads and put 1 spark plug in each cylinder to make it easier once the heads are on to put the last 8 plugs in. I left 1 out per cylinder because once the heads are on I’m going to turn the motor over by hand to insure all pushrods are seated and that my timing truly is good so as not to tulip a valve.

I blew out all the cylinder bolt holes with the air compressor and holy crap there was a lot more in there that my shop vac didn’t suck out. I sprayed some break cleaner in the holes after I was satisfied they were dry then blew em out one more time.

Pretty sure I’ll be able to button up the truck tomorrow I only had about 1.5 hours to work on it today but tomorrow is dedicated to first fire up!

I’ll post pics of how the cylinder heads came out after the machine shop.
 

Attachments

  • IMG_2697.jpeg
    IMG_2697.jpeg
    189.5 KB · Views: 15
  • IMG_2699.jpeg
    IMG_2699.jpeg
    187.1 KB · Views: 15
  • IMG_2698.jpeg
    IMG_2698.jpeg
    135.2 KB · Views: 15

Wild one

Senior Member
Joined
Jan 17, 2016
Posts
23,819
Reaction score
54,832
Ram Year
14 Sport
Engine
5.7
Well I had enough time to get the new cam in, put a bit of Lucas assembly lube on it and install was easy using the cam phaser to push it the rest of the way home. Chain went on easy and all my paint marks lined up. Put the crank bolt on and wedged a breaker bar in place in order to get cam bolt torqued and not allow the cam phaser sprocket to spin. Felt pretty smart doing that

Put the timing cover back on with a bit of black RTV at the corners of the oil pan. The oil pan bolts were a PITA they ALL wanted to cross thread. I purposely left the water pump off for now so I have more room to put the heads on tomorrow. I went ahead and put the exhaust manifolds on the heads and put 1 spark plug in each cylinder to make it easier once the heads are on to put the last 8 plugs in. I left 1 out per cylinder because once the heads are on I’m going to turn the motor over by hand to insure all pushrods are seated and that my timing truly is good so as not to tulip a valve.

I blew out all the cylinder bolt holes with the air compressor and holy crap there was a lot more in there that my shop vac didn’t suck out. I sprayed some break cleaner in the holes after I was satisfied they were dry then blew em out one more time.

Pretty sure I’ll be able to button up the truck tomorrow I only had about 1.5 hours to work on it today but tomorrow is dedicated to first fire up!

I’ll post pics of how the cylinder heads came out after the machine shop.
Use a straightened out coat hanger,or a piece of welding wire laid across the rocker stand offs to help hold the pushrods in place when you lay the rocker shafts back in place.I know you want it up and running again,but take your time,it's when guys get in a rush that they have issues.You're better off taking 2 days to put it back together,then having to spend the next several weeks trying to figure out why it doesn't run right.
 
OP
OP
Barr2255

Barr2255

Senior Member
Joined
Aug 27, 2024
Posts
178
Reaction score
264
Location
California
Ram Year
2015
Engine
Hemi 5.7
You sound like my father in law! LOL
I will absolutely take my time, it’s funny the little issues you run into upon reassembly like my oil pan bolts. That chewed up A LOT of time today and it’s something so simple. Its funny thinking okay, I know all the ends and outs on disassembly” but then on reassembly you start noticing things like the harmonic balancer once it’s seated the snout of the balancer is what actually seals against the front main seal not the crankshaft itself. Things like that really make me slow down and try an figure out why it’s designed the way it is purely out of curiosity.

I just turn on a playlist throw some electrolytes in my canteen and start jamming. Take frequent breaks to throw the ball for my border collie (she likes to steal tools off my table if I’m not acknowledging her 24-7) my son he’s two, he likes to hand me tools I drop under the truck which seems to happen way to often. Lol

Point is dually noted, I’ll take my time. Also I’ve used the welding wire trick and plan to use it this time as well. Thanks man!
 

Wild one

Senior Member
Joined
Jan 17, 2016
Posts
23,819
Reaction score
54,832
Ram Year
14 Sport
Engine
5.7
You sound like my father in law! LOL
I will absolutely take my time, it’s funny the little issues you run into upon reassembly like my oil pan bolts. That chewed up A LOT of time today and it’s something so simple. Its funny thinking okay, I know all the ends and outs on disassembly” but then on reassembly you start noticing things like the harmonic balancer once it’s seated the snout of the balancer is what actually seals against the front main seal not the crankshaft itself. Things like that really make me slow down and try an figure out why it’s designed the way it is purely out of curiosity.

I just turn on a playlist throw some electrolytes in my canteen and start jamming. Take frequent breaks to throw the ball for my border collie (she likes to steal tools off my table if I’m not acknowledging her 24-7) my son he’s two, he likes to hand me tools I drop under the truck which seems to happen way to often. Lol

Point is dually noted, I’ll take my time. Also I’ve used the welding wire trick and plan to use it this time as well. Thanks man!
It never hurts to smear some RTV inside the balancer snout,as they can leak oil right past the crankshaft
 

dchapma1957

Senior Member
Joined
Sep 16, 2024
Posts
166
Reaction score
286
Location
Lakeland Highlands, FL, USA
Ram Year
2011
Engine
Hemi 5.7
Well, think of the next guy that's in there wondering how the chain slipped ... ?

Use a straightened out coat hanger,or a piece of welding wire laid across the rocker stand offs to help hold the pushrods in place when you lay the rocker shafts back in place.I know you want it up and running again,but take your time,it's when guys get in a rush that they have issues.You're better off taking 2 days to put it back together,then having to spend the next several weeks trying to figure out why it doesn't run right.
Agree! I just went through this and I took my time, I had a small inspection mirror so I could double/triple check that the pushrods were in the cup of the rocker. Even after all of that I missed the right hole on #8 exhaust. It all went together and nothing seemed amis but I bent that pushrod and had to redo that rocker assembly.

Rotate the motor by hand several revolutions and visually look at each rocker. I thought I had, but I missed that one.

Also, if you have rags stuffed in the intake ports to protect from droping somting in there - don't forget to take them out before bolting on the intake! Ask me how I know.
 

Ken226

Senior Member
Joined
Mar 12, 2017
Posts
2,305
Reaction score
5,971
Location
Washington State
Ram Year
2013
Engine
Hemi
Since the dealer has it now for diagnosis and repair, any wild ass guesses as to what it turns out to be?

My WAG is that the dealer diagnoses the PCM as bad, replaces it, then the replacement dies too. They dig further and eventually decide that an aftermarket coil, or maybe a sensor, killed the original PCM, and the replacement too.

They then replace the offending coil/sensors, put in a new, the third, PCM and the truck goes another 100,000 miles.

I could easily be totally wrong though, since it IS a wild ass guess.
 
OP
OP
Barr2255

Barr2255

Senior Member
Joined
Aug 27, 2024
Posts
178
Reaction score
264
Location
California
Ram Year
2015
Engine
Hemi 5.7
Since the dealer has it now for diagnosis and repair, any wild ass guesses as to what it turns out to be?

My WAG is that the dealer diagnoses the PCM as bad, replaces it, then the replacement dies too. They dig further and eventually decide that an aftermarket coil, or maybe a sensor, killed the original PCM, and the replacement too.

They then replace the offending coil/sensors, put in a new, the third, PCM and the truck goes another 100,000 miles.

I could easily be totally wrong though, since it IS a wild ass guess.
My guess is a bad crank sensor or cam sensor. It sucks because most mechanics these days are just parts replacers not actually good at diagnosing.
 
OP
OP
Barr2255

Barr2255

Senior Member
Joined
Aug 27, 2024
Posts
178
Reaction score
264
Location
California
Ram Year
2015
Engine
Hemi 5.7
How did ya’ll torque your crank bolt to spec? Or did you just air gun it on and call it a day?

Cylinder heads are on,(ARP head bolts torqued to 100’ lbs is no joke)
water pump is on. Cylinder heads are buttoned up and I turned over the motor with the crank bolt no binding and all valve springs compressing evenly exhaust manifolds are hooked up to the cats.
 

Ken226

Senior Member
Joined
Mar 12, 2017
Posts
2,305
Reaction score
5,971
Location
Washington State
Ram Year
2013
Engine
Hemi
How did ya’ll torque your crank bolt to spec? Or did you just air gun it on and call it a day?

If there's an Oreilly's nearby:

Or, if you don't want to spend 50$ for a one time use tool:

Got a cargo strap laying around?


Or, if you don't mind a 50% probability of splitting a knuckle and getting a black eye:

image.jpg
 

Wild one

Senior Member
Joined
Jan 17, 2016
Posts
23,819
Reaction score
54,832
Ram Year
14 Sport
Engine
5.7
How did ya’ll torque your crank bolt to spec? Or did you just air gun it on and call it a day?

Cylinder heads are on,(ARP head bolts torqued to 100’ lbs is no joke)
water pump is on. Cylinder heads are buttoned up and I turned over the motor with the crank bolt no binding and all valve springs compressing evenly exhaust manifolds are hooked up to the cats.
One of these around the balancer.

 
OP
OP
Barr2255

Barr2255

Senior Member
Joined
Aug 27, 2024
Posts
178
Reaction score
264
Location
California
Ram Year
2015
Engine
Hemi 5.7
If there's an Oreilly's nearby:

Or, if you don't want to spend 50$ for a one time use tool:

Got a cargo strap laying around?


Or, if you don't mind a 50% probability of splitting a knuckle and getting a black eye:

View attachment 552302
That orange enamel is pretty sweet! I already have a a couple busted knuckles the casting on these cylinder heads is pretty sharp in places lol.

In all seriousness thanks for the advice. I’ll look at that O’Reilly thing not sure it would work on my balancer.

I had tried a a big filter remover with a rubber belt and plastic handle to remove the bolt originally, even with a cheater bar and a helping hand couldn't get off until I used the air gun. The one wild one posted looks nice though. Of course though when I clicked the link Amazon said it can’t be shipped to my current location, probably some California bull crap law.
 

Ken226

Senior Member
Joined
Mar 12, 2017
Posts
2,305
Reaction score
5,971
Location
Washington State
Ram Year
2013
Engine
Hemi
That orange enamel is pretty sweet! I already have a a couple busted knuckles the casting on these cylinder heads is pretty sharp in places lol.

In all seriousness thanks for the advice. I’ll look at that O’Reilly thing not sure it would work on my balancer.

I had tried a a big filter remover with a rubber belt and plastic handle to remove the bolt originally, even with a cheater bar and a helping hand couldn't get off until I used the air gun. The one wild one posted looks nice though. Of course though when I clicked the link Amazon said it can’t be shipped to my current location, probably some California bull crap law.

Got Amazon Prime?

it's made specifically for the Hemi. A little pricey, but you'll always have it.


Ken226

Senior Member
Joined
Mar 12, 2017
Posts
2,305
Reaction score
5,971
Location
Washington State
Ram Year
2013
Engine
Hemi
That orange enamel is pretty sweet! I already have a a couple busted knuckles the casting on these cylinder heads is pretty sharp in places lol.


I built this 383 stroker for my boat back in May of 2013.

It's still in the boat, still runs strong, and still running the same OEM Chevy roller lifters that already had 150,000 miles on them when the engine block came out of the IROC Z Camaro Donor car to be built, and installed in the 2000 Chaparral 200SSE.

IMG_20130522_170832_913_zps9024fcf5.jpg
 
OP
OP
Barr2255

Barr2255

Senior Member
Joined
Aug 27, 2024
Posts
178
Reaction score
264
Location
California
Ram Year
2015
Engine
Hemi 5.7
I built this 383 stroker for my boat back in May of 2013.

It's still in the boat, still runs strong, and still running the same OEM Chevy roller lifters that already had 150,000 miles on them when the engine block came out of the IROC Z Camaro Donor car to be built, and installed in the 2000 Chaparral 200SSE.

View attachment 552310
Ooooohh that’s sexy! The only thing that makes it look like a $2 H-o-o-k-e-r is that fram oil filter ;)
 

Yardbird

Senior Member
Joined
Aug 6, 2022
Posts
1,159
Reaction score
2,702
Location
Western NC
Ram Year
2018
Engine
3.6
Don't us an air wrench. I did once, and the bolt snapped off in the snout of the crank.

Try getting a hardened bolt out of a crank snout. It's no fun, but I finally did it.
 
OP
OP
Barr2255

Barr2255

Senior Member
Joined
Aug 27, 2024
Posts
178
Reaction score
264
Location
California
Ram Year
2015
Engine
Hemi 5.7
Don't us an air wrench. I did once, and the bolt snapped off in the snout of the crank.

Try getting a hardened bolt out of a crank snout. It's no fun, but I finally did it.
That was one uga dugga too many lol I put it on with my cordless impact gun waiting to torque it once I get the tool or weld something in the shop that will work.
Everything’s on except the intake manifold and cooling accessories, fan radiator ect

Yes that’s blood on the passenger head… don’t ask
 

Attachments

  • IMG_2707.jpeg
    IMG_2707.jpeg
    189.9 KB · Views: 15
Back
Top